ChevyParts
My Garage
My Account
Cart
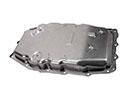
OEM 2000 Cadillac Seville Automatic Transmission Filter
AT Filter- Select Vehicle by Model
- Select Vehicle by VIN
Select Vehicle by Model
orMake
Model
Year
Select Vehicle by VIN
For the most accurate results, select vehicle by your VIN (Vehicle Identification Number).
1 Automatic Transmission Filter found


2000 Cadillac Seville Auto Transmission Filter Part Number: 24216035
Product Specifications- Other Name: Filter Kit, Automatic Transmission Fluid; Transmission Filter; Hydraulic Filter; Filter; Filter Kit, Transmission Oil Suction Tube
- Replaces: 8684953
- Item Weight: 1.30 Pounds
- Item Dimensions: 24.2 x 18.8 x 4.4 inches
- Condition: New
- Fitment Type: Direct Replacement
- SKU: 24216035
- Warranty: This genuine part is guaranteed by GM's factory warranty.
2000 Cadillac Seville Automatic Transmission Filter
With a comprehensive array of OEM 2000 Cadillac Seville Automatic Transmission Filter, from fuel pumps to door handles, our website is a one-stop-shop for your needs. All our genuine 2000 Cadillac Seville Automatic Transmission Filter are backed by the manufacturer's warranty and are offered at competitive prices in the market. Rest assured, you can shop with complete confidence.
2000 Cadillac Seville Automatic Transmission Filter Parts and Q&A
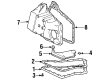
- Q: How to Service the HYDRA-MATIC 4T80-E Automatic Transmission Filter and Scavenging Screens on 2000 Cadillac Seville?A: Service professionals should inspect the filter located under the side cover due to its limited service need during transmission overhaul but should replace all scavenging screens beneath the bottom pan when performing transmission fluid changes. Start by hoisting the vehicle and position a drain container under the transmission bottom pan. Most of the transmission fluid stays in the side cover and Torque Converter when you disconnect the bottom pan of the transmission because the drain operation is not complete yet. Additional fluid drainage occurs after removing the side cover plug but this procedure happens only occasionally. Start by draining the pan fluid through bottom pan bolts then unfasten the Drain Plug found in the transmission case followed by the bottom pan and its pan bolts and seal. Remove both scavenger screens from the left and right side of the transmission while keeping in mind the bottom pan seal requires replacement since it cannot be used again. It is essential to check the lip seals on transmission case scavenger screens for damages and examine transmission case and bottom pan sealing surfaces for any permanent marks while inspecting bolts for thread defects that require part replacement. The installation process demands that both the bottom pan seal surfaces and the case must be free of debris for proper sealing while bolts and holes should remain moist for retaining correct torque values. Begin by placing the Drain Plug in the transmission case followed by installation of new left and right scavenger screens and finally adding the bottom pan with a new seal and finger-tightening the bolts. Install the 16 bolts on the bottom pan in the following order: torque them to 3 nm (27 inch lbs.) then redo them to 6 nm (53 inch lbs.) and finish with a final torque of 12 nm (106 inch lbs.). Reduce the vehicle height while adding dexron (R) iii transmission fluid according to the need amount and execute a reset of the transmission adapts and transmission oil life indicator.