ChevyParts
My Garage
My Account
Cart
OEM 2008 GMC Yukon HVAC Control Module
Heater Control Assembly- Select Vehicle by Model
- Select Vehicle by VIN
Select Vehicle by Model
orMake
Model
Year
Select Vehicle by VIN
For the most accurate results, select vehicle by your VIN (Vehicle Identification Number).
1 HVAC Control Module found


2008 GMC Yukon Blower Motor Resistor Part Number: 84178783
$89.14 MSRP: $183.19You Save: $94.05 (52%)Ships in 1-2 Business DaysProduct Specifications- Other Name: Module Assembly-Blower Motor Control; Control Module; Resistor
- Replaces: 13503201, 13598134, 13598091, 15141283, 13598090, 13501703, 22811003
- Item Weight: 0.70 Pounds
- Item Dimensions: 7.2 x 7.1 x 6.2 inches
- Condition: New
- Fitment Type: Direct Replacement
- SKU: 84178783
- Warranty: This genuine part is guaranteed by GM's factory warranty.
2008 GMC Yukon HVAC Control Module
With a comprehensive array of OEM 2008 GMC Yukon HVAC Control Module, from fuel pumps to door handles, our website is a one-stop-shop for your needs. All our genuine 2008 GMC Yukon HVAC Control Module are backed by the manufacturer's warranty and are offered at competitive prices in the market. Rest assured, you can shop with complete confidence.
2008 GMC Yukon HVAC Control Module Parts and Q&A
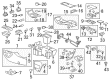
- Q: How to replace the auxiliary HVAC Control Module on 2008 GMC Yukon?A: To replace the auxiliary HVAC module in a tahoe, yukon, or escalade, recover the refrigerant from the A/C system and drain the engine coolant first. Lift up the vehicle and detach the heater lines (2, 3) and air conditioning lines (4, 5) from the auxiliary HVAC module located under the vehicle. Remove the nuts from the studs, securing the module, then drop the vehicle and remove the right rear quarter trim panel. Sheed the upper auxiliary air duct, remove the fastener for the upper auxiliary air duct, and carefully slide the duct up into the headliner then disconnect the electrical connectors from the auxiliary HVAC module. Take out the fasteners that hold the auxiliary HVAC module in place and remove the module from the vehicle. For installation, return the auxiliary HVAC module assembly back into the vehicle, home it in with 2 bolts. In the vehicle. Replace fastener , reconnect electrical connectors to auxiliary HVAC module, and install upper auxiliary air duct back on to air distributor duct. Replace the right rear quarter trim panel; hoist the vehicle again and mount the nuts that fasten auxiliary HVAC module torque to 9 N.m (80 lb in). Attach the air conditioning lines (4, 5) and the nut to the auxiliary HVAC module and tighten the nut to 16 N.m 12 lb ft) and install the heater lines (2, 3) at the underside of the vehicle. Lower the vehicle, check level of coolant, the engine, recharge the refrigerant, and lastly carry out a leakage test on the fittings using Halogen Leak Detector (J 39400-A).
Related 2008 GMC Yukon Parts
 2008 GMC Yukon Blend Door Actuator
 2008 GMC Yukon Blower Motor Resistor
 2008 GMC Yukon Blower Motor
 2008 GMC Yukon A/C Accumulator
 2008 GMC Yukon A/C Condenser
 2008 GMC Yukon A/C Hose
 2008 GMC Yukon A/C Orifice Tube
 2008 GMC Yukon A/C Service Cap
 2008 GMC Yukon A/C Switch
 2008 GMC Yukon A/C System Valve Core
 2008 GMC Yukon Ambient Temperature Sensor
 2008 GMC Yukon Blower Control Switches