ChevyParts
My Garage
My Account
Cart
OEM Chevrolet Express 1500 Alternator Bracket
Alternator Mount- Select Vehicle by Model
- Select Vehicle by VIN
Select Vehicle by Model
orMake
Model
Year
Select Vehicle by VIN
For the most accurate results, select vehicle by your VIN (Vehicle Identification Number).
5 Alternator Brackets found


Chevrolet Express 1500 Mount Bracket Part Number: 12567922
$121.68 MSRP: $211.86You Save: $90.18 (43%)


Chevrolet Express 1500 Mount Bracket Part Number: 12554030
$96.56 MSRP: $163.23You Save: $66.67 (41%)Ships in 1-2 Business Days


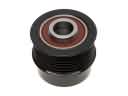
Chevrolet Express 1500 Idler Pulley Part Number: 10236997
$91.02 MSRP: $153.85You Save: $62.83 (41%)Ships in 1-3 Business Days

Chevrolet Express 1500 Mount Brace Part Number: 10237270
$13.11
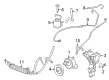
Chevrolet Express 1500 Alternator Bracket Part Number: 10237271
Chevrolet Express 1500 Alternator Bracket
Want to cut long-term maintenance and repair costs? Choose OEM Alternator Bracket. Those parts deliver top durability you can trust. On our site, you'll find a huge catalog of genuine Chevrolet Express 1500 parts. Prices are unbeatable, so you can keep more in your pocket. Every OEM Chevrolet Express 1500 Alternator Bracket includes a manufacturer's warranty. You can also get an easy return policy that keeps buying risk free. Fast delivery, get your car on the road quickly. It's simple to search, compare, and order. Stop guessing about quality or fit. Order today and save with parts that last.
Chevrolet Express 1500 Alternator Bracket Parts Questions & Experts Answers
- Q: How to replace the alternator bracket on Chevrolet Express 1500?A:The replacement process for the generator bracket begins by disconnecting the negative Battery Cable followed by air cleaner assembly and upper radiator Fan Shroud removal. The first step will be disconnecting the auxiliary generator electrical connector while simultaneously removing the Drive Belt. To reach the terminal stud of the positive cable you should move the boot down. Remove first the positive cable nut then the positive cable itself. First remove the auxiliary generator bolts before taking out the auxiliary generator and later remove the auxiliary generator bracket bolt and bracket. Begin highway operations by installing the auxiliary generator bracket first and tightening its bolt to 50 n.m (37 lb ft). Fit the auxiliary generator into place followed by the bolts and tighten them to 50 n.m (37 lb ft). Position the positive cable and fasten it with a nut that should be tightened to 9 n.m (80 lb in). Afterwards slide the boot up to conceal the terminal stud. Complete the installation by first putting back the Drive Belt then joining the auxiliary generator electrical connector then reattaching the radiator Fan Shroud and air cleaner assembly before reconnecting the negative cable.