ChevyParts
My Garage
My Account
Cart
OEM Chevrolet Tracker Door Jamb Switch
Door Jamb Interior Dome Light Switch- Select Vehicle by Model
- Select Vehicle by VIN
Select Vehicle by Model
orMake
Model
Year
Select Vehicle by VIN
For the most accurate results, select vehicle by your VIN (Vehicle Identification Number).
2 Door Jamb Switches found


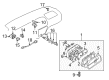
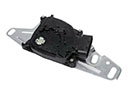
Chevrolet Tracker Door Jamb Switch Part Number: 30024014

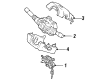
Chevrolet Tracker Door Jamb Switch Part Number: 30019582
Chevrolet Tracker Door Jamb Switch
Our website offers an extensive catalog of genuine Chevrolet Tracker Door Jamb Switch at unbeatable prices. Every OEM Chevrolet Tracker Door Jamb Switch comes with a manufacturer's warranty, an easy return policy, and rapid delivery service. Don't miss out on this great opportunity!
Chevrolet Tracker Door Jamb Switch Parts Questions & Experts Answers
- Q: How to Properly Maintain the Door Jamb Switch on a Chevrolet Tracker?A: A 2 Door vehicle door switch servicing requires users to first open the front side door to expose both the rubber cap and the door jamb switch retaining screw. You must first remove the door jamb switch retaining screw to detach the switch from the jamb before proceeding to expose the door jamb electrical connector by removing the rear quarter lower trim panel. First disconnect the electrical connector before taking out the door jamb switch from the car. To install the door jamb switch position the electrical connector and afterward slot the switch onto its jamb and finalize with the retaining screw. Replace the rear quarter lower trim panel followed by closing the rubber cap before finishing with closing the front side door.

Related Chevrolet Tracker Parts
 Chevrolet Tracker Automatic Transmission Shift Position Sensor Switch
 Chevrolet Tracker Camshaft Position Sensor
 Chevrolet Tracker Crankshaft Position Sensor
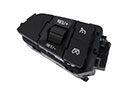 Chevrolet Tracker Cruise Control Switch
 Chevrolet Tracker Daytime Running Light Relay
 Chevrolet Tracker Door Lock Switch
 Chevrolet Tracker Engine Control Module
 Chevrolet Tracker Fuel Pump Relay
 Chevrolet Tracker Headlight Switch
 Chevrolet Tracker Neutral Safety Switch
 Chevrolet Tracker Turn Signal Switch
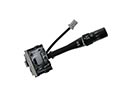 Chevrolet Tracker Wiper Switch