
Popular OEM Chevrolet Tracker Parts
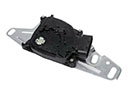
- Body & Hardware Parts View More >
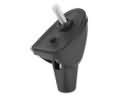
- Steering Parts View More >
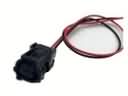
- Electrical Parts View More >
- Air & Fuel Delivery Parts View More >
- Charging & Starting Parts View More >
- Engine Parts View More >
- Belts & Cooling Parts View More >
- Suspension Parts View More >
- Driveline & Axles Parts View More >
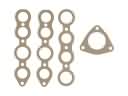
- Emission Control & Exhaust Parts View More >
- Transmission Parts View More >
- Brakes Parts View More >


Why Buy Genuine Chevrolet Tracker Parts From ChevyPartsGiant.com
Looking for real Chevrolet Tracker parts? ChevyPartsGiant.com may be a better choice to find genuine parts at wallet-friendly prices. We sell only OEM Chevrolet Tracker parts, ensuring perfect fit, reliability, and long-term performance. With our website, you can easily get access to the same parts found at local Chevrolet stores. All components are produced by Chevrolet and are exclusively fitted on Chevrolet Tracker automobiles. By shopping at our store, you can enjoy the quality of the Chevrolet factory without the high prices of brick-and-mortar facilities. We achieve this because we are an online store operating at lower costs, which we pass on to you. We also have a user-friendly platform where you can find and order genuine Chevrolet Tracker parts swiftly. We are here to make your process of restoring a Chevrolet Tracker or dealing with simple repairs quick and inexpensive. We also make it easy to obtain Chevrolet Tracker parts at competitive shipping prices and a team of knowledgeable staff ready to take your order. Choose ChevyPartsGiant.com to save time and money, as well as keep your Chevrolet Tracker in the good condition.
From its first appearance in 1988 until today the Chevrolet Tracker has experienced multiple generations of development and entered different markets worldwide. Released in 1988 the Chevrolet Tracker entered the market as a mini-sized SUV while its off-road performance together with its design indicated it was closest to light trucks. The first-generation Chevrolet Tracker came equipped with an 8-valve 1.6L G16 I4 engine producing around 80 horsepower, with later models upgraded to a 16-valve version making about 95 horsepower. The second generation offered more powerful Suzuki-sourced engines: a 2.0L J20A inline-4 with 130 horsepower and an optional 2.5L H25A V6 delivering 155 horsepower. In 2019 the Chevrolet Tracker presented three turbocharged fuel engines to Chinese and Latin American customers through its 1.0 L turbo I3 and 1.3 L turbo I3 offerings. Customers of the first-generation Chevrolet Tracker received options among three transmission types: 5-speed manual transmission and 3-speed GM TH180 automatic or 4-speed Aisin 03-72LE automatic. The 2013 Chevy Tracker for South American and Russian markets received either a 5-speed manual transmission or a manual or automatic transmission option. Crossover Version 2019 received driving enhancements through two transmission options including manual and automatic choices. The off-road all-wheel-drive system combined with truck-like ride quality distinguishes the Chevrolet Tracker as separate from regular SUVs. The Chevy Tracker replacement parts stem from authorized suppliers who maintain high quality standards for maintenance and servicing needs.
Chevrolet Tracker issues group into emissions sealing, brake hardware, and ignition maintenance. The Tracker frequently causes a check engine light to go off in the emissions control system. A loose or worn gas cap produces a vapor leak and sets small leak codes. Examine the seal, clean the filler neck, and fit a new cap. Pull a full cycle to verify that readiness is recorded on the Tracker. In braking, the Tracker will pulse on short stops or on downhill. Common causing factors include: surface roughness due to heat accumulation, rust, or incorrect lug tension of the front brake rotors. Measure runout and thickness of brake rotors, then replace front brake rotors with front brake pads. Bed in and recheck the wheel torque carefully on the Tracker. In ignition service, out of date spark plugs compound the coil load and revoke misfire convulsions. Change spark plugs as frequently as possible and check spark wire arcing. Ensure that there is a smooth idle and smooth acceleration of the Tracker following the repairs. Chevrolet guidance also suggests that grounds and harness connectors be checked against corrosion. Indeed, to obtain the torque value and fastener patterns, you'd better use Chevrolet service information. Continue Chevrolet service schedules to ensure EVAP sealing. These measures make the Chevrolet Tracker predictable in everyday traffic and off-roading.
Chevrolet Tracker Parts Questions & Answers
- Q: How to replace the PUP catalytic converter on Chevrolet Tracker?A:Start by lifting the vehicle before proceeding with pup Catalytic Converter replacement. It is necessary to disconnect the ho2s1 heated Oxygen Sensor's electrical connector. First remove the twc bolts from the pup Catalytic Converter before you disassemble it from the standard Catalytic Converter assembly. First remove the three nuts from the pup Catalytic Converter's flange so you can separate it from the Exhaust Manifold before removing the pup Catalytic Converter from your vehicle for cleaning its gasket and seal mating surfaces. Install new gaskets and seals for the new pup Catalytic Converter before installation. Fasten the pup Catalytic Converter to the Exhaust Manifold using three nuts at this point but maintain loose fasteners. Secure the pup Catalytic Converter to the standard Catalytic Converter assembly with twc bolts but do not fully tighten them at this time. Reconnect the wire harness at the heated Oxygen Sensor (HO2S1). System components should first be aligned correctly then fasteners need to be tightened to avoid noise and vibrations during this process. Secure the pup Catalytic Converter to the standard Catalytic Converter assembly bolts using 50 nm torque (37 ft. Lbs.) while also secure the pup Catalytic Converter Exhaust Manifold nuts to 50 nm torque (37 ft. Lbs.). Finally, lower the vehicle.
- Q: How to service and repair the steering wheel on Chevrolet Tracker?A:Disabling sir system is the necessary step, needed before servicing and repairing the Steering Wheel. In the event that the Steering Column is not supposed to be removed then it is important that the front wheels should be put back to the straight ahead position. Next, you take off the inflatable restraint Steering Wheel module and then the Steering Shaft nut. Apply paint to put alignment marks on both the Steering Wheel and the Steering Shaft to act as guide back to install. It is important to use the recommended tools, for using another Steering Wheel puller or side screws can damage the sir coil assembly. Lastly, use the j1859-a Steering Wheel puller (J1859-A) to remove the Steering Wheel.
- Q: How to replace the front bumper fascia on Chevrolet Tracker?A:The first step in front Bumper fascia replacement requires removal of the headlamps together with the front side marker lamps. Seven plastic retainers situated along the top must be removed to detach the front Bumper fascia. Support the raised vehicle and disconnect the bolt and plastic retainer at the front Bumper fascia at each side then remove the three bottom bolts. Move the fascia frontward to take out the front Bumper from the automobile. Place the front Bumper fascia onto the vehicle while properly directing the front side marker lamps wiring harness before securing it with the 3 bolts along the bottom at 15 n.m (11 lb ft). Place and tighten the bolt along with the plastic retainer to 15 n.m (11 lb ft) at each side. Lower the vehicle while you fasten seven plastic retainers which go along the top. Propagate the front side marker lamps and headlamps before completion of the installation.
- Q: How to replace the alternator on Chevrolet Tracker?A:To replace the generator, begin by disconnecting the negative Battery Cable while keeping a visitor's eye on battery disconnect precautions. Untie the air cleaner hose and the Drive Belt from the pulley generator. Remove the power steering pressure switch connector and the generator electrical. Remove the rubber protector, the nut, and electric connector from the generator b+ pole, and the two vacuum lines from the top of the evap canister. Take the evap canister out of the bracket on the inner fender and remove it. Next, remove the generator mounting bolts top and bottom and take out the generator from the vehicle. For installation, removing it from the vehicle to replace, reposition the generator in the vehicle and then faceting it with the upper and lower mounting bolts and locking them taught at 23 n.m (17 lb ft). When connecting the electrical connector to the generator b+ terminal, ensure that it is done with the use of one nut and the rubber protector, and tighten this nut 10 n.m (89 lb in). Connect the generator electrical connector and the power steering pressure switch connector. Slide the evap canister back into the bracket on the inner fender and reconnect the two vacuum lines to the top of the evap canister. If your generator is old, it also used to have its own canisters located above the engine bay. What you need to do is to replace these original canisters with the bmw gts aluminum canisters. Lastly, reconnect the negative Battery Cable and tighten the negative Battery Cable to negative battery terminal retainer to 15 n.m (11 lb ft).


