ChevyParts
My Garage
My Account
Cart
OEM Chevrolet Traverse CV Joint
CV Joint Axle- Select Vehicle by Model
- Select Vehicle by VIN
Select Vehicle by Model
orMake
Model
Year
Select Vehicle by VIN
For the most accurate results, select vehicle by your VIN (Vehicle Identification Number).
14 CV Joints found


Chevrolet Traverse Inner CV Joint, Front Part Number: 84240329
$168.21 MSRP: $277.08You Save: $108.87 (40%)Ships in 1-2 Business Days
Chevrolet Traverse Inner Joint, Rear Part Number: 22783790
$156.51 MSRP: $248.49You Save: $91.98 (38%)Ships in 1-2 Business Days
Chevrolet Traverse Outer CV Joint, Front Part Number: 25940424
$131.58 MSRP: $215.37You Save: $83.79 (39%)
Chevrolet Traverse Outer CV Joint, Rear Part Number: 22783789
$126.08 MSRP: $224.52You Save: $98.44 (44%)Ships in 1-2 Business Days
Chevrolet Traverse Inner CV Joint, Rear Part Number: 84710415
$77.94 MSRP: $122.09You Save: $44.15 (37%)Ships in 1-3 Business Days
Chevrolet Traverse Outer CV Joint, Inner Part Number: 84148596

Chevrolet Traverse Inner CV Joint, Front Part Number: 84666183
Chevrolet Traverse Inner CV Joint Part Number: 84666171
Chevrolet Traverse Inner CV Joint, Rear Part Number: 84650829
Chevrolet Traverse Outer CV Joint, Inner Part Number: 84499557
Chevrolet Traverse Outer CV Joint, Rear Part Number: 84207684
Chevrolet Traverse Inner CV Joint, Rear Part Number: 84207673
Chevrolet Traverse Inner CV Joint, Front Part Number: 84499586
$106.18 MSRP: $166.28You Save: $60.10 (37%)Chevrolet Traverse Outer CV Joint, Rear Part Number: 15855634
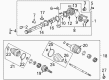
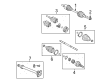
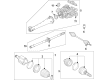
Chevrolet Traverse CV Joint
Want to cut long-term maintenance and repair costs? Choose OEM CV Joint. Those parts deliver top durability you can trust. On our site, you'll find a huge catalog of genuine Chevrolet Traverse parts. Prices are unbeatable, so you can keep more in your pocket. Every OEM Chevrolet Traverse CV Joint includes a manufacturer's warranty. You can also get an easy return policy that keeps buying risk free. Fast delivery, get your car on the road quickly. It's simple to search, compare, and order. Stop guessing about quality or fit. Order today and save with parts that last.
Chevrolet Traverse employs the CV Joint of transferring torque from the transmission to the drive wheels while simultaneously accepting any motion related to the suspension and even the steering wheel. This mechanism is useful for the effective supply of power in the front wheel drive arrangements; however, it can also be useful for the all wheel or four wheel drive systems. The Traverse contains various types of CV Joints such as Rzeppa joints at the outer ends and tripod joints on the inboard side. Rzeppa joints are for greater articulation and tripod joints permit axial movement. They are known to work at wider angles than the inboard joints, the latter are designed to accommodate changes in shaft length during suspension travel. The rubber boots that contain theses joints must be checked to ensure that they are in good condition since damage of them is disastrous in that it leads to loss of lubricant an aspect that can cause complete failure of joints.
Chevrolet Traverse CV Joint Parts Questions & Experts Answers
- Q: How to Replace a CV Boot and CV Joint on a Rear Wheel Drive Shaft for Inner on Chevrolet Traverse?A:To replace the rear wheel drive shaft inner joint and boot, first torque off the wheel drive shaft and the outer CV joint and boot as well. Caution should be exercised to avoid cutting through the inboard or outboard boot because in doing so may wear off the sealing surface and cause premature wear on the constant velocity joint. After using the right tools, rid of and dispose of the outer boot clamp and the inner boot clamp on the CV joint. Even if in margins of the boot are broken, or if there are foreign factors in the CV-joint then the wheel drive shaft should be replaced as a whole, since the internal CV-joint is being maintained. Strip off the CV joint boot from the CV joint and the wheel drive shaft then degrease the boot and shaft's lubricant. For the assembly, the CV joint boot and clamp should be fitted to the wheel drive shaft and CV joint housing to ensure the boot is seated into the groove of the wheel drive shaft. Closing the clamp using the J 35910 - pliers, breaker bar, torque wrench, or ratchet until the gap is each the 1.8 mm (0.07 in) with X88 and 2.6 mm (0.10 in) with Z88/W49/WDA. Apply half of the lubricant in the CV joint boot and the rest in the CV joint then apply the CV joint boot and clamp on the CV joint housing. For the ear type boot clamp, make use of the J 35910 - pliers , breaker bar and a torque or ratchet wrench to close the clamp such that the gap is 1.9 mm (0.07 in) for vehicles with X88 such that the boot clamp is made to close well. For earless type clamps , go straight to closing the boot clamp, using the CH 48894- pliers. Rotate the CV joint in a circular direction to spread the lubricant inside the housing and wipe of any residual lubricant from the outside of the CV joint. Lastly, establish the outer CV part and cover as well as the wheel drive shaft.

Related Chevrolet Traverse Parts
 Chevrolet Traverse Control Arm Bushing
 Chevrolet Traverse Control Arm
 Chevrolet Traverse Axle Beam Mount
 Chevrolet Traverse Axle Pivot Bushing
 Chevrolet Traverse Axle Shaft
 Chevrolet Traverse Axle Support Bushings
 Chevrolet Traverse CV Boot
 Chevrolet Traverse Drive Shaft
 Chevrolet Traverse Lateral Arm
 Chevrolet Traverse Shock and Strut Boot
 Chevrolet Traverse Sway Bar Bracket
 Chevrolet Traverse Trailing Arm Bushing