Make sure this part fits

GM 15855634
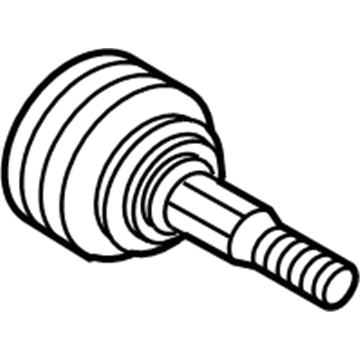
Outer CV Joint, Rear

2007-2011 GM

Customer Questions & Expert Answers (12)
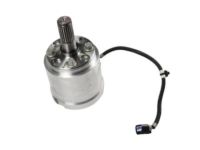
GM 15855634 Outer CV Joint, Rear
  • Part Description
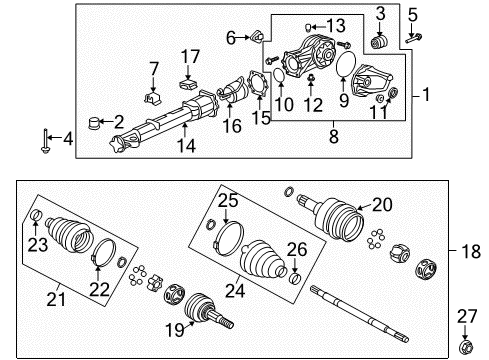
    Joint, Rear Axle Shaft; CV Joint
  • Position
    Rear
  • Manufacturer
    General Motors
  • Manufacturer's Notes
    This part is discontinued.
Make sure this part fits
  • Vehicle Fitment

    Year Make Model Trim Engine
    2008-2011 Buick EnclaveCX, CXL6 Cyl 3.6 L GAS
    2009-2011 Chevrolet TraverseLS, LT, LTZ6 Cyl 3.6 L GAS
    2007-2011 GMC AcadiaDenali, SL, SLE, SLT6 Cyl 3.6 L GAS
    2007-2010 Saturn OutlookXE, XR6 Cyl 3.6 L GAS
    Warning: California's Proposition 65
  • Customer Questions & Expert Answers

    Q:
    Is this 15855634 designed for my car? Posted by ChevyPartsGiant Specialist
    A:
    Please Select Your Vehicle model to see if part number 15855634 is suitable before ordering.
    Posted by ChevyPartsGiant Specialist
    Q:
    How to Replace a CV Boot and CV Joint on a Rear Wheel Drive Shaft for Inner on Chevrolet Traverse? Posted by Customer
    A:
    To replace the rear wheel drive shaft inner joint and boot, first torque off the wheel drive shaft and the outer CV joint and boot as well. Caution should be exercised to avoid cutting through the inboard or outboard boot because in doing so may wear off the sealing surface and cause premature wear on the constant velocity joint. After using the right tools, rid of and dispose of the outer boot clamp and the inner boot clamp on the CV joint. Even if in margins of the boot are broken, or if there are foreign factors in the CV-joint then the wheel drive shaft should be replaced as a whole, since the internal CV-joint is being maintained. Strip off the CV joint boot from the CV joint and the wheel drive shaft then degrease the boot and shaft's lubricant. For the assembly, the CV joint boot and clamp should be fitted to the wheel drive shaft and CV joint housing to ensure the boot is seated into the groove of the wheel drive shaft. Closing the clamp using the J 35910 - pliers, breaker bar, torque wrench, or ratchet until the gap is each the 1.8 mm (0.07 in) with X88 and 2.6 mm (0.10 in) with Z88/W49/WDA. Apply half of the lubricant in the CV joint boot and the rest in the CV joint then apply the CV joint boot and clamp on the CV joint housing. For the ear type boot clamp, make use of the J 35910 - pliers , breaker bar and a torque or ratchet wrench to close the clamp such that the gap is 1.9 mm (0.07 in) for vehicles with X88 such that the boot clamp is made to close well. For earless type clamps , go straight to closing the boot clamp, using the CH 48894- pliers. Rotate the CV joint in a circular direction to spread the lubricant inside the housing and wipe of any residual lubricant from the outside of the CV joint. Lastly, establish the outer CV part and cover as well as the wheel drive shaft.
    Posted by ChevyPartsGiant Specialist
    Q:
    What tools are required to service and repair the CV Joint boot for the rear wheel drive shaft outer joint and seal replacement on GMC Acadia? Posted by Customer
    A:
    A set of tools needs to be procured for constant velocity joint boot service and repair of rear wheel drive shaft outer joint and seal replacement including j 35566 drive axle seal clamp pliers alongside j 42572 drive shaft seal clamp pliers. The technical equipment includes j 35566 drive axle seal clamp pliers and j 42572 drive shaft seal clamp pliers. First use side cutters to remove and discard the small seal clamp attached to the wheel drive shaft bar making sure to prevent damage to the wheel drive shaft trilobal tripot bushing. Use side cutters to remove the large seal clamp from the tripot joint then discard it. Seal the wheel drive shaft outboard by separating it from the trilobal tripot bushing then move the seal outwards along the wheel drive shaft bar. Maintain the 60-degree offset relationship between tripot spiders by accurately marking their bar position before disassembly. Remove the housing and wheel drive shaft bar and then remove the tripot joint spider. A brass drift tool equipped with a hammer gently touching the tripot spider face will compress the wheel drive shaft bar retaining ring before extracting both the tripot spider and its barrel retaining ring. Check all components of the wheel drive shaft outboard seal alongside the tripot joint spider assembly and housing and trilobal tripot bushing for signs of wear or damage. Lay a new small seal clamp onto the joint seal's small end before sliding both components onto the wheel drive shaft bar while keeping the small end inside the joint seal groove. Apply the j 42572 tool to crimp the small seal retaining clamp before tightening it to 136 n.m (100 lb ft). Secure the wheel drive shaft bar with a new barrel retaining ring while maintaining the correct 60-degree offset arrangement. Place the reference mark of the tripot spider exactly on the wheel drive shaft bar while aligning its beveled edge toward the bar during assembly. When pressuring the barrel retaining ring with a flat-bladed tool, install the tripot spider while verifying its positive engagement by attempting to pull it free from the wheel drive shaft bar. The trilobal tripot bushing must rest against the housing face while technicians use the service kit grease to fill half of the wheel drive shaft outboard seal and the rest of the housing. First, position the trilobal tripot bushing into the housing then insert the spring and conserve its position with housing grease before guiding the spring into position using the same grease technique. Set the bigger retaining clamp on the wheel drive shaft's outboard seal before sliding the housing over the bar containing the tripot joint spider assembly on the shaft. Place the wheel drive shaft outboard seal with its large diameter across the trilobal tripot bushing while maintaining its groove location free of any seal deformation. Check the seal's shape is correct then make any needed adjustments. The joint assembly needs to be positioned at the correct vehicle dimension while properly aligning the wheel drive shaft outboard seal with the tripot housing and large seal retaining clamp during latching. Use the j 35566 tool to install the large seal retaining clamp by making sure its latching tangs fully enter the large seal clamp band. To spread the grease evenly in tripot spider bearings across the outer tripot housing you must rotate it four or five times.
    Posted by ChevyPartsGiant Specialist
    Q:
    What is the procedure for the ear type boot clamp for the 2009 Buick Enclave? Posted by Customer
    A:
    Use J 35910 - Drive Axle Boot Clamp Pliers, a breaker bar, and a torque or ratchet wrench to close the clamp until the gap measures 1.9 mm (0.07 in).
    Posted by ChevyPartsGiant Specialist
    See expert answers on similar CV Joint
    Q:
    What tools are needed to replace the rear wheel drive shaft outer joint and boot for the 2008 Buick Enclave? Posted by Customer
    A:
    Drive Axle Seal Clamp Pliers (J 35566) and Drive Shaft Seal Clamp Pliers (J 42572).
    Posted by ChevyPartsGiant Specialist
    See expert answers on similar CV Joint
    Q:
    How should the boot clamp be tightened for the 2009 Buick Enclave? Posted by Customer
    A:
    Using the J 35910 - Drive Axle Seal Clamp Pliers, tighten the boot clamp until the gap measures 1.9 mm (0.07 in).
    Posted by ChevyPartsGiant Specialist
    See expert answers on similar CV Joint
    Q:
    What should be inspected after removing the CV joint for the 2010 Buick Enclave? Posted by Customer
    A:
    Inspect the outer CV joint for damage and wear.
    Posted by ChevyPartsGiant Specialist
    See expert answers on similar CV Joint
    Q:
    How should the lubricant be distributed within the outer CV joint for the 2009 Buick Enclave? Posted by Customer
    A:
    Distribute the lubricant within the outer CV joint by moving it in a circular motion at least four to five times.
    Posted by ChevyPartsGiant Specialist
    See expert answers on similar CV Joint
    Q:
    What should you do after closing the boot clamp and distributing the lubricant for the 2009 GMC Acadia? Posted by Customer
    A:
    Remove any excess lubricant from the tripot housing and wheel drive shaft, then move the tripot joint housing in a circular motion to ensure proper lubricant distribution.
    Posted by ChevyPartsGiant Specialist
    See expert answers on similar CV Joint
    Q:
    What should be inspected for damage or wear for the 2008 GMC Acadia? Posted by Customer
    A:
    Inspect the wheel drive shaft inboard seal, tripot joint spider assembly, housing, and trilobal tripot bushing.
    Posted by ChevyPartsGiant Specialist
    See expert answers on similar CV Joint
    Q:
    What is the final step in the process for the 2010 GMC Acadia? Posted by Customer
    A:
    Install the outer CV joint and boot, followed by the wheel drive shaft.
    Posted by ChevyPartsGiant Specialist
    See expert answers on similar CV Joint
    Q:
    What should be inspected after removing the CV joint for the 2010 GMC Acadia? Posted by Customer
    A:
    Inspect the outer CV joint for damage and wear.
    Posted by ChevyPartsGiant Specialist
    See expert answers on similar CV Joint
    If you have any questions about this product, please don't hesitate to ask us. We will be happy to help you!

OEM GM Outer CV Joint, Rear 15855634 Designed for Proper Fit and Performance

Original OEM GM parts deliver superior quality and meet all performance standards needed for optimal automotive operation. The authentic part identified by 15855634 Outer CV Joint, Rear is available in the market under the name GM CV Joint. This genuine product has a full warranty coverage from the manufacturer available at all authorized GM dealers throughout the United States. This part 15855634 Outer CV Joint, Rear fits certain Chevrolet Traverse models, as well as GMC Acadia. Additionally, it is compatible with Buick Enclave and Saturn Outlook models.
The original GM component designated by manufacturer part number 15855634 maintains top performance when functioning as the Joint, Rear Axle Shaft; CV Joint unit at its Rear. The component 15855634 is constructed from durable material and its dimensions span 8.2 x 3.3 x 3.2 inches while weighing 4.70 Pounds. The Direct Replacement component is ready in New condition to ensure full compatibility with your vehicle system. This component receives the designation of Outer Joint. The part 15855634 has available replacement options. Each vehicle needs 2 units of the part marked as SKU 15855634. GM manufacturer provides a warranty that ensures reliable operation of this product. The Shipping Policy and Return Policy pages outline complete details regarding shipping procedures and return processes.
If you want to save money in the long run on maintenance and repairs, you should choose OEM products because they're of the top level of durability. Are you on the quest of finding GM parts, our site is worth a visit. We stock an endless selection of high-quality GM components including things like ignition coils all the way through to fan shrouds and all at prices that can not be matched. You have nothing to worry about because all our OEM parts are covered with a manufacturer warranty, which guarantees superior quality and value.