ChevyParts
My Garage
My Account
Cart
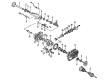
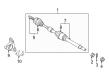
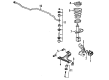
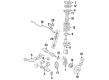
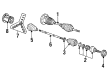
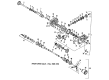
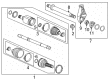
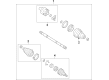
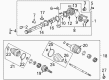
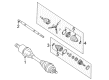
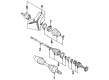
OEM Chevrolet CV Joint
CV Joint Axle- Select Vehicle by Model
- Select Vehicle by VIN
Select Vehicle by Model
orMake
Model
Year
Select Vehicle by VIN
For the most accurate results, select vehicle by your VIN (Vehicle Identification Number).
220 CV Joints found

Chevrolet Inner CV Joint Part Number: 26037152
$125.65 MSRP: $225.39You Save: $99.74 (45%)Ships in 1-3 Business DaysProduct Specifications- Other Name: CV Joints; CV Joint; Spider Assembly
- Position: Front

Chevrolet Inner CV Joint, Front Passenger Side Part Number: 19317737
$148.52 MSRP: $266.40You Save: $117.88 (45%)Ships in 1-3 Business DaysProduct Specifications- Other Name: Joint Kit, Front Wheel Drive Axle; CV Joint; Inner Joint
- Position: Front Passenger Side

Chevrolet CV Joints Part Number: 7846866
$95.91 MSRP: $171.26You Save: $75.35 (44%)Ships in 1-3 Business DaysProduct Specifications- Other Name: Spider Kit - Tripot; CV Joint; Spider Kit
- Replaced by: 26005377
Chevrolet CV Joints Part Number: 26005377
$95.91 MSRP: $171.26You Save: $75.35 (44%)Ships in 1-3 Business DaysProduct Specifications- Other Name: CV Joint; Spider Assembly; Joint Assembly; Inner Joint; Inner Joint Assembly
- Replaces: 07846866, 7846866

Chevrolet C.V. Joint, Front Part Number: 26037373
$258.89 MSRP: $464.38You Save: $205.49 (45%)Ships in 1-3 Business DaysProduct Specifications- Other Name: Joint Kit, Front Wheel Drive Axle; CV Joint
- Position: Front
- Replaces: 26025716
Chevrolet C.V. Joint, Front Part Number: 26037364
$272.97 MSRP: $494.06You Save: $221.09 (45%)Ships in 1-2 Business DaysProduct Specifications- Other Name: Joint Kit, Front Wheel Drive Axle; CV Joint; Outer CV Joint; Joint Kit, Front Axle U Joint
- Position: Front
- Replaces: 26020728

Chevrolet Inner CV Joint, Front Part Number: 26059677
$46.64 MSRP: $564.50You Save: $517.86 (92%)Ships in 1-2 Business DaysProduct Specifications- Other Name: Joint Kit, Front Wheel Drive Axle; Joint Assembly; Inner Joint; Inner Joint Assembly
- Position: Front

Chevrolet Outer CV Joint Part Number: 95908459
$163.62 MSRP: $257.43You Save: $93.81 (37%)Ships in 1-3 Business DaysProduct Specifications- Other Name: Joint Kit, Front Wheel Drive Axle; CV Joint; Outer Joint
- Position: Front Outer

Chevrolet Inner CV Joint, Front Part Number: 84576607
$97.98 MSRP: $153.47You Save: $55.49 (37%)Ships in 1-3 Business DaysProduct Specifications- Other Name: Joint Kit, Front Wheel Drive Axle
- Position: Front
- Replaces: 84380414, 84227479

Chevrolet Inner Joint, Rear Part Number: 22783790
$156.51 MSRP: $248.49You Save: $91.98 (38%)Ships in 1-2 Business DaysProduct Specifications- Other Name: Housing-Rear Wheel Drive Shaft Tri-Pot Joint
- Position: Rear

Chevrolet Outer CV Joint, Inner Part Number: 84227477
$86.40 MSRP: $135.31You Save: $48.91 (37%)Ships in 1-3 Business DaysProduct Specifications- Other Name: Inner CV Joint; Joint Kit, Front Wheel Drive Axle
- Position: Inner
Chevrolet Inner CV Joint, Front Part Number: 26062596
Product Specifications- Other Name: Joint Kit, Front Wheel Drive Axle; CV Joint; Inner Joint; Inner Joint Assembly
- Position: Front


Chevrolet Inner CV Joint, Front Passenger Side Part Number: 26039154
Product Specifications- Other Name: Joint Kit, Front Wheel Drive Axle; CV Joint; Inner Joint; Inner Joint Assembly
- Position: Front Passenger Side
Chevrolet Inner CV Joint, Front Part Number: 26079694
Product Specifications- Other Name: Joint Kit, Front Wheel Drive Axle; CV Joint; Inner Joint Assembly
- Position: Front
Chevrolet Inner CV Joint, Front Passenger Side Part Number: 26079698
Product Specifications- Other Name: Joint Kit, Front Wheel Drive Axle; CV Joint; Inner Joint; Inner Joint Assembly
- Position: Front Passenger Side
Chevrolet Inner CV Joint, Front Driver Side Part Number: 26051141
Product Specifications- Other Name: Joint Kit, Front Wheel Drive Axle; CV Joint; Inner Joint; Inner Joint Assembly
- Position: Front Driver Side
Chevrolet Inner CV Joint, Front Driver Side Part Number: 26079693
Product Specifications- Other Name: Joint Kit, Front Wheel Drive Axle; CV Joint; Inner Joint; Inner Joint Assembly
- Position: Front Driver Side
Chevrolet Inner CV Joint, Front Driver Side Part Number: 26039161
Product Specifications- Other Name: Joint Kit, Front Wheel Drive Axle; CV Joint; Inner Joint; Inner Joint Assembly
- Position: Front Driver Side
Chevrolet Inner CV Joint, Front Driver Side Part Number: 26039301
Product Specifications- Other Name: Joint Kit, Front Wheel Drive Axle; CV Joint; Inner Joint; Inner Joint Assembly; Tripod
- Position: Front Driver Side
Chevrolet Inner CV Joint, Front Driver Side Part Number: 26062570
Product Specifications- Other Name: Joint Kit, Front Wheel Drive Axle; CV Joint; Inner Joint; Inner Joint Assembly
- Position: Front Driver Side
| Page 1 of 11 |Next >
1-20 of 220 Results
Chevrolet CV Joint
Want to cut long-term maintenance and repair costs? Choose OEM CV Joint. Those parts deliver top durability you can trust. On our site, you'll find a huge catalog of genuine Chevrolet parts. Prices are unbeatable, so you can keep more in your pocket. Every OEM Chevrolet CV Joint includes a manufacturer's warranty. You can also get an easy return policy that keeps buying risk free. Fast delivery, get your car on the road quickly. It's simple to search, compare, and order. Stop guessing about quality or fit. Order today and save with parts that last.
Chevrolet CV Joint Parts Questions & Experts Answers
- Q: What tools are required to service and repair the CV Joint for the wheel drive shaft outer joint and seal replacement on Chevrolet Impala?A:To service and repair constant velocity joint, namely the wheel drive shaft outer joint and seal replacement, the following tools are needed: j41048 drive axle swage ring clamp, j8059 snap ring pliers, and j35910 drive axle seal clamp pliers. Starting with the removal of the large seal retaining clamp from the CV Joint by using a side cutter and disposing of it thereby beware not to cut into the contact of the wheel drive shaft inboard seal. Use a hand grinder to cut through swage ring to remove. Pull the halfshaft outboard seal from the CV Joint outer race and slide it out from the joint over the halfshaft bar. Take off the grease from the face of the CV Joint inner race and spread the ears on the race retaining ring with the j8059. Take out the CV Joint assembly from the halfshaft bar and get rid of the old outboard seal. Tap and tilt the CV Joint cage with a brass drift gently to remove the chrome alloy balls until all six are removed. Clean the inner and outer race assemblies, as well as the CV Joint cage and the chrome alloy balls with cleaning solvent and dry all parts out before inspecting for any unusual wear, cracks or damage and replacing any of the damages parts. Clean the area around the seal mounting with wire brush and rust from halfshaft bar. For the assembly, the swage ring, new, should be mounted on the neck of the outboard seal, unswaged, followed by sliding of the outboard seal onto the halfshaft bar, and positioning in the seal groove. Swage the ring into the position using the j41048 and tighten the bolts aligning them and checking any deformities upon completion. Put a light coat of grease from the service kit onto the inner and outer races' ball grooves, then install the inner race into the cage with proper alignment with the outer one. Install the chrome balls, with grease packing the CV Joint and with the outboard seal properly formed. Lastly, slip the large diameter of the outboard seal with the large seal retaining clamp on over the CV Joint outer race, and crimp the clamp with the j35910 to the specified torque, verifying the gap dimension on the clamp ear.
- Q: How to replace the outer CV Joint and seal on Chevrolet Malibu?A:In order to replace the wheel drive shaft outer joint and seal, start by using a side cutter to remove, and discard, the large seal retaining clamp from the CV and also the small seal retaining clamp from the half shaft bar. Dismount the seal the CV joint outer race and slide it out from joint over the back . Wipe any grease from the inner race and then use the J 8059 Snap Ring Pliers to spread the CV joint inner race race retaining ring's ears before removing the CV joint assembly from the bar. Remove the seal from the bar and carefully tap the CV joint cage with the help of a brass drift and hammer so as to push out all the six chrome alloy balls. Rotate the CV joint cage and inner race to 90 degrees relative to the CV joint outer race, so that the windows of the cage align with the lands of the outer race. Take out the cage and inner race after which one rotates inner race 90 degrees to align it with the windows of the cage and turns it into the cage. Clean all parts thoroughly with Cleaning solvent and let them dry. For assembly, install the seal retaining clamp on the neck of the seal where it wasn't crimped and then slide the seal onto the halfshaft bar while positioning it on the seal groove. Crimp the seal retaining clamp with the help of J 35910 Drive Axle Seal Clamp Pliers, breaker bar, and torque wrench, holding 136 (100 ft. lbs. Nm) torque tightening it and monitor the dimension of the gap. Lightly grease from the service kit of the ball grooves of both races and fix the inner race at a 90 angle to the cage and push it into the cage. Ensure that the retaining ring side of the inner faces the halfshaft bar, then insert the cage and inner race in the outer race. Put the first chrome ball and tip the cage to add the opposite ball, then continue to do this until there are six balls in place. After that, the CV joint should be packed with grease, then one should push the CV joint onto the bar until the retaining ring is seated, and the seal should be shaped properly. Push the large diameter of the seal in conjunction with the large seal retaining clamp to fit over the CV joint outer race such that the seal lip is fitted into the groove. Lastly, crimp the seal retaining clamp with the J 35910 , breaker bar , and a torque wrench till making the gap dimension 1.90mm ( /16 inch) 176Nm (130ft. lbs.).
- Q: What Tools Are Required to Service and Repair the CV Boot and CV Joint for the Wheel Drive Shaft Inner Joint on Chevrolet S10?A:To service and repair the Axle Shaft assembly, namely the wheel drive shaft inner joint and boot replacement; the following (list of) tools are required: swag clamp tool (J 41048), drive axle seal clamp plier (J 35566), and snap ring pliers (J 8059) were the 3 items of disc brake consumer products that I chose to be included in the showroom inventory. Start by disassembling the clamp from the boot using the side cutters without harming the tripot housing. Grind using a hand grinder to cut through swag ring, then withdraw the tripot housing and the tripot tri-lobal bushing from the halfshaft bar. Degrease the housing and spider assembly completely, disposing of the tripot tri-lobal bushing. Apply 320 grit of 3m cloth to remove any corrosion on the transmission sealing surface and let the housing and spider assembly dry. Apply cautious handling to the tripot spider assembly to avoid separation of tripot balls and needle rollers. Compress the tripot boot onto the halfshaft-bar, snap ring plier (J 8059) to widen spacer ring spacing and eliminate the spider assembly, also the spacer ring, spider assembly and second spacer ring and tripot boot. Discard the tripot boot and spacer rings, clean half-shaft bar with wire brush and inspect needle bearings, needle rollers and trunnion for any damage. Replace any damaged parts. To assemble, locate the new swage clamp up on the neck of the boot without swaging, then slide the new small swage clamp and boot to the precise location on half shaft bar. Make sure the neck of the boot is in the boot groove on the halfshaft bar; and swage the clamp, using the swag clamp tool (J 41048) with the alignment and securing of the parts. Hand tighten the bolts until snug, making sure that there are no pinch points on the boot. Turn the bolts alternately 180 degrees off with a ratchet wrench until both sides hit bottom, then back off the bolts and split the dies. Should there be deformities in the swage clamp, then insert into j 41048 and re-swage. Examine for any "lip" deformation and confirm that the convolute retainer has been assembled correctly so that there is no damage to the boot. Mount the convolute retainer over the boot for four convolutions, then mount the spacer ring and spider assembly on the halfshaft bar, and the other spacer ring into the groove at the end of the halfshaft bar making sure all rings fit into the grooves. After the pre-measured grease from the kit is packed into the boot and housing, the large retaining clamp must be placed on the boot and pack the housing and new tripot tri-lobal bushing over the spider assembly. Place the boot on the tripot tri-lobal bushing, inspect the inboard stroke position for the male tripot housing assembly (dimension a = '11.02 inches') or female tripot housing assembly (dimension b = '8.98 inches'), secure the large retaining clamp and boot to the housing using 'drive axle seal clamp plier(J 35566) and finally, remove the convolute retainer off the boot.


Related Chevrolet Parts
 Chevrolet Torsion Bar
 Chevrolet 4WD Actuator
 Chevrolet Spindle
 Chevrolet Wheel Cover
 Chevrolet Alignment Bolt
 Chevrolet Axle Shaft Retainer
 Chevrolet Coil Spring Insulator
 Chevrolet Control Arm Bracket
 Chevrolet Lateral Arm
 Chevrolet Shock and Strut Boot
 Chevrolet Suspension Strut Rod
 Chevrolet Sway Bar Kit
Browse Chevrolet CV Joint by Models
Nova S10 Tahoe Cruze Malibu Camaro Equinox Impala SS Avalanche Silverado 1500 Silverado 2500 HD Caprice Classic Suburban Traverse Blazer Sonic Tracker Volt Spark Trax Trailblazer Astro Cavalier Corvette Aveo Beretta C1500 C2500 C3500 Celebrity City Express Corsica Express 1500 Express 2500 Express 3500 K1500 K2500 K3500 Lumina Metro Monte Carlo Prizm S10 Blazer Silverado 2500 Sprint Uplander Venture Lumina APV Silverado 3500 Suburban 1500 Trailblazer EXT Avalanche 1500 Avalanche 2500 Aveo5 C1500 Suburban C2500 Suburban Captiva Sport Citation II Cruze Limited Impala Limited K1500 Suburban K2500 Suburban Malibu Limited Silverado 1500 Classic Silverado 1500 HD Silverado 1500 HD Classic Silverado 1500 LD Silverado 2500 HD Classic Silverado 3500 Classic Silverado 3500 HD Spark EV Suburban 2500 Suburban 3500 HD