ChevyParts
My Garage
My Account
Cart
OEM Chevrolet Uplander CV Joint
CV Joint Axle- Select Vehicle by Model
- Select Vehicle by VIN
Select Vehicle by Model
orMake
Model
Year
Select Vehicle by VIN
For the most accurate results, select vehicle by your VIN (Vehicle Identification Number).
1 CV Joint found

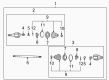
Chevrolet Uplander Axle Assembly Part Number: 88967242
Chevrolet Uplander CV Joint
Our website offers an extensive catalog of genuine Chevrolet Uplander CV Joint at unbeatable prices. Every OEM Chevrolet Uplander CV Joint comes with a manufacturer's warranty, an easy return policy, and rapid delivery service. Don't miss out on this great opportunity!
Chevrolet Uplander CV Joint Parts Questions & Experts Answers
- Q: How to replace the outer CV Boot and CV Joint on Chevrolet Uplander?A: Begin wheel drive shaft outer joint and boot replacement by cutting the seal retaining clamp off the cv joint with a side cutter then discard. Cutting through the wheel drive shaft inboard boot will create damage to the sealing surface so avoid this practice. A hand grinder should cut the swage ring to allow its removal. Start by taking apart the outboard seal from the cv joint's outer race at its larger diameter then move the seal away from the joint following the halfshaft bar direction. Clean grease from the cv joint inner race face before opening the race retaining ring ears with j 8059 snap ring pliers (J 8059). Extract the halfshaft barcv joint assembly which leads to disposal of the existing outboard seal. To separate the cv joint balls place the brass drift tool against the cage and carefully move it to remove each chrome alloy component individually six times. Turn the cv joint cage and inner race at a 90-degree angle before lifting them out from the outer race. Use gravity to rotate the cage's inner race upward before cleaning all pieces fully with a cleaning solvent to eliminate all previous grease and debris. Examine the cv joint assembly for any signs of unusual wear followed by damage inspection. Replace any components with definite damage. Dry all parts first. A wire brush should be used to clean rust off the halfshaft bar near the seal mounting area. The rail should sit in a vise equipped with a protective towel during assembly. Use a new small eared clamp to fasten the outboard seal at its neck without collapsing it before placing the seal onto the halfshaft bar until it rests in its designated groove. Use a j 35910 drive axle seal clamp plier (J 35910) to tighten the small eared clamp while holding the torque wrench at 136 n.m (100 lb ft) and checking gap dimensions during tightening. Add light grease in the ball grooves of the inner and outer races from the service kit before placing the inner race into the cage with correct orientation. Position the cage and inner race inside the outer race and carefully add the chrome balls one by one until you reach six balls in place. Use grease to pack the cv joint then press it onto the halfshaft bar until the retaining ring properly settles. Examine the outboard seal to check for crumpling or elongation then adjust it manually if needed. Fit the outer race of the cv joint by sliding its large diameter along with the large seal retaining clamp until the seal lip rests in the groove properly. After sealing the clamp with a j 35910 torque of 174 n.m (130 lb ft) check the gap width on the ear before final tightening to reach 1.9 mm (5/64 in).

Related Chevrolet Uplander Parts
 Chevrolet Uplander Air Suspension Compressor
 Chevrolet Uplander Axle Pivot Bushing
 Chevrolet Uplander Axle Shaft
 Chevrolet Uplander Ball Joint
 Chevrolet Uplander CV Boot
 Chevrolet Uplander Coil Spring Insulator
 Chevrolet Uplander Control Arm Bolt
 Chevrolet Uplander Crossmember Bushing
 Chevrolet Uplander Differential
 Chevrolet Uplander Ride Height Sensor
 Chevrolet Uplander Strut Bearing
 Chevrolet Uplander Suspension Strut Rod