ChevyParts
My Garage
My Account
Cart
OEM Chevrolet S10 CV Joint
CV Joint Axle- Select Vehicle by Model
- Select Vehicle by VIN
Select Vehicle by Model
orMake
Model
Year
Select Vehicle by VIN
For the most accurate results, select vehicle by your VIN (Vehicle Identification Number).
5 CV Joints found

Chevrolet S10 Inner CV Joint, Front Part Number: 26059677
$46.64 MSRP: $564.50You Save: $517.86 (92%)Ships in 1-2 Business Days
Chevrolet S10 C.V. Joint Part Number: 7841224


Chevrolet S10 Outer CV Joint Part Number: 26059673
Chevrolet S10 C.V. Joint, Outer Part Number: 26055391
Chevrolet S10 CV Joint
Want to cut long-term maintenance and repair costs? Choose OEM CV Joint. Those parts deliver top durability you can trust. On our site, you'll find a huge catalog of genuine Chevrolet S10 parts. Prices are unbeatable, so you can keep more in your pocket. Every OEM Chevrolet S10 CV Joint includes a manufacturer's warranty. You can also get an easy return policy that keeps buying risk free. Fast delivery, get your car on the road quickly. It's simple to search, compare, and order. Stop guessing about quality or fit. Order today and save with parts that last.
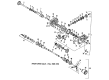
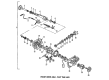
Amongst the Chevrolet S10, one of the most notable subassemblies is the CV Joint which exhibits the aspects of reliability and high performance in the construction of Chevrolet S10 vehicles. CV joint is basically an element, assigned to transmit the torque originating from the transmission in the environment of drive wheels and to allow suspension's movement and steering angles. Rzeppa joints are used in the outboard applications of various S10 models while the tripod joints are used in the inboard applications to allow the needed articulation and axial movement. The CV Joint comes with rubber boots and this covers the joint hence the need to ensure that in the regular checkups one does not see the boots surrounded by contaminants as this would depict joint failure. These elements contribute to the general effectiveness and reliability of Chevrolet S10 and thus are valued by drivers. The Chevrolet S10 has barely gone through three generations since the year 1981 and since then the car model has always been compatible with a variety of engines and most importantly transmission systems to further prove how versatile the CV Joint is. Chevrolet S10 has maintained many features that respond to dimensions of practicality and comfort, thus making it remain a popular truck of the compact type. Thus, specific characteristics of the CV Joint like constant speed rotation ability really helps to make the strength of this car stand out from the large auto market. Altogether, the CV Joint is important in improving the driveability of the vehicle and promising continued value of the Chevrolet S10 to its potential and actual users.
Chevrolet S10 CV Joint Parts Questions & Experts Answers
- Q: How to replace the inner CV Joint and seal on Chevrolet S10?A:Start the wheel drive shaft inner joint and seal replacement by collecting the following tools: Swag Clamp Tool (J 41048), Drive Axle Seal Clamp Plier (J 35566) and Snap Ring Pliers (J 8059). Work with Swag Clamp Tool (J 41048) along with Drive Axle Seal Clamp Plier (J 35566) and Snap Ring Pliers (J 8059). Use side cutters to remove the clamp from the boot but take care to avoid damaging the tripot housing. A hand grinder should cut through the swag ring before you remove the tripot housing along with the tripot tri-lobal bushing from the halfshaft bar. The cleaning process should remove all traces of lubricants from both the housing and spider assembly while you dispose of the tripot tri-lobal bushing. The transmission sealing surface requires preparation with 320 grit 3M cloth to remove corrosion until components dry completely while proper handling of the tripot spider assembly avoids tripot ball and needle roller separation. Bind the tripot boot around the halfshaft bar while using tool J8059 to disperse the spider assembly's spacer rings . Professional cleaning of the halfshaft bar with a wire brush reveals damage to the needle bearings, needle rollers and trunnion components. Discard the tripot boot together with the spacer rings before inspection. When components exhibit damage it is essential to replace those faulty parts. To install the new swage clamp place it on the boot neck without swaging it before adding the new small swage clamp and boot in their proper position on the halfshaft bar. Swage the boot clamp using J 41048 on the halfshaft bar while making sure the boot neck sits within the bar's groove. Evolve slowly tighten the bolts by hand before achieving a snug fit while matching the boot alignment with the halfshaft bar and swage clamp. Finish the installation by using a ratchet wrench to torque each bolt at 180 degrees intervals. Inspect the sunken areas in the clamp if present before re-swaging the clamp. Review the swage clamp for "lip" deformities before confirming the correct positioning of the boot convolute retainer to capture four convolutions. Sitting installation of the spacer ring together with spider assembly onto halfshaft bar while inserting the second spacer ring into the groove at the halfshaft bar's terminal. Verify proper seating of all rings. Put the pre-packaged grease from the kit into the boot and housing space while clamping the large retaining clamp to the boot and mounting the housing together with the new tripot tri-lobal bushing onto the spider assembly . Check the inboard stroke position on the tripot tri-lobal bushing before you install the boot then secure the large retaining clamp and boot to the housing using J 35566 while still removing the convolute retainer from the boot.

Related Chevrolet S10 Parts
 Chevrolet S10 Drive Shaft
 Chevrolet S10 Ball Joint
 Chevrolet S10 Shock Absorber
 Chevrolet S10 Alignment Bolt
 Chevrolet S10 Axle Beam Mount
 Chevrolet S10 Axle Pivot Bushing
 Chevrolet S10 Axle Support Bushings
 Chevrolet S10 CV Boot
 Chevrolet S10 Control Arm Bumper
 Chevrolet S10 Spindle
 Chevrolet S10 Sway Bar Bracket
 Chevrolet S10 Sway Bar Bushing