ChevyParts
My Garage
My Account
Cart
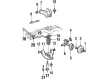
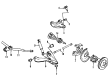
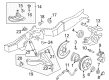
OEM Chevrolet S10 Ball Joint
Control Arm Joint- Select Vehicle by Model
- Select Vehicle by VIN
Select Vehicle by Model
orMake
Model
Year
Select Vehicle by VIN
For the most accurate results, select vehicle by your VIN (Vehicle Identification Number).
5 Ball Joints found


Chevrolet S10 Ball Joint, Front Upper Part Number: 88911387
$34.06 MSRP: $60.81You Save: $26.75 (44%)Ships in 1-3 Business Days
Chevrolet S10 Lower Ball Joint, Front Part Number: 17980954
$65.21 MSRP: $107.41You Save: $42.20 (40%)Ships in 1-2 Business Days
Chevrolet S10 Ball Joint, Front Lower Part Number: 19416895
$20.58 MSRP: $50.23You Save: $29.65 (60%)
Chevrolet S10 Lower Ball Joint Part Number: 88967425
$65.21 MSRP: $107.41You Save: $42.20 (40%)Ships in 1-2 Business Days
Chevrolet S10 Upper Ball Joint, Front Part Number: 19133669
Chevrolet S10 Ball Joint
Want to cut long-term maintenance and repair costs? Choose OEM Ball Joint. Those parts deliver top durability you can trust. On our site, you'll find a huge catalog of genuine Chevrolet S10 parts. Prices are unbeatable, so you can keep more in your pocket. Every OEM Chevrolet S10 Ball Joint includes a manufacturer's warranty. You can also get an easy return policy that keeps buying risk free. Fast delivery, get your car on the road quickly. It's simple to search, compare, and order. Stop guessing about quality or fit. Order today and save with parts that last.
The Ball Joint of Chevrolet S10 vehicles plays a critical role in the suspension and steering systems as it joins the control arms and the steering knuckles. These ball joints enable free rotation in two planes and prevent translation to improve vehicle handling, stability and ride comfort. The requirement of the Chevrolet S10 Ball Joint often comprises a bearing stud and socket adjoining a protective rubber-like boot to shut out dirt and permit the flow of lubricant. Loaded and unloaded ball joints are two types which have different roles in the suspension system; while some ball joints work on supporting the structure of the car, the other's work is on giving the car a correct orientation. In order to maintain paddle ends in good working conditions, and to ensure that your cars driveability requirements are met, used and worn ball joints must be replaced often.
Chevrolet S10 Ball Joint Parts Questions & Experts Answers
- Q: How to replace the lower ball joint on Chevrolet S10?A:You need to lift and support the vehicle before taking off its tire and wheel to replace the lower Ball Joint. First release the Torsion Bar and extract the wheel drive shaft parts. Rephrase verbalization by using a smaller drill before a bigger drill to prepare each rivet for easy removal. Drill a centerpoint 6.25 mm deep with 3.175 mm drill bit before adding the rivet heads to the 12.7 mm drill bit. Push the pin punch through the rivets to get the lower Ball Joint out of the lower Control Arm assembly. When installing the system put the lower Ball Joint over the lower Control Arm while keeping to the fastener notice as detailed in the service precautions section. Fasten the lower Ball Joint bolts while tightening its retaining nuts to 23 nm. Insert the wheel shaft into place and lift the vehicle using the lifting device before sliding in the Torsion Bar and putting on the wheel and tire. Complete the assessment with the wheel alignment test.

Related Chevrolet S10 Parts
 Chevrolet S10 Coil Springs
 Chevrolet S10 Torsion Bar
 Chevrolet S10 Axle Beam Mount
 Chevrolet S10 Axle Shaft
 Chevrolet S10 Axle Support Bushings
 Chevrolet S10 Coil Spring Insulator
 Chevrolet S10 Control Arm
 Chevrolet S10 Control Arm Bumper
 Chevrolet S10 Spindle
 Chevrolet S10 Sway Bar Bracket
 Chevrolet S10 Sway Bar Kit
 Chevrolet S10 Wheel Cover