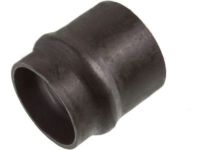
Make sure this part fits

GM 26059673
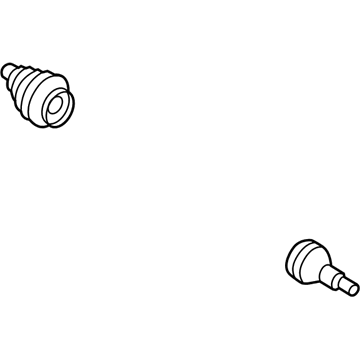
Outer CV Joint

1997-2009 GM

Customer Questions & Expert Answers (17)
GM 26059673 Outer CV Joint
  • Part Description
    Outer CV Joint
  • Position
    Outer
  • Replaces
    26095325
  • Manufacturer
    General Motors
  • Manufacturer's Notes
    This part is discontinued.
Make sure this part fits
  • Related Parts
  • Product Specifications
  • Vehicle Fitment
  • Customer Questions & Expert Answers
  • Product Specifications

    BrandGenuine GM
    Manufacturer Part Number26059673
    Part DescriptionOuter CV Joint
    Other NamesJoint Assembly; Outer Joint; Joint Kit, Front Axle U Joint; CV Joint
    Item Dimensions9.5 x 8.5 x 7.1 inches
    Item Weight7.40 Pounds
    PositionOuter
    ConditionNew
    Fitment TypeDirect Replacement
    Replaces26095325
    Require Quantity2
    ManufacturerGeneral Motors
    SKU26059673
    WarrantyThis genuine GM part is guaranteed by GM's factory warranty.
    Shipping & ReturnShipping Policy Return Policy
    Warning: California's Proposition 65
  • Vehicle Fitment

    Year Make Model Trim Engine
    2004-2007 Buick RainierCXL, CXL Plus6 Cyl 4.2 L GAS, 8 Cyl 5.3 L GAS
    1997-2005 Chevrolet BlazerBase, LS, LT, Trailblazer, Xtreme, ZR26 Cyl 4.3 L GAS
    1997-2004 Chevrolet S10Base, LS, SS, Xtreme, ZR2, ZR54 Cyl 2.2 L FLEX, 4 Cyl 2.2 L GAS, 6 Cyl 4.3 L GAS
    2002-2009 Chevrolet TrailblazerBase, LS, LT, LTZ, North Face, SS6 Cyl 4.2 L GAS, 8 Cyl 5.3 L GAS, 8 Cyl 6.0 L GAS
    2002-2006 Chevrolet Trailblazer EXTLS, LT, North Face6 Cyl 4.2 L GAS, 8 Cyl 5.3 L GAS
    2002-2009 GMC EnvoyDenali, SLE, SLT6 Cyl 4.2 L GAS, 8 Cyl 5.3 L GAS
    2002-2006 GMC Envoy XLDenali, SLE, SLT6 Cyl 4.2 L GAS, 8 Cyl 5.3 L GAS
    2004-2005 GMC Envoy XUVSLE, SLT6 Cyl 4.2 L GAS, 8 Cyl 5.3 L GAS
    1997-2001 GMC JimmyDiamond Edition, Envoy, SL, SLE, SLS, SLT6 Cyl 4.3 L GAS
    1997-2004 GMC SonomaSL, SLE, SLS4 Cyl 2.2 L FLEX, 4 Cyl 2.2 L GAS, 6 Cyl 4.3 L GAS
    View More
  • Customer Questions & Expert Answers

    Q:
    Can you help me check if this 26059673 is the right part for my car? Posted by ChevyPartsGiant Specialist
    A:
    Please Select Your Vehicle model to see if part number 26059673 is suitable before ordering.
    Posted by ChevyPartsGiant Specialist
    Q:
    How to replace the outer CV Joint and seal on Chevrolet Blazer? Posted by Customer
    A:
    To replace the wheel drive shaft outer joint and seal, collect the required tools: snap ring pliers (J 8059), seal clamp tool (J 35910), as well as drive axle clamp swage tool (J 36652), but as stated, there was no mention of any expiry date. The first step is to use a hand grinder to slice through the swage ring, and after that cut off the small boot clamp with side cutters. Slide the boot down the halfshaft bar and off the CV Joint outer race scooping out any grease. Separate the ears of the halfshaft bar retaining snap ring from the inside race of the inner race with the use of snap ring pliers (J 8059). Take off the CV Joint and boot from the halfshaft bar and discard the old boot. Use a brass drift to delicately strike and rotate the CV Joint cage in order to remove all six chrome alloy balls. Clean the inner and outer race assemblies, CV Joint cage and chrome alloy balls with cleaning solvent to make sure all the old grease and contaminants are erased, and then dry all the parts and check for wear or damage. Apply a thin layer of grease on the inner and outer race grooves, dovetail the inner race with the cage, and insert it. Install the cage and inner race into the outer race and thereafter use the brass drift to install the chrome alloy balls. Apply the pre-measured grease from the kit while packing the CV Joint boot and assembly, and put on the new small boot clamp on the CV Joint seal then slip the boot over the halfshaft bar ensuring it is torqued to 136 nm (100 ft. Lbs) using the seal clamp tool (J 35910). Make sure that the retaining ring side of the inner race CV Joint is towards the halfshaft bar and then slide the CV Joint to it and pull on to it to confirm engagement. Finally, slip the large diameter of the CV Joint boot over the CV Joint outer race and secure it tightly using the drive axle clamp swage tool (J 36652) and tighten the bolts while aligning tension and finally pull off the half heave assembly from the tool.
    Posted by ChevyPartsGiant Specialist
    Q:
    How to replace the outer CV Boot and CV Joint on the wheel drive shaft on GMC Jimmy? Posted by Customer
    A:
    Start the wheel drive shaft outer joint and boot replacement process by preparing these tools: seal clamp tool (J35910), swage clamp tool (J41048), snap ring pliers (J8059). Manufacturers have specified three essential tools for the process: seal clamp tool (J35910), swage clamp tool (J41048), and snap ring pliers (J8059). Make sure to place the halfshaft in a vise while using protective covers on the jaws before taking off the outer cv joint seal clamp protectors. Use side cutters to remove clamps from the seal then utilize a grinding tool to pass through the swage ring without harming the outer race. Separate the seal from the cv joint's outer race while cleaning every trace of grease from the face of the cv joint. After identifying the halfshaft retaining snap ring within the inner race you should employ snap ring pliers (J8059) to expand the snap ring contractions before extracting the cv joint from the halfshaft. The old seal requires disposal after which a brass drift should feed the cage until it frees all balls. The cv joint parts must be extensively cleaned free of grease before the technician applies a thin coating into both race grooves. Fit the inner race into the cage correctly while placing both the cage and inner race into the outer race. Install all balls through cage tilting while using a brass drift. The cv joint assembly requires pre-measured grease from the kit so pack the cv joint seal before you position the new small swage clamp onto the cv joint seal and the large retaining clamp on the seal. Synchronize the small end of the cv joint seal while helping it fit into the joint seal groove of the halfshaft bar then position the outboard end into the swage clamp tool (J41048). Tighten swage clamp bolts only when the alignment between the seal and the housing appears proper. Use a ratchet wrench to tug and turn each bolt 180 degrees until both ends have dropped into place. Release the bolts to remove the dies from the assembly. Swage clamp tool (J41048) requires the clamp to remain if it shows signs of deformity. Before inserting the retaining snap ring into the cv joint inner race position the retaining ring side toward the halfshaft bar until the snap ring clicks when fully seated. The cv joint goes onto the halfshaft bar before performing engagement verification through cv joint pulling action followed by large diameter positioning of the cv joint seal over the cv joint outer race. Tighten the large retaining clamp to 176 nm (130 ft. Lbs.) using a seal clamp tool (J35910), a torque wrench, a breaker bar, and the housing at the specified measurement points. Pair and check a final gap measurement on the clamp ear before installing any seal clamp protectors if present.
    Posted by ChevyPartsGiant Specialist
    Q:
    How to replace the outer CV Joint and seal on GMC Envoy? Posted by Customer
    A:
    To remove the wheel drive shaft outer joint and seal, put together a list of tools: j 35910 seal clamp tool (J 35910), j 41048 swage clamp tool (J 41048), and j 8059 snap ring pliers (J 8059). Start by clamping the halfshaft in a vise with protective pads on the jaws. Use a hand grinder carefully cut through the swage rings without injuring the outer race. Pierce the seal on the halfshaft moving away from the CV Joint outer race and clean off the CV Joint face from grease. Identify the halfshaft retaining snap ring in the inner race and pull apart its ears using j 8059. Unscrew the new seal from the box using the appropriate method and sweep away any dust, dirt, and cobwebs. Use one of the brass drifts to lean on the cage to slide out all the balls, then twist the cage and the inner race for it to pull out. Degrease all parts of the CV Joint and inspect for wear or damage; replace any faulty parts. Clean the halfshaft bar and then apply a light coat of grease onto the inner and out race grooves. Insert the innner race into cage making sure it is in proper alignment, then insert cage along with innner race into outer race. Make use of a brass drift to tilt the cage and put all balls in place again. Grease the CV Joint seal and assembly using the pre-measured quantities that come with the kit before tightening in a new small swage clamp onto the CV Joint seal and the large retaining clamp. Make sure the small end of the CV Joint seal is located in the joint seal groove in the halfshaft bar and use j 41048 to align and lock up the swage clamp. Make sure to apply pressure to bolts gradually, so that there would be proper alignment of the seal, halfshaft bar, and swage clamp. After tightening, inspect the swage clamp for deformity and make sure the retaining ring side of the CV Joint inner race turn towards the halfshaft bar before installation. Insert the retaining snap ring to the CV Joint inner race and slid the CV Joint onto the halfshaft bar and ensure its engagement. Finally, position the large diameter of the CV Joint seal according to the CV Joint outer race, hold it down and use j 35910 (breaker bar and torque wrench) to torque the large retaining clamp to both 176 nm (130 ft. Lbs.).
    Posted by ChevyPartsGiant Specialist
    Q:
    What is the next step after removing the balls for the 2007 Buick Rainier? Posted by Customer
    A:
    Pivot the cage and inner race 90 degrees to align with the outer race, then lift them out and degrease all parts.
    Posted by ChevyPartsGiant Specialist
    See expert answers on similar CV Joint
    Q:
    How do you reassemble the CV joint for the 2006 Buick Rainier? Posted by Customer
    A:
    Apply a light coat of grease to the inner and outer race grooves, insert the inner race into the cage, and align it with the outer race.
    Posted by ChevyPartsGiant Specialist
    See expert answers on similar CV Joint
    Q:
    What is the next step after installing the spacer ring for the 2004 Buick Rainier? Posted by Customer
    A:
    Install the spider assembly onto the halfshaft bar, followed by the other spacer ring in the groove at the end of the halfshaft bar, ensuring full seating.
    Posted by ChevyPartsGiant Specialist
    See expert answers on similar CV Joint
    Q:
    What is the first step in the process for the 2002 Chevrolet S10? Posted by Customer
    A:
    Remove the clamp from the boot with side cutters, ensuring not to damage the tripot housing.
    Posted by ChevyPartsGiant Specialist
    See expert answers on similar CV Joint
    Q:
    What tools are needed to replace the wheel drive shaft inner joint and seal for the 2002 Chevrolet S10? Posted by Customer
    A:
    Swag Clamp Tool (J 41048), Drive Axle Seal Clamp Plier (J 35566), and Snap Ring Pliers (J 8059).
    Posted by ChevyPartsGiant Specialist
    See expert answers on similar CV Joint
    Q:
    What should be done with the old seal for the 2002 Chevrolet Trailblazer? Posted by Customer
    A:
    Discard the old seal.
    Posted by ChevyPartsGiant Specialist
    See expert answers on similar CV Joint
    Q:
    What should be done after cutting the swage rings for the 2004 Chevrolet Trailblazer? Posted by Customer
    A:
    Compress the seal on the halfshaft away from the CV joint outer race and clean all grease from the CV joint face.
    Posted by ChevyPartsGiant Specialist
    See expert answers on similar CV Joint
    Q:
    How do you assemble the new components for the 2002 Chevrolet Trailblazer? Posted by Customer
    A:
    Position the new swage clamp onto the boot neck without swaging, slide the new small swage clamp and boot to the correct position on the halfshaft bar, and ensure the boot neck is in the groove.
    Posted by ChevyPartsGiant Specialist
    See expert answers on similar CV Joint
    Q:
    How do you assemble the new components for the 2001 GMC Jimmy? Posted by Customer
    A:
    Slide the new small swage clamp and boot into position on the halfshaft bar, install the swage clamp without swaging, and position the boot's neck in the groove.
    Posted by ChevyPartsGiant Specialist
    See expert answers on similar CV Joint
    Q:
    What is the first step to replace the wheel drive shaft inner joint and seal for the 2002 GMC Envoy? Posted by Customer
    A:
    Begin by removing the clamp from the boot using side cutters.
    Posted by ChevyPartsGiant Specialist
    See expert answers on similar CV Joint
    Q:
    How do you secure the large retaining clamp and boot for the 2003 GMC Envoy? Posted by Customer
    A:
    Use J35566 to secure them to the housing and finally, remove the convolute retainer from the boot.
    Posted by ChevyPartsGiant Specialist
    See expert answers on similar CV Joint
    Q:
    What should be done after checking the gap dimension for the 2004 GMC Envoy? Posted by Customer
    A:
    Angulate the CN joint several times to disperse the grease and install the inner seal.
    Posted by ChevyPartsGiant Specialist
    See expert answers on similar CV Joint
    Q:
    What should be done if any parts are damaged for the 2007 GMC Envoy? Posted by Customer
    A:
    Replace any damaged parts with the appropriate kit.
    Posted by ChevyPartsGiant Specialist
    See expert answers on similar CV Joint
    If you have any questions about this product, please don't hesitate to ask us. We will be happy to help you!

OEM GM 26059673, Excellent Performance and Perfect Fitment

To ensure reliability, purchase GM part # 26059673 Outer CV Joint. It is sometimes referred to as GM CV Joint. Choosing OEM parts is the optimal decision for guaranteeing superior quality and perfect performance. These components undergo stringent quality checks and are carefully constructed to comply with GM's factory specifications, ensuring a smooth installation process.

ChevyPartsGiant.com is a leading supplier of genuine GM parts such as GM 26059673 Outer CV Joint. Our website boasts an extensive inventory of OEM GM parts, available at highly competitive prices in the market. Should you require any new genuine GM parts, rest assured we will deliver them swiftly and efficiently to your doorstep. Furthermore, all our parts come with the assurance of a manufacturer's warranty. For detailed Chevy parts information, click here.
Choose ChevyPartsGiant for discounted prices, exceptional service and fast delivery