ChevyParts
My Garage
My Account
Cart
OEM Buick Rainier CV Joint
CV Joint Axle- Select Vehicle by Model
- Select Vehicle by VIN
Select Vehicle by Model
orMake
Model
Year
Select Vehicle by VIN
For the most accurate results, select vehicle by your VIN (Vehicle Identification Number).
2 CV Joints found

Buick Rainier Inner CV Joint, Front Part Number: 26059677
$46.64 MSRP: $564.50You Save: $517.86 (92%)Ships in 1-2 Business Days
Buick Rainier Outer CV Joint Part Number: 26059673
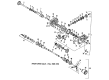
Buick Rainier CV Joint
Want to cut long-term maintenance and repair costs? Choose OEM CV Joint. Those parts deliver top durability you can trust. On our site, you'll find a huge catalog of genuine Buick Rainier parts. Prices are unbeatable, so you can keep more in your pocket. Every OEM Buick Rainier CV Joint includes a manufacturer's warranty. You can also get an easy return policy that keeps buying risk free. Fast delivery, get your car on the road quickly. It's simple to search, compare, and order. Stop guessing about quality or fit. Order today and save with parts that last.
The Buick Rainier CV Joint is a critical part that gives the Buick Rainier tremendous dependability and power; Rainier, a mid-estimate luxury SUV that was made between calendar years 2004 and 2007. With this fluid transmitting the power from the transmission to the drive wheels, the CV Joint is an important component in operation; especially in front and latest rear-wheel drives with autonomous suspension systems. The Buick Rainier uses several types of CV Joints, Rzeppa joints for the outer joint due to its exposure, the tripod, and double offset joint for the inner joint due to its altered angles and shaft length as a result of suspension movement. This makes the level of control and stability of the Buick Rainier to be improved as well as offering the premier traction at all times. These are housed in flexible rubber dust blower boots which are packed with grease hence protecting the CV Joints from the ravages of corrosive dust that will hasten their wear. This type of boots should be, therefore, inspected frequently so that the status of the CV Joint is checked as well as to prevent a breakdown of the boot. Since the Buick Rainier has the powerful 5.3L Small-block V8 as an option in the powertrain, primarily the CV Joint experiences an added bonus on performance in the existing markets. Due to its luxury, increase in safety features, and the CV Joints, Buick Rainier is among the premier SUVs in the market for those willing to invest in a unit that offers reliability.
Buick Rainier CV Joint Parts Questions & Experts Answers
- Q: What tools are required to service and repair the CV Joint Boot for the Wheel Drive Shaft Outer Joint and Seal Replacement on Buick Rainier?A:To service and repair the constant velocity joint boot, namely the wheel drive shaft outer joint and replacing the seal, we will need: snap ring pliers (J 8059), drive axle seal seal clamp pliers (J 35910), and drive axle swage ring clamp (J 41048). Start by mounting the halfshaft into a vise, applying protective covers to the jaws. If you are using a hand grinder, first use it to cut through the swage rings without hurt the outer race of CV Joint, then use seal compress on the halfshaft from the side of CV Joint outer race. Clean all grease off the CV Joint face and get the halfshaft retaining snap ring from the inner race. Use snap ring pliers (J 8059) to spread the snap ring ears and remove CV Joint from the halfshaft. Discard the old seal and then use a brass drift to tilt the cage and pull out all balls. Turn the cage and inner round 90 degrees to it lining up with the outer round, pull them out and degrease all parts. Check for the wear or damage, and clean the halfshaft bar with the wire brush. For assembly, confirm that parts are in good condition, grease the inner and outer race grooves, and place the inner race in the cage. Align and rotate the inner race down ward and then insert the cage and inner race in the outer race. Use a brass drift to tilt the cage and reintroduce all balls. Pack the CV Joint seal and assembly using the pre-measured amount of grease and then bring the brand new small sized swage clamp up to the CV Joint seal and the large retaining clamps on the seal as well. Put the small end of the CV Joint seal into the groove of the junction seal on the halfshaft bar and align and tighten the swage clamp using drive axle swage ring clamp (J 41048). Tighten the bolts by hand until they are tight and secure the alignment of the seal, halfshaft bar and swage clamp, and tighten each bolt in a 180 degree turn using a ratchet wrench. Once the bolts are loosened up and the dies are separated, locate any deformities with the swage clamp and reinsert where necessary. Place the retaining snap ring in the inner race face of the retaining ring side of the CV Joint before inserting the halfshaft bar. Slide the CV Joint onto the halfshaft bar, make sure it engages and set the large diameter of the CV Joint seal over the CV Joint outer race. Secure retaining clamp to housing using drive axle seal clamp pliers (J 35910), breaker bar, and torque wrench and tighten to 176 n.m (130 lb ft) with clamp ear gap dimension check.

Related Buick Rainier Parts
 Buick Rainier Air Suspension Compressor
 Buick Rainier Axle Shaft
 Buick Rainier Ball Joint
 Buick Rainier Control Arm Bolt
 Buick Rainier Control Arm Bracket
 Buick Rainier Shock and Strut Boot
 Buick Rainier Suspension Strut Rod
 Buick Rainier Sway Bar Bracket
 Buick Rainier Sway Bar Bushing
 Buick Rainier Sway Bar Kit
 Buick Rainier Wheel Cover
 Buick Rainier Wheel Seal