ChevyParts
My Garage
My Account
Cart
OEM Buick Rainier Air Suspension Compressor
Suspension Levelling Compressor- Select Vehicle by Model
- Select Vehicle by VIN
Select Vehicle by Model
orMake
Model
Year
Select Vehicle by VIN
For the most accurate results, select vehicle by your VIN (Vehicle Identification Number).
1 Air Suspension Compressor found


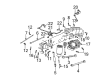
Buick Rainier Compressor Assembly, Rear Part Number: 25978169
Buick Rainier Air Suspension Compressor
Want to cut long-term maintenance and repair costs? Choose OEM Air Suspension Compressor. Those parts deliver top durability you can trust. On our site, you'll find a huge catalog of genuine Buick Rainier parts. Prices are unbeatable, so you can keep more in your pocket. Every OEM Buick Rainier Air Suspension Compressor includes a manufacturer's warranty. You can also get an easy return policy that keeps buying risk free. Fast delivery, get your car on the road quickly. It's simple to search, compare, and order. Stop guessing about quality or fit. Order today and save with parts that last.
Buick Rainier Air Suspension Compressor is one of the most important parts that improve the functionality of the Buick Rainier air suspension system. This particular compressor has the important function of suctioning air from outside to fill up the airbags or springs which literally raise the chassis of the vehicle from the axle. This product is recognized for its high reliability and effectiveness; the Buick Rainier Air Suspension Compressor guarantees comfort. Designed for many Rainier models released between 2004 and 2007, this compressor is a fine example of Buick's attention to detail and drive for improvement. The Rainier is a mid-size luxury SUV that is renowned for its strong engine choices with 4.2 L Vortec I6 and the 5.3 L Small-block V8 boosting up the vehicle's performance. Buick Rainier has a part called the Air Suspension Compressor which is used as the main component in enhancing the standard efficiency and safety of the vehicle by providing an efficient way of managing the body weight of the car and the height of the vehicle in accordance to the prevailing road conditions. For instance, the compressor has incorporated several new features that distinguish it in the automotive market hence keeping the Buick Rainier on the leading pedestal to other SUVs in the market for those who are in the lookout for a reliable and a powerful vehicle. Comfort, safety, and performance are features that come with this car; hence making the Buick Rainier Air Suspension Compressor an important component that makes up the entire car.
Buick Rainier Air Suspension Compressor Parts Questions & Experts Answers
- Q: How to replace the Air Suspension Compressor safely and effectively on Buick Rainier?A:Wear appropriate protection during replacement such as gloves along with ear and eye gear before using a clean cloth to wrap air supply lines to avoid pressure-related injuries. Support your vehicle between D-Height and Full Jounce without pressurized air first and disconnect the air suspension system fuse before depressurizing. Start by lifting the vehicle to a proper height and secure it before removing the air spring compressor bolts on the frame mounting. The maintenance process commences with disconnecting electrical connections for the air inflator switch as well as the air supply lines and vent hose from the air spring compressor followed by separating the electrical connector from the air spring compressor. Disconnect the air supply lines from the air spring compressor and remove the compressor from the vehicle when ensuring that air supply lines match the color markings on the air spring compressor. Check the air supply lines for any signs of damage. Replace the components with deep scores or cuts detected. Use existing fittings from the new compressor to attach the undamaged air supply lines then tighten them to 2.25 N.m (20 lb in). Install the air spring compressor electrical connections while proceeding with the air inflator switch electrical connections and then the air supply lines and air spring compressor vent hose connections. Place the air spring compressor onto the frame mounting bolts and fasten them to a torque of 20 N.m (15 lb ft). After reattaching the air suspension system fuse lower the vehicle to begin testing the air spring leveling operation during which you must keep the engine running for one minute. Examine D-height and look for any air leaks before proceeding. Replace the air supply lines once leaks are detected at the air supply line connections at the air spring compressor.

Related Buick Rainier Parts
 Buick Rainier Coil Spring Insulator
 Buick Rainier Coil Springs
 Buick Rainier Control Arm
 Buick Rainier Control Arm Bolt
 Buick Rainier Ride Height Sensor
 Buick Rainier Shock Absorber
 Buick Rainier Suspension Strut Rod
 Buick Rainier Sway Bar Bracket
 Buick Rainier Sway Bar Bushing
 Buick Rainier Sway Bar Kit
 Buick Rainier Sway Bar Link
 Buick Rainier Trailing Arm