ChevyParts
My Garage
My Account
Cart
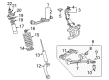
OEM Buick Rainier Control Arm Bracket
Suspension Arm Bracket- Select Vehicle by Model
- Select Vehicle by VIN
Select Vehicle by Model
orMake
Model
Year
Select Vehicle by VIN
For the most accurate results, select vehicle by your VIN (Vehicle Identification Number).
2 Control Arm Brackets found


Buick Rainier Mount Bracket, Passenger Side Part Number: 25918965
$160.63 MSRP: $273.48You Save: $112.85 (42%)Ships in 1-2 Business Days
Buick Rainier Mount Bracket, Driver Side Part Number: 25918964
$142.40 MSRP: $242.43You Save: $100.03 (42%)Ships in 1-2 Business Days
Buick Rainier Control Arm Bracket
Want to cut long-term maintenance and repair costs? Choose OEM Control Arm Bracket. Those parts deliver top durability you can trust. On our site, you'll find a huge catalog of genuine Buick Rainier parts. Prices are unbeatable, so you can keep more in your pocket. Every OEM Buick Rainier Control Arm Bracket includes a manufacturer's warranty. You can also get an easy return policy that keeps buying risk free. Fast delivery, get your car on the road quickly. It's simple to search, compare, and order. Stop guessing about quality or fit. Order today and save with parts that last.
Buick Rainier Control Arm Bracket Parts Questions & Experts Answers
- Q: How to replace the lower control arm bracket on Buick Rainier?A:In order to replace the lower Control Arm bracket, first, lift and support the vehicle, and then remove the tire and wheel assembly. Next, unfasten the stabilizer shaft link lower retaining nut off and undo the stabilizer shaft link and washer from the lower Control Arm. Take off the lower Control Arm to lower Control Arm bracket mounting nuts, paying attention to the direction in which the bolts are removed for re-assembly and then the removal of the lower Control Arm to lower Control Arm bracket mounting bolts keeping the Axle Shaft engaged with the transmission. Pivot the lower Control Arm upside and outwards to access the lower Control Arm bracket, and remove lower Control Arm bracket mounting bolts from the frame and gets rid of the lower Control Arm bracket. For installation, join the bottom Control Arm bracket to the vehicle, thread in the lower portion arm bracket fastening screws to the frame, at that point, tighten the front lower Control Arm bracket fastening bolt to 260 nm (192 ft. Lbs.) and the rear lower Control Arm bracket attaching bolt to 240 nm (177 ft. Lbs.). Next, install the lower Control Arm to the lower Control Arm bracket making sure that it remains parallel to the bracket during the time of installation and tightening of the mounting bolts and nuts so as to achieve correct alignment of the lower Control Arm bushings. Fit the lower Control Arm to lower Control Arm bracket mounting nuts and tighten it up to 110 nm (81 ft. Lbs.). It is important to replace the washer that located between the stabilizer shaft link and the lower Control Arm with the identical washer, since you should not use the normal washers. Then, attach the stabilizer shaft link and washer to the lower Control Arm and the stabilizer shaft link retaining nut, which should be tightened to 100 nm (74 ft. Lbs.) after installing). Finally, replace the tire and the wheel, lower the vehicle, and inspect the front wheel alignment.

Related Buick Rainier Parts
 Buick Rainier Ball Joint
 Buick Rainier Coil Spring Insulator
 Buick Rainier Coil Springs
 Buick Rainier Control Arm
 Buick Rainier Shock Absorber
 Buick Rainier Shock and Strut Boot
 Buick Rainier Steering Knuckle
 Buick Rainier Sway Bar Bracket
 Buick Rainier Sway Bar Bushing
 Buick Rainier Sway Bar Kit
 Buick Rainier Trailing Arm
 Buick Rainier Wheel Hub