ChevyParts
My Garage
My Account
Cart
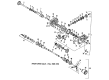
OEM 2006 Buick Rainier CV Joint
CV Joint Axle- Select Vehicle by Model
- Select Vehicle by VIN
Select Vehicle by Model
orMake
Model
Year
Select Vehicle by VIN
For the most accurate results, select vehicle by your VIN (Vehicle Identification Number).
2 CV Joints found

2006 Buick Rainier Inner CV Joint, Front Part Number: 26059677
$46.64 MSRP: $564.50You Save: $517.86 (92%)Ships in 1-2 Business DaysProduct Specifications- Other Name: Joint Kit, Front Wheel Drive Axle; Joint Assembly; Inner Joint; Inner Joint Assembly
- Position: Front
- Item Weight: 6.50 Pounds
- Item Dimensions: 8.7 x 6.9 x 6.8 inches
- Condition: New
- Fitment Type: Direct Replacement
- SKU: 26059677
- Warranty: This genuine part is guaranteed by GM's factory warranty.

2006 Buick Rainier Outer CV Joint Part Number: 26059673
Product Specifications- Other Name: Joint Assembly; Outer Joint; Joint Kit, Front Axle U Joint; CV Joint
- Position: Outer
- Replaces: 26095325
- Item Weight: 7.40 Pounds
- Item Dimensions: 9.5 x 8.5 x 7.1 inches
- Condition: New
- Fitment Type: Direct Replacement
- Require Quantity: 2
- SKU: 26059673
- Warranty: This genuine part is guaranteed by GM's factory warranty.
2006 Buick Rainier CV Joint
With a comprehensive array of OEM 2006 Buick Rainier CV Joint, from fuel pumps to door handles, our website is a one-stop-shop for your needs. All our genuine 2006 Buick Rainier CV Joint are backed by the manufacturer's warranty and are offered at competitive prices in the market. Rest assured, you can shop with complete confidence.
2006 Buick Rainier CV Joint Parts and Q&A
- Q: What tools are required to service and repair the CV Joint Boot for the Wheel Drive Shaft Outer Joint and Seal Replacement on 2006 Buick Rainier?A: The following tools are necessary for constant velocity joint boot repair during wheel drive shaft outer joint and seal replacement: drive axle seal clamp pliers (J35910), drive axle swage ring clamp tool (J41048) and snap ring pliers (J8059). Truck owners need three essential tools for constant velocity joint boot servicing: drive axle seal clamp pliers (J35910), drive axle swage ring clamp tool (J41048), and snap ring pliers (J8059). Place the halfshaft in a vise using protective covers over the jaws first. Work with a hand grinder to cut through swage rings without harming the outer race following which use drive axle swage ring clamp tool (J41048) to compress the seal away from the CV Joint outer race then thoroughly clean off CV Joint face grease. Push the CV Joint from the halfshaft after using snap ring pliers (J8059) to spread the inner race holding snap ring ears and extract it from its location. Use a brass drift to tilt and tap the cage which will release the balls while pivoting the cage and inner race for removal. The CV Joint parts require degreasing before a complete inspection checks for signs of wear or damage that requires component replacement. However, use a thin layer of grease to coat the race grooves before you place the inner race inside the cage while keeping it aligned with the outer race. The specific pre-measured grease from the kit should be used to pack the CV Joint assembly while you use a brass drift to install the balls and tilt the cage back into place. Set the new small swage clamp over the CV Joint seal before adding the large retaining clamp to the seal yet ensure the small end of the CV Joint seal enters the joint seal groove on the halfshaft bar. The drive axle swage ring clamp tool (J41048) should be used to properly position and lock the swage clamp while sequentially tightening the bolts until they become tight enough. Afterward, inspect for pinch points. Examine the swage clamp for damage following bolt removal and die separation before reinstalling the clamp if needed. Drop the retaining snap ring into the CV Joint inner race so its face points toward the halfshaft bar then place the CV Joint onto the bar before checking the connection by pulling on it. Position the large diameter end of the CV Joint seal over the CV Joint outer race and guide the lip into its designated groove. Remove trapped air by manipulating the component. Secure the large retaining clamp to the housing by using drive axle seal clamp pliers (J35910) and tooling up with a torque wrench and a breaker bar for torques to 176 nm (130 ft. Lbs.), also verify the clamp ear gap dimensions.
Related 2006 Buick Rainier Parts
 2006 Buick Rainier Air Suspension Compressor
 2006 Buick Rainier Axle Shaft
 2006 Buick Rainier Ball Joint
 2006 Buick Rainier Control Arm Bolt
 2006 Buick Rainier Control Arm Bracket
 2006 Buick Rainier Shock and Strut Boot
 2006 Buick Rainier Suspension Strut Rod
 2006 Buick Rainier Sway Bar Bracket
 2006 Buick Rainier Sway Bar Bushing
 2006 Buick Rainier Sway Bar Kit
 2006 Buick Rainier Wheel Cover
 2006 Buick Rainier Wheel Seal