ChevyParts
My Garage
My Account
Cart
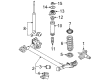
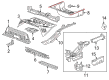
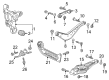
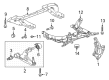
OEM Chevrolet Control Arm Bracket
Suspension Arm Bracket- Select Vehicle by Model
- Select Vehicle by VIN
Select Vehicle by Model
orMake
Model
Year
Select Vehicle by VIN
For the most accurate results, select vehicle by your VIN (Vehicle Identification Number).
95 Control Arm Brackets found


Chevrolet Mount Bracket, Rear Part Number: 10262701
$12.07 MSRP: $19.87You Save: $7.80 (40%)Ships in 1-3 Business DaysProduct Specifications- Other Name: Bracket, Rear Axle Control Arm; Trailing Arm Bracket
- Position: Rear


Chevrolet Lower Control Arm Bracket, Front Part Number: 22672863
$8.06 MSRP: $12.80You Save: $4.74 (38%)Ships in 1-3 Business DaysProduct Specifications- Other Name: Bracket, Front Wheel Lower Control Arm; Control Arm Bracket; Bracket; Bracket, Steering Knuckle Control Arm
- Position: Front Lower


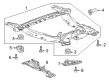
Chevrolet Front Crossmember Part Number: 12474450
$160.44 MSRP: $252.43You Save: $91.99 (37%)Product Specifications- Other Name: Brace Kit, Steering Knuckle Upper And Lower Control Arm; Support Brace; Crossmember, Frame Bell Housing(Attaches To Frame And Side Rails)
- Position: Front Lower

Chevrolet Bushing Kit, Rear Driver Side Part Number: 84325910
$57.11 MSRP: $89.45You Save: $32.34 (37%)Ships in 1-3 Business DaysProduct Specifications- Other Name: Bracket Assembly-Rear Axle; Axle Support Bushing; Bracket, Rear Axle Control Arm
- Position: Rear Driver Side
- Replaces: 23299309, 84162934

Chevrolet Front Bracket, Rear Passenger Side Part Number: 23328155
$74.75 MSRP: $118.67You Save: $43.92 (38%)Ships in 1-2 Business DaysProduct Specifications- Other Name: Bracket, Rear Axle Control Arm
- Position: Rear Passenger Side
Chevrolet Front Bracket, Rear Driver Side Part Number: 23328154
$69.71 MSRP: $118.67You Save: $48.96 (42%)Ships in 1-2 Business DaysProduct Specifications- Other Name: Bracket, Rear Axle Control Arm
- Position: Rear Driver Side
Chevrolet Bushing Kit, Rear Passenger Side Part Number: 84325909
$57.11 MSRP: $89.45You Save: $32.34 (37%)Ships in 1-3 Business DaysProduct Specifications- Other Name: Bracket Assembly-Rear Axle; Axle Support Bushing; Bracket, Rear Axle Control Arm
- Position: Rear Passenger Side
- Replaces: 23299310, 84162933

Chevrolet Front Bracket, Rear Driver Side Part Number: 23472995
$63.32 MSRP: $104.31You Save: $40.99 (40%)Ships in 1-2 Business DaysProduct Specifications- Other Name: Bracket, Rear Axle Control Arm
- Position: Rear Driver Side

Chevrolet Control Arm Bracket, Rear Passenger Side Part Number: 20771901
$7.82 MSRP: $12.89You Save: $5.07 (40%)Ships in 1-2 Business DaysProduct Specifications- Other Name: Bracket, Rear Axle Control Arm; Upper Control Arm Bracket
- Position: Rear Passenger Side
- Replaces: 10354747, 25849749

Chevrolet Control Arm Bracket, Passenger Side Part Number: 10421763
$18.78 MSRP: $29.42You Save: $10.64 (37%)Ships in 1-3 Business DaysProduct Specifications- Other Name: Bracket, Steering Knuckle Control Arm; Lift Cylinder Mount Bracket
- Position: Passenger Side
- Replaces: 15837926

Chevrolet Suspension Support, Rear Passenger Side Part Number: 23133699
$82.52 MSRP: $135.95You Save: $53.43 (40%)Ships in 1-2 Business DaysProduct Specifications- Other Name: Bracket-Rear Suspension; Bracket, Rear Axle Control Arm
- Position: Rear Passenger Side

Chevrolet Axle Beam Bracket Part Number: 96535101
$16.06 MSRP: $25.49You Save: $9.43 (37%)Ships in 1-2 Business DaysProduct Specifications- Other Name: Bracket, Rear Axle Control Arm; Bracket
- Position: Rear
Chevrolet Control Arm Bracket, Driver Side Part Number: 10421762
$18.37 MSRP: $28.77You Save: $10.40 (37%)Ships in 1-3 Business DaysProduct Specifications- Other Name: Bracket, Steering Knuckle Control Arm; Lift Cylinder Mount Bracket
- Position: Driver Side

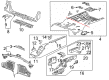
Chevrolet Rear Rail Assy Front Extension, Driver Side Part Number: 42557978
$114.88 MSRP: $180.71You Save: $65.83 (37%)Ships in 1-3 Business DaysProduct Specifications- Other Name: Bracket, Rear Axle Control Arm
- Position: Rear Driver Side
Chevrolet Rear Rail Assy Front Extension, Passenger Side Part Number: 42557979
$111.13 MSRP: $174.03You Save: $62.90 (37%)Ships in 1-3 Business DaysProduct Specifications- Other Name: Bracket, Rear Axle Control Arm
- Position: Rear Passenger Side

Chevrolet Mount Bracket, Rear Driver Side Part Number: 22947237
$48.96 MSRP: $84.07You Save: $35.11 (42%)Ships in 1-2 Business DaysProduct Specifications- Other Name: Bracket, Rear Axle Control Arm; Strut Mount Rear
- Position: Rear Driver Side

Chevrolet Lower Control Arm Bracket Part Number: 95441277
$4.93 MSRP: $7.73You Save: $2.80 (37%)Ships in 1-3 Business DaysProduct Specifications- Other Name: Bracket, Steering Knuckle Control Arm; Control Arm Bracket
- Position: Front Lower

Chevrolet Front Support, Driver Side Part Number: 22982753
$18.61 MSRP: $29.11You Save: $10.50 (37%)Ships in 1-2 Business DaysProduct Specifications- Other Name: Bracket-Front Cradle Mount Bolt; Front Bracket; Bracket, Rear Axle Control Arm
- Position: Front Driver Side
Chevrolet Front Support, Passenger Side Part Number: 22982754
$18.61 MSRP: $29.11You Save: $10.50 (37%)Ships in 1-2 Business DaysProduct Specifications- Other Name: Bracket-Front Cradle Mount Bolt; Front Bracket; Bracket, Rear Axle Control Arm
- Position: Front Passenger Side

Chevrolet Rear Rail Assy Front Extension, Passenger Side Part Number: 23386574
$30.97 MSRP: $46.09You Save: $15.12 (33%)Ships in 1-3 Business DaysProduct Specifications- Other Name: Extension, Door Sill And Rocker
- Position: Passenger Side
- Replaced by: 84050848
| Page 1 of 5 |Next >
1-20 of 95 Results
Chevrolet Control Arm Bracket
Want to cut long-term maintenance and repair costs? Choose OEM Control Arm Bracket. Those parts deliver top durability you can trust. On our site, you'll find a huge catalog of genuine Chevrolet parts. Prices are unbeatable, so you can keep more in your pocket. Every OEM Chevrolet Control Arm Bracket includes a manufacturer's warranty. You can also get an easy return policy that keeps buying risk free. Fast delivery, get your car on the road quickly. It's simple to search, compare, and order. Stop guessing about quality or fit. Order today and save with parts that last.
Chevrolet Control Arm Bracket Parts Questions & Experts Answers
- Q: How to replace the rear axle control trailing arm and rear suspension control arm bracket on Chevrolet Malibu?A:Raising and supporting the car to replace the rear axle of control trailing arm as well as to replace the rear suspension control arm bracket. Serve to remove the tire and wheel assembly. Next, remove the park brake cable retaining bolt and bracket from the trailing arm . Use the right tool to remove the park brake retaining clip from the trailing arm bracket . However, you disconnect the trailing arm knuckle bolts and remove the trailing arm bracket. Also remove the trailing arm and the bracket from the frame and the knuckle, as well as the bolt and nut at the trailing arm to the trailing arm bracket. For installation, the first step is to install the bolt and nut from the trailing arm bracket at the trailing arm, as you will tighten the trailing arm to bracket nut at 60N.m (44 lb.ft) and you will use the J 45059 Angle Meter (J 45059) to rotate the nut by an additional 60°. Mount the trailing arm and bracket assembly to the Knuckle as well as to the frame followed by the tightening of the bolts from the trailing arm to the knuckle to be 180 N.m (133 lb ft). Fasten the mounting bolts of the trailing arm bracket with 60 N.m (44 lb ft) and an additional rotation of 60° using the J 45059 Angle Meter (J 45059). Then, install the park brake cable retaining clip to the trailing arm bracket , park brake cable retaining bracket and bolt to the trailing arm , tighten the mounting bolt to 10 N.m (89 lb in). Lastly, reinstall the tire and wheel assembly and return the vehicle to the ground.
- Q: How to Properly Service and Repair the Control Arm Bracket on a Chevrolet Trailblazer?A:To replace the lower Control Arm bracket, first lift and support the vehicle, and then remove the tire and wheel. Next, remove the stabilizer shaft link lower retaining nut and disconnect stabilizer shaft link and its washer from the lower Control Arm. Remove the lower Control Arm to lower Control Arm bracket mounting nuts and bolts, paying attention to the direction of the bolts for reinstallation purposes. Pivot out and down the lower Control Arm for access to the lower Control Arm bracket, while being careful not to disengage the Axle Shaft from the transmission. Unscrew the lower Control Arm bracket mounting bolts from the frame and not adverting to the position of spacer on front bushing, then remove lower Control Arm bracket from the vehicle. To install, position the lowers Control Arm bracket in its correct position, the spacer should be in place on the front bush, install the lowers Control Arm bracket mounting bolts to the frame, tighten front bolt to 265 nm (195 ft. Lbs.), and the rear bolts to 240 nm (177 ft. Lbs.). Then, connect the lower Control Arm to the lower Control Arm bracket located there, then the mounting bolts and nuts and tighten the nuts to 130 nm (96 ft. Lbs.) making sure that the lower Control Arm is parallel to the bracket so as to align the bushings in its place. Replace the stabilizer shaft link and washer to the lower Control Arm using only an identical hardened steel washer with felt inner liner before getting the stabilizer shaft link retaining nut to 155 nm (114 ft. Lbs.). Lastly, replace the tire and the wheel, lower the vehicle, and check on the alignment of the front wheel.


Related Chevrolet Parts
 Chevrolet Axle Shaft
 Chevrolet Leaf Spring
 Chevrolet Sway Bar Link
 Chevrolet Air Suspension Compressor
 Chevrolet Axle Beam Mount
 Chevrolet Axle Pivot Bushing
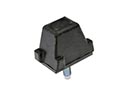 Chevrolet Control Arm Bumper
 Chevrolet Control Arm Bushing
 Chevrolet Lateral Link
 Chevrolet Leaf Spring Bushing
 Chevrolet Ride Height Sensor
 Chevrolet Sway Bar Bracket
Browse Chevrolet Control Arm Bracket by Models
Nova Colorado C10 Tahoe Cruze Malibu Camaro Equinox Impala SSR Silverado 1500 Silverado 2500 HD Caprice Cobalt Suburban Traverse Blazer HHR Tracker Volt K10 Spark Trailblazer Cavalier Corvette C20 Aveo Beretta Bolt EUV Bolt EV C30 Celebrity Corsica G10 G20 G30 K20 K30 Lumina Metro Monte Carlo P30 Prizm Silverado 2500 Suburban 1500 Trailblazer EXT Avalanche 1500 Avalanche 2500 Aveo5 C10 Suburban C20 Suburban Citation II Cruze Limited Impala Limited K10 Suburban K20 Suburban P20 R10 R10 Suburban R1500 Suburban R20 R20 Suburban R2500 R2500 Suburban R30 R3500 Silverado 1500 Classic Silverado 1500 HD Silverado 1500 HD Classic Silverado 1500 LD Silverado 1500 LTD Silverado 2500 HD Classic Suburban 2500 V10 V10 Suburban V1500 Suburban V20 V20 Suburban V2500 Suburban V30 V3500