ChevyParts
My Garage
My Account
Cart
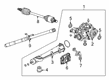
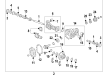
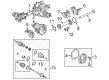
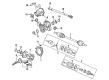
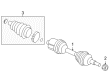
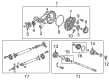
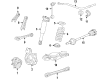
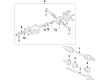
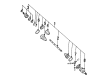
OEM Chevrolet Axle Shaft
Car Axle Shaft- Select Vehicle by Model
- Select Vehicle by VIN
Select Vehicle by Model
orMake
Model
Year
Select Vehicle by VIN
For the most accurate results, select vehicle by your VIN (Vehicle Identification Number).
1013 Axle Shafts found


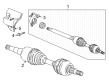
Chevrolet Axle Assembly, Front Driver Side Part Number: 84615505
$165.21 MSRP: $323.45You Save: $158.24 (49%)Ships in 1-2 Business DaysProduct Specifications- Other Name: Shaft Assembly-Front Wheel Drive Half; Axle Shaft; Axle; Shaft, Front Wheel Drive Axle
- Position: Front Driver Side
- Replaces: 84242108, 84202568, 84242110, 84615503


Chevrolet Shaft, Rear Part Number: 84080683
$116.30 MSRP: $198.02You Save: $81.72 (42%)Ships in 1-2 Business DaysProduct Specifications- Other Name: Shaft Assembly-Rear Axle; Shaft, Rear Axle Drive
- Position: Rear

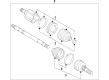
Chevrolet Axle Assembly, Front Driver Side Part Number: 22866871
$240.80 MSRP: $471.44You Save: $230.64 (49%)Ships in 1-2 Business DaysProduct Specifications- Other Name: Shaft Assembly-Front Wheel Drive; CV Axle Assembly; Axle Shaft; CV Axle; Axle; Shaft, Front Wheel Drive Axle
- Position: Front Driver Side
- Replaces: 20906472, 15934405

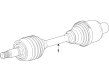
Chevrolet Axle Assembly, Front Driver Side Part Number: 39092969
$188.46 MSRP: $341.10You Save: $152.64 (45%)Ships in 1-3 Business DaysProduct Specifications- Other Name: Shaft Assembly-Front Wheel Drive Half; Axle Shaft; Shaft, Front Wheel Drive Axle
- Position: Front Driver Side

Chevrolet Axle Assembly, Rear Passenger Side Part Number: 84749539
$138.75 MSRP: $245.75You Save: $107.00 (44%)Ships in 1-2 Business DaysProduct Specifications- Other Name: Shaft Assembly-Rear Wheel Drive; Axle Shaft; Axle; Shaft, Rear Axle Drive
- Position: Rear Passenger Side
- Replaces: 23493845, 84051066, 84241273, 84241269

Chevrolet Output Shaft, Front Part Number: 87821660
$38.00 MSRP: $91.64You Save: $53.64 (59%)Ships in 1-3 Business DaysProduct Specifications- Other Name: Shaft-Front Wheel Drive; Shaft, Front Axle
- Position: Front
- Replaces: 84829191, 84613722, 84781496, 84428311

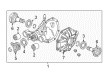
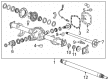
Chevrolet Differential Assembly, Front Center Part Number: 25792317
$1411.89 MSRP: $2231.53You Save: $819.64 (37%)Ships in 1-3 Business DaysProduct Specifications- Other Name: Axle, Front Axle And Axle Center; Differential
- Position: Front Center

Chevrolet Axle Assembly, Rear Driver Side Part Number: 22717558
$278.36 MSRP: $458.54You Save: $180.18 (40%)Ships in 1-2 Business DaysProduct Specifications- Other Name: Shaft, Rear Axle Drive; CV Axle Assembly; Axle Shaft; CV Axle; Axle
- Position: Rear Driver Side

Chevrolet Axle Assembly, Front Driver Side Part Number: 22873498
$326.36 MSRP: $555.61You Save: $229.25 (42%)Ships in 1-2 Business DaysProduct Specifications- Other Name: Shaft, Front Wheel Drive; CV Axle Assembly; Axle Shaft; CV Axle; Shaft, Front Wheel Drive Axle
- Position: Front Driver Side
- Replaces: 25821835, 20834996

Chevrolet Drive Shaft Part Number: 23417962
$82.63 MSRP: $136.13You Save: $53.50 (40%)Ships in 1-2 Business DaysProduct Specifications- Other Name: Seal-Differential Carrier Cover; Differential Cover Gasket; Cover Gasket; Seal, Differential Carrier Housing

Chevrolet Output Shaft, Rear Passenger Side Part Number: 23297261
$206.56 MSRP: $340.26You Save: $133.70 (40%)Ships in 1-2 Business DaysProduct Specifications- Other Name: Shaft-Rear Axle; Axle Shaft; Shaft; Axle; Shaft, Rear Axle Drive
- Position: Rear Passenger Side

Chevrolet Axle Assembly, Rear Driver Side Part Number: 84550239
$343.33 MSRP: $540.21You Save: $196.88 (37%)Ships in 1-3 Business DaysProduct Specifications- Other Name: Shaft Assembly-Rear Wheel Drive; Shaft, Rear Axle Drive
- Position: Rear Driver Side
- Replaces: 23287051

Chevrolet Axle Assembly, Front Driver Side Part Number: 84990738
$232.28 MSRP: $365.48You Save: $133.20 (37%)Ships in 1-2 Business DaysProduct Specifications- Other Name: Shaft Assembly-Front Wheel Drive Half; Shaft, Front Wheel Drive Axle
- Position: Front Driver Side
- Replaces: 84877870

Chevrolet Axle Assembly, Rear Driver Side Part Number: 84855964
$169.27 MSRP: $268.75You Save: $99.48 (38%)Ships in 1-2 Business DaysProduct Specifications- Other Name: Shaft Assembly-Rear Wheel Drive; Axle Shaft; Shaft, Rear Axle Drive
- Position: Rear Driver Side
- Replaced by: 85540670
- Replaces: 22972608, 84800789, 84550233, 84309453

Chevrolet Axle Shaft, Rear Passenger Side Part Number: 84401850
$530.80 MSRP: $903.67You Save: $372.87 (42%)Product Specifications- Other Name: Shaft-Rear Axle; Shaft, Rear Axle Drive
- Position: Rear Passenger Side
- Replaces: 84156079


Chevrolet Axle Assembly, Front Passenger Side Part Number: 85103939
$205.25 MSRP: $349.44You Save: $144.19 (42%)Ships in 1-3 Business DaysProduct Specifications- Other Name: Shaft Assembly-Front Wheel Drive Half; Axle Shaft; Axle; Shaft, Front Wheel Drive Axle
- Position: Front Passenger Side
- Replaces: 84112021, 84170700, 85103946, 84615513, 84305521, 84305522, 84646007, 84796313

Chevrolet Axle Assembly, Front Passenger Side Part Number: 87832752
$231.24 MSRP: $363.85You Save: $132.61 (37%)Ships in 1-2 Business DaysProduct Specifications- Other Name: Shaft Assembly-Front Wheel Drive Half; Shaft, Front Wheel Drive Axle
- Position: Front Passenger Side
- Replaces: 84990740
Chevrolet Axle Assembly, Front Passenger Side Part Number: 85103941
$130.67 MSRP: $222.45You Save: $91.78 (42%)Ships in 1-3 Business DaysProduct Specifications- Other Name: Shaft Assembly-Front Wheel Drive Half; Axle Shaft; Axle; Shaft, Front Wheel Drive Axle
- Position: Front Passenger Side
- Replaces: 84112017, 84645996, 84796309, 85103944, 84170692, 84645994, 84796310, 84615518

Chevrolet Drive Axle, Front Driver Side Part Number: 26087488
$326.07 MSRP: $513.04You Save: $186.97 (37%)Ships in 1-3 Business DaysProduct Specifications- Other Name: Shaft Kit, Front Wheel Drive; Axle Shaft; Axle Assembly; Shaft Kit, Front Wheel Drive Axle
- Position: Front Driver Side
- Replaces: 26018524

Chevrolet Axle Assembly, Front Passenger Side Part Number: 84877877
$327.39 MSRP: $515.13You Save: $187.74 (37%)Ships in 1-3 Business DaysProduct Specifications- Other Name: Shaft Assembly-Front Wheel Drive; Axle Shaft; Shaft, Front Wheel Drive Axle
- Position: Front Passenger Side
- Replaced by: 85660313
| Page 1 of 51 |Next >
1-20 of 1013 Results
Chevrolet Axle Shaft
Want to cut long-term maintenance and repair costs? Choose OEM Axle Shaft. Those parts deliver top durability you can trust. On our site, you'll find a huge catalog of genuine Chevrolet parts. Prices are unbeatable, so you can keep more in your pocket. Every OEM Chevrolet Axle Shaft includes a manufacturer's warranty. You can also get an easy return policy that keeps buying risk free. Fast delivery, get your car on the road quickly. It's simple to search, compare, and order. Stop guessing about quality or fit. Order today and save with parts that last.
Chevrolet Axle Shaft Parts Questions & Experts Answers
- Q: How to replace the rear axle shaft on Chevrolet Colorado?A:The first step to replace rear axle shafts involves taking off the tires and wheels. Moving onto the next step you need to remove the clip keeping the rear Brake Drum in place and afterward uninstall the rear brake drums from the vehicle. Begin your procedures by taking away first the rear axle housing cover and after that the lock pin bolt and the pinion shaft. You should take off the c-lock from the rear axle before you can remove the rear Axle Shaft. Begin installation by putting on the new rear Axle Shaft and then move forward with c-lock installation and finishing with the pinion shaft. The installation process requires tightening the lock bolt to 25 n.m (18 lb ft). Reinstall the brake drums after which you can fit the rear axle housing cover together with its gasket. Place the designed fluid into the rear axle then put back the tire and wheel.
- Q: How to replace the wheel axle shaft on Chevrolet Malibu?A:Start your wheel drive shaft replacement by first raising and safely supporting the vehicle before taking off the wheel and tire. After you remove the front wheel drive shaft nut use tools to disconnect the outer tie rod assembly from the Steering Knuckle followed by separation of the Ball Joint from the Steering Knuckle. The hub spindle remover (J 42129) allows users to disconnect the front wheel drive axle from the bearing while protecting thread integrity by installing the nut partially. Insert the wheel drive shaft into the transaxle after removing it with Axle Shaft remover (J 33008-A) combined with Axle Shaft remover extension (J 29794) and slide hammer (J 2619-01). Installation begins with driving the wheel drive shaft inside the transaxle but requires checking the front wheel drive shaft retaining ring installation by pulling on the inner housing while avoiding the front wheel drive Axle Shaft. Satisfactory installation requires insertion of the front wheel drive shaft into the front Wheel Bearing while the Ball Joint returns to the Steering Knuckle and the outer tie rod assembly connects to the Steering Knuckle. Secure a new wheel drive shaft nut then prevent rotor movement through the use of a drift or flat-bladed tool before tightening it to 215 nm (159 ft. Lbs.). Install the wheel and tire after lowering the vehicle and check transaxle fluid level together with wheel alignment.
- Q: How to Replace the Front Axle Shaft (S4WD) Inner Shaft and Housing on Chevrolet S10?A:Replacing front Axle Shaft (S4WD) inner shaft or housing starts with vehicle lifting. First disconnect the wheel Axle Shaft from the right side of the vehicle along with the Clutch Cable from the Clutch Fork. Begin by removing bolts and washers from the inner Axle Shaft housing before proceeding to remove the remaining two inner Axle Shaft housing to differential carrier assembly bolts. During removal make sure thrust washers and Clutch Fork sleeve remain secure with the inner Axle Shaft. Use a vise to clamp down the inner shaft housing before striking the inside of the Axle Shaft with a hammer and brass drift to extract the assembly from the Axle Shaft. Remove the Clutch Cable retainer spring followed by the Clutch Fork assembly then Clutch Fork inner spring and Clutch Fork sleeve and thrust washer and clutch gear. To replace the inner Axle Shaft bearing and seal insert them into the axle housing after using a punch tool to remove the clutch gear, thrust washer, inner Axle Shaft, and Clutch Fork seal. Use the j33799 Clutch Fork housing seal installer (J33799) to set the new Clutch Fork seal before placing the inner Axle Shaft inside the housing and adding the thrust washer. Secure the thrust washer with chassis grease. Drive the clutch gear onto the inner Axle Shaft by using a plastic hammer after installing the new retaining ring into the clutch gear. Afterward add the thrust washer together with Clutch Fork inner spring, Clutch Fork, Clutch Fork sleeve, and Clutch Cable retainer spring to the inner Axle Shaft housing. Sealant gm p/n 1052492 or its equivalent must be applied to the inner axle housing differential carrier interface before attaching the housing assembly to the differential carrier with finger-tight bolt placement at the 1 o'clock position then positioning the housing to install the 11 o'clock position bolt also finger tight. First install the Clutch Cable housing and Clutch Cable before using bolts and washers and nuts to secure the inner Axle Shaft housing to the frame bracket. Tighten the frame bracket nuts to 98 nm (72 ft. Lbs.) and the housing to differential carrier assembly bolts to 48 nm (36 ft. Lbs.). Last, install the right Axle Shaft then check the axle lubricant levels before lowering the vehicle.


Related Chevrolet Parts
 Chevrolet Torsion Bar
 Chevrolet Wheel Cover
 Chevrolet Axle Beam Mount
 Chevrolet Axle Pivot Bushing
 Chevrolet Coil Spring Insulator
 Chevrolet Control Arm Bolt
 Chevrolet Lateral Arm
 Chevrolet Leaf Spring Shackle
 Chevrolet Shock And Strut Mount
 Chevrolet Sway Bar Bracket
 Chevrolet Sway Bar Kit
 Chevrolet Trailing Arm Bushing
Browse Chevrolet Axle Shaft by Models
Nova S10 Colorado C10 Tahoe Cruze Malibu Camaro Equinox Impala SS SSR Avalanche Silverado 1500 Silverado 2500 HD Caprice Classic Cobalt Suburban Traverse Blazer HHR Sonic Tracker Volt El Camino K10 Spark Trax Trailblazer Astro Cavalier Corvette C20 Aveo Beretta Bolt EUV Bolt EV C1500 C2500 C30 C3500 Celebrity Chevette City Express Corsica Express 1500 Express 2500 Express 3500 G10 G20 G30 K1500 K20 K2500 K30 K3500 K5 Blazer Lumina Metro Monte Carlo P30 Prizm S10 Blazer Silverado 2500 Uplander Venture Lumina APV Silverado 3500 Suburban 1500 Trailblazer EXT Avalanche 1500 Avalanche 2500 Aveo5 C10 Suburban C1500 Suburban C20 Suburban C2500 Suburban Captiva Sport Citation II Cruze Limited Impala Limited K10 Suburban K1500 Suburban K20 Suburban K2500 Suburban Malibu Limited P20 R10 R10 Suburban R1500 Suburban R20 R20 Suburban R2500 R2500 Suburban R30 R3500 Silverado 1500 Classic Silverado 1500 HD Silverado 1500 HD Classic Silverado 1500 LD Silverado 1500 LTD Silverado 2500 HD Classic Silverado 3500 Classic Silverado 3500 HD Spark EV Suburban 2500 Suburban 3500 HD V10 V10 Suburban V1500 Suburban V20 V20 Suburban V2500 Suburban V30 V3500