ChevyParts
My Garage
My Account
Cart
OEM Chevrolet Classic Axle Shaft
Car Axle Shaft- Select Vehicle by Model
- Select Vehicle by VIN
Select Vehicle by Model
orMake
Model
Year
Select Vehicle by VIN
For the most accurate results, select vehicle by your VIN (Vehicle Identification Number).
1 Axle Shaft found

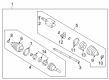
Chevrolet Classic Axle Assembly, Front Part Number: 26059860
Chevrolet Classic Axle Shaft
Want to cut long-term maintenance and repair costs? Choose OEM Axle Shaft. Those parts deliver top durability you can trust. On our site, you'll find a huge catalog of genuine Chevrolet Classic parts. Prices are unbeatable, so you can keep more in your pocket. Every OEM Chevrolet Classic Axle Shaft includes a manufacturer's warranty. You can also get an easy return policy that keeps buying risk free. Fast delivery, get your car on the road quickly. It's simple to search, compare, and order. Stop guessing about quality or fit. Order today and save with parts that last.
Chevrolet Classic Axle Shaft Parts and Q&A
- Q: How to replace the wheel axle shaft on Chevrolet Classic?A:To replace the wheel drive shaft, start by lifting the vehicle onto a hoist and removing the tire and wheel component. Remove the Tie Rod from the knuckle, after which time a drift may be inserted into the rotor and against the caliper so as to stop it from turning. Eliminate the wheel drive shaft nut and stabilizer link. Make sure that the wheel speed sensor wiring harness goes back out of the way of the Ball Joint after the electric connector is disconnected from the sensor. Disengage the Ball Joint from the steering knuckle and employing the hub spindle remover (J 42129), take the wheel drive shaft disengage from the Wheel Hub and bearing with the help of the wheel drive shaft while engaging the wheel drive shaft. Assemble the slide hammer (J 2619-01), Axle Shaft puller (J 33008-A), and Axle Shaft remover extension (J 29794) ensuring that my goals bottom out the threads as much as possible. Use this assembly to disconnect the wheel drive shaft from transaxle and then extract the drive shaft off the motor vehicle. For installation, first, install Axle Shaft to the transaxle, ensure the proper engagement can be maintained by gripping the inner tripod housing with hands and pull it out. Then install the wheel drive shaft to the steering knuckle, later the Ball Joint, and stabilizer link. Reconnect the wheel speed electrical connector, and slide a drift into the rotor and against the caliper again. Mount the first design wheel drive shaft nut (Black) and tighten it to 385 nm (284 ft. Lbs.), and the second design wheel drive shaft nut (Grey) to 235 nm (173 ft. Lbs.). Lastly, attach the Tie Rod to the knuckle, then install the tire and wheel assemblies, and then set the vehicle down.

Related Chevrolet Classic Parts
 Chevrolet Classic Axle Beam Mount
 Chevrolet Classic Ball Joint
 Chevrolet Classic CV Boot
 Chevrolet Classic CV Joint
 Chevrolet Classic Coil Spring Insulator
 Chevrolet Classic Control Arm
 Chevrolet Classic Shock Absorber
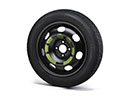 Chevrolet Classic Spare Wheel
 Chevrolet Classic Sway Bar Bracket
 Chevrolet Classic Sway Bar Bushing
 Chevrolet Classic Sway Bar Kit
 Chevrolet Classic Sway Bar Link