ChevyParts
My Garage
My Account
Cart
OEM Chevrolet Classic Shock Absorber
Suspension Shock Absorber- Select Vehicle by Model
- Select Vehicle by VIN
Select Vehicle by Model
orMake
Model
Year
Select Vehicle by VIN
For the most accurate results, select vehicle by your VIN (Vehicle Identification Number).
3 Shock Absorbers found

Chevrolet Classic Strut, Front Part Number: 22064731
$167.36 MSRP: $300.20You Save: $132.84 (45%)Ships in 1-3 Business Days

Chevrolet Classic Strut Assembly Part Number: 19179863
Chevrolet Classic Strut, Front Part Number: 22064770
$185.31 MSRP: $332.40You Save: $147.09 (45%)
Chevrolet Classic Shock Absorber
Want to cut long-term maintenance and repair costs? Choose OEM Shock Absorber. Those parts deliver top durability you can trust. On our site, you'll find a huge catalog of genuine Chevrolet Classic parts. Prices are unbeatable, so you can keep more in your pocket. Every OEM Chevrolet Classic Shock Absorber includes a manufacturer's warranty. You can also get an easy return policy that keeps buying risk free. Fast delivery, get your car on the road quickly. It's simple to search, compare, and order. Stop guessing about quality or fit. Order today and save with parts that last.
Chevrolet Classic Shock Absorber Parts and Q&A
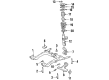
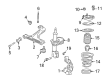
- Q: How to service and repair the front shock absorber and steering knuckle on Chevrolet Classic?A:A sharp tool needs to draw a mark on the knuckle beginning from the outboard part of the strut radius. Make the strut flange scribe on the inboard wall according to the knuckle contour. During the repair process you must mark the interface between the strut and knuckle . The assembly process should include matching all marks precisely to their designated components.
- Q: How to replace the front shock absorber assembly on Chevrolet Classic?A:To replace the strut assembly, first, take off the nuts and bolt that join the top of the strut assembly to the body . Lift and secure the vehicle by supporting the vehicle using jack stands under the front crossmember, and lower it just enough to place some weight on to the jack stands instead of the control arms. Exercising care to avoid over-extension of the drive axle joints in that unconnecting either end of the shaft may cause internal component separation and compromise of the joint; use drive axle joint boot protectors in service within the drive axles to prevent damages. Then remove tire and wheel assembly, then brake line bracket and mark the strut flange. Support the Steering Knuckle so that there is no over extension of the axle joint and remove the bolts and nuts that are fastened to the strut and the Steering Knuckle. Disassemble the strut from the vehicle with much care not to scratch or crack the spring coating as it might result into early failure. For installation put the strut and hand tighten nuts and bolt incremented fixing it to the body. Align the lining of the Steering Knuckle to the scribed mark on the strut flange, then install the bolts and nuts that have to be bolted with 180 nm (133 ft. Lbs.). Then tighten nuts and bolts at the top of strut to 25 nm (18 ft. Lbs.). The brake line bracket should be reinstalled and followed by the tire and wheel assembly and then there should be inspection of the front wheel alignment.

Related Chevrolet Classic Parts
 Chevrolet Classic Coil Springs
 Chevrolet Classic Control Arm
 Chevrolet Classic Control Arm Bolt
 Chevrolet Classic Control Arm Bushing
 Chevrolet Classic Shock And Strut Mount
 Chevrolet Classic Steering Knuckle
 Chevrolet Classic Sway Bar Bracket
 Chevrolet Classic Sway Bar Bushing
 Chevrolet Classic Sway Bar Kit
 Chevrolet Classic Sway Bar Link
 Chevrolet Classic Trailing Arm
 Chevrolet Classic Trailing Arm Bushing