ChevyParts
My Garage
My Account
Cart
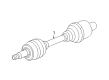
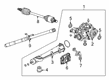
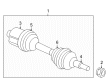
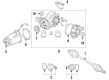
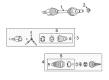
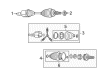
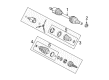
OEM Chevrolet Equinox Axle Shaft
Car Axle Shaft- Select Vehicle by Model
- Select Vehicle by VIN
Select Vehicle by Model
orMake
Model
Year
Select Vehicle by VIN
For the most accurate results, select vehicle by your VIN (Vehicle Identification Number).
32 Axle Shafts found

Chevrolet Equinox Axle Assembly, Front Passenger Side Part Number: 84615506
$291.18 MSRP: $522.27You Save: $231.09 (45%)Ships in 1-2 Business DaysChevrolet Equinox Axle Assembly, Front Passenger Side Part Number: 84170703
$500.75 MSRP: $824.89You Save: $324.14 (40%)Ships in 1-2 Business Days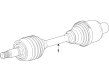
Chevrolet Equinox Axle, Front Part Number: 84826680
$521.91 MSRP: $824.89You Save: $302.98 (37%)Ships in 1-3 Business Days
Chevrolet Equinox Axle Assembly, Rear Driver Side Part Number: 84749538
$157.64 MSRP: $248.04You Save: $90.40 (37%)Ships in 1-2 Business Days
Chevrolet Equinox Axle Assembly, Front Passenger Side Part Number: 22866872
$240.80 MSRP: $471.44You Save: $230.64 (49%)Ships in 1-2 Business Days
Chevrolet Equinox Axle Assembly, Front Driver Side Part Number: 84202563
$163.83 MSRP: $307.66You Save: $143.83 (47%)Ships in 1-2 Business DaysChevrolet Equinox Axle Assembly, Front Passenger Side Part Number: 23291774
$240.80 MSRP: $471.46You Save: $230.66 (49%)Ships in 1-2 Business DaysChevrolet Equinox Axle Assembly, Front Passenger Side Part Number: 84615501
$207.64 MSRP: $375.81You Save: $168.17 (45%)


Chevrolet Equinox Axle, Front Part Number: 84212541


Chevrolet Equinox Axle Assembly, Rear Passenger Side Part Number: 25829163
$183.15 MSRP: $288.16You Save: $105.01 (37%)
| Page 1 of 2 |Next >
1-20 of 32 Results
Chevrolet Equinox Axle Shaft
Want to cut long-term maintenance and repair costs? Choose OEM Axle Shaft. Those parts deliver top durability you can trust. On our site, you'll find a huge catalog of genuine Chevrolet Equinox parts. Prices are unbeatable, so you can keep more in your pocket. Every OEM Chevrolet Equinox Axle Shaft includes a manufacturer's warranty. You can also get an easy return policy that keeps buying risk free. Fast delivery, get your car on the road quickly. It's simple to search, compare, and order. Stop guessing about quality or fit. Order today and save with parts that last.
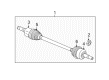
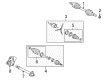
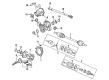
The Axle Shaft of Chevrolet Equinox vehicles is regarded as a vital component that connects the differential to the drive wheels in order to facilitate independent rotation to boost tractive effort. These steel shafts are available in different designs; trunnion style for trucks as well as older rear-wheel-drive cars, and half-shafts for cars with independent rear suspension system. Differentials and axle shaft are located in solid axles while half shafts transmit power to the wheels from the transaxle. In communication with different obstacles, the axle shafts get worn leading to problem such as noise and vibration while the worn seals can case the loss of lube and contamination of brakes. Thus, the Axle Shaft has several important functions in Chevrolet Equinox; namely bearing the vehicle load, transferring the torque, and ensuring the proper position of wheels.
Chevrolet Equinox Axle Shaft Parts and Q&A
- Q: How to replace the rear wheel axle shaft on Chevrolet Equinox?A:To replace the rear Axle Shaft, you first need to raise and support the vehicle and remove the tire and wheel assembly. Remove the Axle Shaft Spindle Nut, while applying a wrench on the stabilizer link, pull the nut of stabilizer link-to-lower Control Arm and pull the link out of the Control Arm. Upgrade fixing the lower Control Arm with a stand, after that take away from the lower bolt and screw of the shock absorber mounting and also from the toe link hard steel cursor, screw and washer. Loosen but don't remove the lower suspension jounce bumper nut loosen and remove lower Control Arm-to-suspension knuckle bolt and nut. Gradually relieve spring tension so that there will be no explosive release of the coil spring, then remove the coil spring. It's only necessary to loosen the upper Control Arm-to-suspension knuckle nut without detaching it. Assisting the shaft of the axle as the disengagement from the Wheel Hub and bearing assembly by the use of a block wood and hammer to release the spindle. Secure the suspension knuckle with heavy mechanics wire, but then assemble the j 45341 (J 45341) and j-2619-a (J-2619-A) to the Axle Shaft inner tripot joint and disconnect the tripot to the rear drive module (RDM) by removing the Axle Shaft from the vehicle. Drop the Axle Shaft retaining ring and then install the Axle Shaft oil seal to the inner tripot joint with a new retaining ring and a j 44394 (J 44394). Align the spline of the inner tripot joint to the output shaft of rdm and fit the Axle Shaft to the rdm output shaft by removing the j 44394 when the splined end goes past the oil seal. Make sure the tripot joint is fully seated and is not damaged, then rotate the suspension knuckle down, while leading constant velocity (CV) spindle to the Wheel Hub and bearing assembly. By hand, install a brand new Axle Shaft Spindle Nut and position the insulators to the coil spring and then secure with two plastic tie straps. Make sure to cut off any excess length of the tie straps. Next, mount the coil spring assembly to the lower Control Arm and lift as you will direct the coil spring into the rear suspension cradle. Place the suspension knuckle to the lower Control Arm and only have the hex head of the suspension knuckle bolt face to the rear of the vehicle and have the lower Control Arm to the suspension knuckle bolt and nut and tighten them at 160 nm (118 ft. Lbs). Tighten the upper Control Arm-to-suspension knuckle bolt and nut to 135 nm (100 ft. Lbs.) and install the lower shock absorber mounting bolt and nut with a torque of 110 nm (81 ft. Lbs.). Gradually take down the support stand and tighten the lower jounce bumper nut to 63 nm (46 f. Lbs.). Position the rear toe link into the suspension knuckle, place washer, bolt, and nut, and tighten them to 110 nm (81 ft. Lbs.). Mount the stabilizer bar link to the lower Control Arm, and fasten the nut applying 15 nm (11 ft. Lbs.), while keeping the stabilizer bar link stable. Lastly, pre-tighten the Axle Shaft Spindle Nut to 110 nm (81 ft. Lbs.), mount the tire and wheel assembly, and lower the vehicle.
- Q: How to replace the front wheel axle shaft on Chevrolet Equinox?A:Start your front Axle Shaft replacement by lifting and supporting your vehicle then taking off both the wheel and tire. Procedure starts with removing the Axle Shaft Spindle Nut then checking for ball stud rotation until completing the outer Tie Rod End-to-Steering Knuckle nut removal. Start by using the steering linkage and tie rod puller (J 24319-B) to break the Tie Rod End from the Steering Knuckle then discard the lower ball joint stud's cotter pin. Finally remove the ball joint stud and its safety nut. Recover the Steering Knuckle from the lower ball joint stud using the ball joint separator (J 43828) before you uninstall the lower stabilizer bar link nut. A wood block and hammer may be needed for using to disengage the Axle Shaft spindle from the Wheel Hub assembly. To prevent fluid loss and start the Axle Shaft removal procedure use the rear wheel Axle Shaft removal tool (J 45341) with the slide hammer (J 2619-01) at the Axle Shaft inner tripot joint. Owners of all-wheel drive vehicles must also cap the power takeoff unit opening. The vehicle must be freed of its Axle Shaft. When installing the Axle Shaft first add a new retaining ring on the output shaft before using a seal protector (J 44394) for oil seal installation. Push the Axle Shaft tripot joint onto the output shaft until it reaches full seat seating. Before final assembly place the constant velocity joint spindle into the Wheel Hub/bearing assembly then hand install a new Axle Shaft Spindle Nut followed by installation of the lower ball joint stud to the Steering Knuckle using a torque wrench set to 10 nm (89 inch lbs.) initial then added torque of 150 degrees. Use a back up wrench to tighten the stabilizer bar link stud nut up to 65 nm (48 ft. Lbs.). Afterward, position the lower link onto the stabilizer bar and install the cotter pin to the ball joint stud. The Steering Knuckle receives the Tie Rod End and you must use the steering linkage installer (J 44015) to pull the stud into position before tightening it to 40 nm (30 ft. Lbs.). Apply a new nut to the Tie Rod End stud and use torque to 50 nm (37 ft. Lbs.). Complete your service by tightening the Axle Shaft Spindle Nut to 205 nm (151 ft. Lbs.), attaching the tire and wheel assembly and checking the vehicle height before verifying the transmission fluid level sufficiency.


Related Chevrolet Equinox Parts
 Chevrolet Equinox Drive Shaft
 Chevrolet Equinox Axle Beam Mount
 Chevrolet Equinox Axle Pivot Bushing
 Chevrolet Equinox Axle Support Bushings
 Chevrolet Equinox CV Boot
 Chevrolet Equinox CV Joint
 Chevrolet Equinox Control Arm Bracket
 Chevrolet Equinox Front Cross-Member
 Chevrolet Equinox Lateral Link
 Chevrolet Equinox Spare Wheel
 Chevrolet Equinox Strut Bearing
 Chevrolet Equinox Sway Bar Bushing