ChevyParts
My Garage
My Account
Cart
OEM Chevrolet Air Suspension Compressor
Suspension Levelling Compressor- Select Vehicle by Model
- Select Vehicle by VIN
Select Vehicle by Model
orMake
Model
Year
Select Vehicle by VIN
For the most accurate results, select vehicle by your VIN (Vehicle Identification Number).
13 Air Suspension Compressors found


Chevrolet Compressor Part Number: 19299545
$482.97 MSRP: $903.51You Save: $420.54 (47%)Ships in 1-2 Business DaysProduct Specifications- Other Name: Compressor, Air Suspension Compressor; Air Suspension Compressor
- Replaces: 15254590, 15056494, 10395825, 15101577, 15070878


Chevrolet Compressor Part Number: 23316154
$273.30 MSRP: $535.07You Save: $261.77 (49%)Product Specifications- Other Name: Compressor, Air Suspension Compressor; Air Suspension Compressor
- Replaces: 23282712, 23232591, 22797525


Chevrolet Compressor Part Number: 22941806
$618.60 MSRP: $957.21You Save: $338.61 (36%)Product Specifications- Other Name: Compressor, Air Suspension Compressor; Air Suspension Compressor
- Replaces: 15296756, 20837299, 20930288, 15949881, 25913289


Chevrolet Compressor Assembly, Rear Part Number: 25978169
Product Specifications- Other Name: Compressor Assembly-Rear Air Spring; Air Suspension Compressor; Compressor
- Position: Rear
- Replaces: 15187099, 15094346, 15145230, 25789710, 15006679, 25878674


Chevrolet Compressor Assembly Part Number: 22137259
Product Specifications- Other Name: Compressor, Air Suspension Compressor; Compressor; Air Suspension Compressor


Chevrolet Compressor Assembly Part Number: 15219513
Product Specifications- Other Name: Compressor, Air Suspension Compressor; Compressor; Air Suspension Compressor

Chevrolet Compressor Assembly Part Number: 88952490
Product Specifications- Other Name: Compressor, Air Suspension Compressor; Compressor; Air Suspension Compressor

Chevrolet Compressor Part Number: 22137571
Product Specifications- Other Name: Compressor, Air Suspension Compressor; Air Suspension Compressor
Chevrolet Compressor Assembly Part Number: 22137472
Product Specifications- Other Name: Compressor, Air Suspension Compressor; Multi Purpose Relay; Relay; Compressor; Air Suspension Compressor

Chevrolet Compressor Assembly Part Number: 22137446
Product Specifications- Other Name: Compressor, Air Suspension Compressor; Compressor; Air Suspension Compressor
- Replaces: 22134640

Chevrolet Air Compressor Part Number: 22134299
Product Specifications- Other Name: Compressor, Air Suspension Compressor; Compressor; Air Suspension Compressor
Chevrolet Compressor Assembly, Rear Part Number: 19329771
Product Specifications- Other Name: Compressor Assembly, Rear Air Spring-Remanufacture; Air Suspension Compressor; Compressor; Compressor, Air Suspension Compressor
- Position: Rear
- Replaces: 15187100, 19177907, 25805727, 15145231

Chevrolet Air Compressor Part Number: 15147082
Product Specifications- Other Name: Compressor, Air Suspension Compressor; Compressor Assembly; Compressor; Air Suspension Compressor
- Replaces: 22137534, 88952489
Chevrolet Air Suspension Compressor
Want to cut long-term maintenance and repair costs? Choose OEM Air Suspension Compressor. Those parts deliver top durability you can trust. On our site, you'll find a huge catalog of genuine Chevrolet parts. Prices are unbeatable, so you can keep more in your pocket. Every OEM Chevrolet Air Suspension Compressor includes a manufacturer's warranty. You can also get an easy return policy that keeps buying risk free. Fast delivery, get your car on the road quickly. It's simple to search, compare, and order. Stop guessing about quality or fit. Order today and save with parts that last.
Chevrolet Air Suspension Compressor Parts Questions & Experts Answers
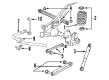
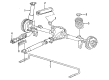
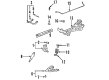
- Q: How to Safely Handle the Air Suspension Compressor Replacement on Chevrolet Trailblazer?A:To replace the air spring compressor, put on safety equipment such as gloves, ear as well as eye protection, and cover the air supply flex lines with a clean material to avoid injury due to sudden relief of pressure. Depressurise the air suspension system only after the rear axle has been supported and set from D-Height to Full Jounce. Start by locating the air suspension system fuse and take out the fuse to avoid calibration problems with the air suspension leveling sensor. Lift up the vehicle, a then take out its air spring compressor mounting bolts. Disconnect the compressor electrical connection after removing the air inflator switch electrical connection and air supply lines, the vent hose. In the disassembly, make sure that the color of the air supply lines, matches that of an air spring compressor for reassembling the compressor to the vehicle, disengage the air supply lines from the compressor and take off the compressor from the vehicle. Check for damage in the air supply lines. if not, remove the fittings from the new compressor and lobby their ends into the fittings and tighten to 2.25 N.m (20 lb in). In case of any damage, replace with air supply lines. Reconnect the electrical connection as well as the air inflator switch connection, the air supply line as well as the vent hose to the compressor. Mount the compressor to the frame mounting bolts, then tighten them to 20 N.m (15 lb ft), after that, lower the vehicle and reconnect the air suspension system fuse. Start the vehicle and let it operate for just about 1 minute to verify the air spring leveling system, inspect D-height, and inspect for leaks at the air supply line connectors; if any leaks are found, replace the air supply lines.
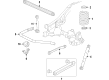
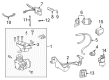
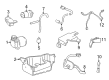
- Q: How to Change the Air Suspension Compressor on a Chevrolet Uplander?A:Begin Air Suspension Compressor replacement by taking out the electronic level control elc/trailer Fuse followed by vehicle elevation and support. Access becomes possible by removing the a/c hoses when present. The Air Suspension Compressor filter can be detached from the underbody rail through soft clip pressure on its side section after removing the compressor bracket bolts and nuts so the compressor will dangle from its bracket hook. Unplug the Air Suspension Compressor electrical connection and eliminate the air line from the air dryer. The Air Suspension Compressor and bracket require a 90-degree rotation to remove the vehicle-hooked compressor bracket. After disengagement you can take both components out. Extract the Air Suspension Compressor dryer and Air Suspension Compressor relay from its bracket while also removing Air Suspension Compressor bolts to proceed with Air Suspension Compressor bracket removal. Reinstallation occurs through bracket attachment of the Air Suspension Compressor filter hose to the Air Suspension Compressor at two points followed by Air Suspension Compressor installation on the bracket before bracket tightening to 50 nm (37 ft. Lbs.). Tighten the Air Suspension Compressor bolt/screws to 4 nm before adding the Air Suspension Compressor shield and installing bolts to 3 nm. Begin by placing the Air Suspension Compressor bracket under the underbody rail with a 90-degree rotation to support the compressor from its bracket hook. After reattaching the Air Suspension Compressor relay to the bracket you can install the Air Suspension Compressor dryer. Connect the electrical Air Suspension Compressor wires and install air tubing to the air drying unit before tightening the Air Suspension Compressor bracket fasteners to 10 nm (89 inch lbs.). The Air Suspension Compressor bracket bolt requires a torque setting of 50 nm (37 ft. Lbs.) and the filter should be mounted next to the underbody rail. Reinstall all a/c hoses after completion of the procedure then lower the vehicle before reinstalling the elc/trailer Fuse.
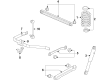
- Q: How to replace the Air Suspension Compressor on Chevrolet Venture?A:The first step to replace an Air Suspension Compressor requires vehicle elevation and support. Touch each clip on the Air Suspension Compressor filter's sides to release the attachment from the underbody rail. Afterward unscrew the bracket bolt followed by the compressor bracket nuts until the compressor hangs from the bracket hook. Detach the air line from the air dryer and also unhook the Air Suspension Compressor's electrical connection. First rotate the Air Suspension Compressor together with its bracket at a 90-degree angle to unhook it from the vehicle then take out the Air Suspension Compressor and the bracket. Start by removing the Air Suspension Compressor relay from the bracket then move to the Air Suspension Compressor dryer before finishing with the bolts to extract the Air Suspension Compressor from its bracket. Remove the Air Suspension Compressor filter hose connections at both points from the compressor body. Position the Air Suspension Compressor filter hose at its original points on the compressor before securely mounting the compressor onto the bracket with bolts/screws and tightening them to 4 nm (35 inch lbs.). Mount the Air Suspension Compressor shield alongside the relay and dryer. Secure the bracket onto the underbody rail while rotating its position through 90 degrees until the compressor can hang from the mounting hook. Secure the power cable together with the compressor airflow tubing to the dryer equipment. Begin by tightening bracket nuts to 10 nm (89 inch lbs.) before moving on to tighten the bracket bolt to 50 nm (37 ft. Lbs.). The Air Suspension Compressor filter requires installation to the underbody rail before lowering the vehicle.


Related Chevrolet Parts
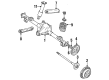
 Chevrolet Drive Shaft
 Chevrolet Wheel Cover
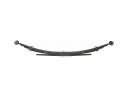 Chevrolet Leaf Spring
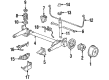
 Chevrolet Steering Knuckle
 Chevrolet Sway Bar Link
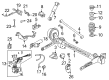
 Chevrolet Control Arm
 Chevrolet Alignment Bolt
 Chevrolet Axle Beam Mount
 Chevrolet Axle Pivot Bushing
 Chevrolet Coil Spring Insulator
 Chevrolet Control Arm Bushing
 Chevrolet Leaf Spring Bushing