ChevyParts
My Garage
My Account
Cart
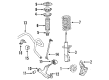
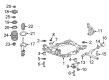
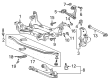
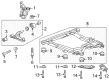
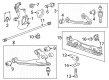
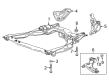
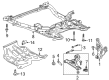
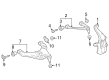
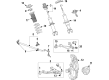
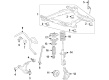
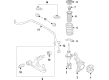
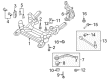
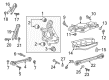
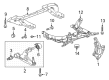
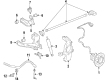
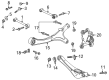
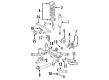
OEM Chevrolet Steering Knuckle
Front Steering Knuckle- Select Vehicle by Model
- Select Vehicle by VIN
Select Vehicle by Model
orMake
Model
Year
Select Vehicle by VIN
For the most accurate results, select vehicle by your VIN (Vehicle Identification Number).
297 Steering Knuckles found


Chevrolet Knuckle, Driver Side Part Number: 25796982
$221.62 MSRP: $351.87You Save: $130.25 (38%)Ships in 1-2 Business DaysProduct Specifications- Other Name: Knuckle, Steering
- Position: Driver Side


Chevrolet Knuckle, Green Line, Driver Side Part Number: 19303853
$287.92 MSRP: $457.11You Save: $169.19 (38%)Ships in 1-2 Business DaysProduct Specifications- Other Name: Knuckle, Steering
- Position: Driver Side
- Replaces: 21995733, 22705299, 25872803


Chevrolet Knuckle, Driver Side Part Number: 84506880
$127.02 MSRP: $218.15You Save: $91.13 (42%)Ships in 1-2 Business DaysProduct Specifications- Other Name: Knuckle, Rear Wheel
- Position: Driver Side
- Replaces: 20959401, 23113206


Chevrolet Knuckle, Passenger Side Part Number: 23119518
$62.00 MSRP: $151.28You Save: $89.28 (60%)Ships in 1-2 Business DaysProduct Specifications- Other Name: Knuckle, Steering
- Position: Passenger Side
- Replaces: 13319481

Chevrolet Knuckle, Passenger Side Part Number: 85124366
$151.38 MSRP: $271.54You Save: $120.16 (45%)Product Specifications- Other Name: Knuckle, Steering
- Position: Passenger Side
- Replaces: 84831199, 23422186

Chevrolet Knuckle Part Number: 95048310
$55.15 MSRP: $99.81You Save: $44.66 (45%)Ships in 1-2 Business DaysProduct Specifications- Other Name: Knuckle, Steering

Chevrolet Knuckle Part Number: 94524774
$144.35 MSRP: $247.90You Save: $103.55 (42%)Ships in 1-2 Business DaysProduct Specifications- Other Name: Knuckle, Steering
- Replaces: 95934240, 95381109

Chevrolet Knuckle, Passenger Side Part Number: 84588072
$119.91 MSRP: $188.67You Save: $68.76 (37%)Ships in 1-2 Business DaysProduct Specifications- Other Name: Knuckle, Steering
- Position: Passenger Side
- Replaced by: 86588655

Chevrolet Knuckle, Driver Side Part Number: 84612177
$94.72 MSRP: $148.35You Save: $53.63 (37%)Ships in 1-3 Business DaysProduct Specifications- Other Name: Knuckle, Steering
- Position: Driver Side
- Replaced by: 86556640

Chevrolet Knuckle, Driver Side Part Number: 84560117
$89.12 MSRP: $139.55You Save: $50.43 (37%)Ships in 1-3 Business DaysProduct Specifications- Other Name: Knuckle, Steering
- Position: Driver Side
- Replaces: 84437330
Chevrolet Knuckle, Passenger Side Part Number: 84612178
$94.72 MSRP: $148.35You Save: $53.63 (37%)Ships in 1-3 Business DaysProduct Specifications- Other Name: Knuckle, Steering
- Position: Passenger Side
- Replaced by: 86556641

Chevrolet Knuckle, Driver Side Part Number: 39030299
$97.56 MSRP: $160.73You Save: $63.17 (40%)Ships in 1-2 Business DaysProduct Specifications- Other Name: Knuckle, Steering
- Position: Driver Side
- Replaces: 39000055

Chevrolet Knuckle Part Number: 92285636
$361.34 MSRP: $586.19You Save: $224.85 (39%)Ships in 1-2 Business DaysProduct Specifications- Other Name: Knuckle Assembly-Steering; Knuckle, Steering

Chevrolet Knuckle, Rear Driver Side Part Number: 84755517
$145.01 MSRP: $228.16You Save: $83.15 (37%)Product Specifications- Other Name: Knuckle, Rear Wheel
- Position: Rear Driver Side
- Replaces: 84089877, 84258571
Chevrolet Knuckle, Rear Passenger Side Part Number: 84755514
$127.71 MSRP: $219.34You Save: $91.63 (42%)Ships in 1-2 Business DaysProduct Specifications- Other Name: Knuckle, Rear Wheel
- Position: Rear Passenger Side
- Replaces: 23206824

Chevrolet Knuckle, Driver Side Part Number: 42712520
$99.08 MSRP: $155.16You Save: $56.08 (37%)Ships in 1-3 Business DaysProduct Specifications- Other Name: Knuckle, Steering
- Position: Driver Side
- Replaces: 42492765

Chevrolet Knuckle Part Number: 23327369
$336.51 MSRP: $537.67You Save: $201.16 (38%)Ships in 1-2 Business DaysProduct Specifications- Other Name: Knuckle, Steering

Chevrolet Knuckle, Rear Driver Side Part Number: 85116617
$108.48 MSRP: $184.70You Save: $76.22 (42%)Ships in 1-3 Business DaysProduct Specifications- Other Name: Knuckle, Rear Wheel
- Position: Rear Driver Side
- Replaced by: 85562432

Chevrolet Knuckle, Driver Side Part Number: 15837478
$248.07 MSRP: $390.32You Save: $142.25 (37%)Ships in 1-3 Business DaysProduct Specifications- Position: Driver Side
Chevrolet Knuckle, Driver Side Part Number: 84588071
$111.73 MSRP: $175.02You Save: $63.29 (37%)Product Specifications- Other Name: Knuckle, Steering
- Position: Driver Side
- Replaced by: 86588654
| Page 1 of 15 |Next >
1-20 of 297 Results
Chevrolet Steering Knuckle
Want to cut long-term maintenance and repair costs? Choose OEM Steering Knuckle. Those parts deliver top durability you can trust. On our site, you'll find a huge catalog of genuine Chevrolet parts. Prices are unbeatable, so you can keep more in your pocket. Every OEM Chevrolet Steering Knuckle includes a manufacturer's warranty. You can also get an easy return policy that keeps buying risk free. Fast delivery, get your car on the road quickly. It's simple to search, compare, and order. Stop guessing about quality or fit. Order today and save with parts that last.
Chevrolet Steering Knuckle Parts Questions & Experts Answers
- Q: What tools are required to replace the steering knuckle on a 4WD on Chevrolet Colorado?A:The Steering Knuckle replacement for a 4wd vehicle demands these essential tools: ball joint remover (J43631) and Ball Joint separator (J6627A). Ball joint remover (J 43631) together with Ball Joint separator (J 6627-A) provides all the needed instruments for the task. Start by elevating the vehicle and place it on supports before taking out the tire along with the wheel. The wheel drive shaft nut needs removal after support of the lower Control Arm. First disconnect the wheel speed sensor harness from the inner fender panel and chassis harness before removing the Brake Caliper Bracket. Begin by disconnecting the outer tie rod from the Steering Knuckle before you separate the upper Control Arm retaining nuts from Ball Joint studs and remove the lower Control Arm retaining nut. Use the Ball Joint remover model j 43631 to detach the lower Steering Knuckle Ball Joint from the Steering Knuckle assembly. After that position the Steering Knuckle assembly on a bench. You should use Ball Joint separator (J 6627-A) to extract the Ball Joint so you can remove the Wheel Hub and bearing assembly. Begin installation with the Wheel Hub and bearing assembly but thoroughly clean all grease and contaminants from the tapered sections and threads of the upper Ball Joint, lower Ball Joint and Tie Rod End. Steering Knuckle components need replacement if mounting surfaces show elongated tapered holes or out-of-round deformities or damage. Hook up the Ball Joint at the lower end to the Steering Knuckle then bolt the retaining nut and torque it to 145 n.m (107 lb ft). Connect the upper Ball Joint to the Steering Knuckle then secure its retaining nut by tightening to a torque of 75 n.m (55 lb ft). First reconnect the outer tie rod to the Steering Knuckle then feed the wheel speed sensor harness through both the chassis harness and inner fender panel for reinstallation. After installation of the Brake Caliper Bracket with new wheel drive shaft nut the tire should be put back on with the wheel. When ready to check wheel alignment the driver should remove the Control Arm support and lower the vehicle.
- Q: How to replace the steering knuckle on Chevrolet Malibu?A:To change the Steering Knuckle, first, the vehicle is raised and supported. Drill the Wheel Bearing and the outer tie rod to knuckle nut hole. With the use of the universal steering linkage puller (J 24319-B), remove the tie rod from the Steering Knuckle. Next, you are to remove the lower Control Arm and the strut to Steering Knuckle nuts and bolts after which you remove the Steering Knuckle from the car. For installation, connect the Steering Knuckle to the strut assembly, and if needed, the abs harness bracket, tighten the bolts and nuts to 120 n.m (89 lb ft). Route the axle through the Steering Knuckle, then install the lower Control Arm and finally the outer tie rod to the Steering Knuckle and torque the nut to 20 n.m (15 lb ft) then turn it a further 180 degrees then check the achieved torque to 50 n.m (37 lb ft). Lastly install the Wheel Bearing, brake rotor, brake caliper, and front wheels and bring the vehicle down then take a road test to confirm alignment and correct any lead or pull guiding any necessary attention.
- Q: How to Service and Repair the Steering Knuckle on a Chevrolet Tahoe?A:Begin Steering Knuckle replacement by lifting the vehicle to support it then proceed with tire and wheel removal. Start by removing the wheel drive shaft when equipment includes it followed by the Wheel Bearing and hub assembly. Following the removal of the outer Tie Rod End from the knuckle, personnel must detach the upper Control Arm and lower Control Arm from the knuckle before they can remove the knuckle. Lower Ball Joint mounts into the knuckle first and upper Ball Joint goes in next for assembly. Begin by reattaching the outer Tie Rod End; after that install the Wheel Bearing and hub assembly and the wheel drive shaft if present. Reinstall the tire and wheel followed by support removal and lowering the vehicle until you check the wheel alignment.


Related Chevrolet Parts
 Chevrolet Ball Joint
 Chevrolet 4WD Actuator
 Chevrolet Coil Springs
 Chevrolet Sway Bar Link
 Chevrolet CV Boot
 Chevrolet CV Joint
 Chevrolet Coil Spring Insulator
 Chevrolet Control Arm Bracket
 Chevrolet Leaf Spring Bushing
 Chevrolet Shock and Strut Boot
 Chevrolet Suspension Strut Rod
 Chevrolet Sway Bar Kit
Browse Chevrolet Steering Knuckle by Models
Nova S10 Colorado C10 Tahoe Cruze Malibu Camaro Equinox Impala SS SSR Avalanche Silverado 1500 Silverado 2500 HD Caprice Classic Cobalt Suburban Traverse Blazer HHR Sonic Tracker Volt El Camino K10 Spark Trax Trailblazer Astro Cavalier Corvette C20 Aveo Beretta Bolt EUV Bolt EV C1500 C2500 C30 C3500 Celebrity Chevette City Express Corsica Express 1500 Express 2500 Express 3500 G10 G20 G30 K1500 K20 K2500 K30 K3500 K5 Blazer Lumina Metro Monte Carlo P30 Prizm S10 Blazer Silverado 2500 Sprint Uplander Venture Lumina APV Silverado 3500 Suburban 1500 Trailblazer EXT Avalanche 1500 Avalanche 2500 Aveo5 C10 Suburban C1500 Suburban C20 Suburban C2500 Suburban Captiva Sport Citation II Cruze Limited Impala Limited K10 Suburban K1500 Suburban K20 Suburban K2500 Suburban Malibu Limited P20 R10 R10 Suburban R1500 Suburban R20 R20 Suburban R2500 R2500 Suburban R30 R3500 Silverado 1500 Classic Silverado 1500 HD Silverado 1500 HD Classic Silverado 1500 LD Silverado 1500 LTD Silverado 2500 HD Classic Silverado 3500 Classic Silverado 3500 HD Spark EV Suburban 2500 Suburban 3500 HD V10 V10 Suburban V1500 Suburban V20 V20 Suburban V2500 Suburban V30 V3500