ChevyParts
My Garage
My Account
Cart
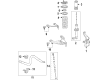
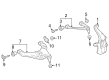
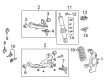
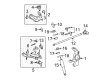
OEM Chevrolet Colorado Steering Knuckle
Front Steering Knuckle- Select Vehicle by Model
- Select Vehicle by VIN
Select Vehicle by Model
orMake
Model
Year
Select Vehicle by VIN
For the most accurate results, select vehicle by your VIN (Vehicle Identification Number).
18 Steering Knuckles found


Chevrolet Colorado Knuckle, Passenger Side Part Number: 84119958
$115.68 MSRP: $198.66You Save: $82.98 (42%)


Chevrolet Colorado Knuckle, Driver Side Part Number: 23298404
$111.97 MSRP: $190.64You Save: $78.67 (42%)

Chevrolet Colorado Knuckle, Passenger Side Part Number: 23298403
$111.97 MSRP: $190.64You Save: $78.67 (42%)
Chevrolet Colorado Knuckle, Passenger Side Part Number: 84925032
$123.68 MSRP: $194.60You Save: $70.92 (37%)Chevrolet Colorado Knuckle, Driver Side Part Number: 84925031
$103.11 MSRP: $161.51You Save: $58.40 (37%)Chevrolet Colorado Knuckle, Passenger Side Part Number: 84588072
$119.91 MSRP: $188.67You Save: $68.76 (37%)Ships in 1-2 Business DaysChevrolet Colorado Knuckle, Driver Side Part Number: 84119959
$115.68 MSRP: $198.66You Save: $82.98 (42%)Ships in 1-2 Business Days
Chevrolet Colorado Knuckle, Passenger Side Part Number: 19303845
$520.38 MSRP: $826.20You Save: $305.82 (38%)Ships in 1-2 Business Days

Chevrolet Colorado Knuckle, Passenger Side Part Number: 19303849


Chevrolet Colorado Knuckle, Driver Side Part Number: 19303836


Chevrolet Colorado Knuckle, Passenger Side Part Number: 19303835


Chevrolet Colorado Knuckle, Passenger Side Part Number: 19303833

Chevrolet Colorado Knuckle, Driver Side Part Number: 19303834
$257.84 MSRP: $405.70You Save: $147.86 (37%)Chevrolet Colorado Knuckle, Driver Side Part Number: 19303850
Chevrolet Colorado Knuckle, Driver Side Part Number: 15178874
Chevrolet Colorado Knuckle, Passenger Side Part Number: 15178873
Chevrolet Colorado Knuckle, Driver Side Part Number: 84588071
$111.73 MSRP: $175.02You Save: $63.29 (37%)Chevrolet Colorado Knuckle, Driver Side Part Number: 19303846
$244.64 MSRP: $384.93You Save: $140.29 (37%)
Chevrolet Colorado Steering Knuckle
Want to cut long-term maintenance and repair costs? Choose OEM Steering Knuckle. Those parts deliver top durability you can trust. On our site, you'll find a huge catalog of genuine Chevrolet Colorado parts. Prices are unbeatable, so you can keep more in your pocket. Every OEM Chevrolet Colorado Steering Knuckle includes a manufacturer's warranty. You can also get an easy return policy that keeps buying risk free. Fast delivery, get your car on the road quickly. It's simple to search, compare, and order. Stop guessing about quality or fit. Order today and save with parts that last.
The Steering Knuckle of Chevrolet Colorado cars is a structural component that comprises a major part of suspension and steering systems of the vehicle, more specifically it transmits the front wheels to the framework of the car. It offers place for control arms, tie-rod ends and spindles, which supports kind of vertical motion according to the roads and horizontal for the behavior of steering. Chevrolet Colorado Steering Knuckles change with the type of drive and the options include rear-wheel drive (RWD) and the front as well as all wheel or four-wheel drive (FWD/AWD/4WD). RWD models can have an interlinked spindle while the front, all, or four-wheel models may contain an axle with the drive routing through the Steering Knuckle, this may include a bolted or pressed hub. Due to the Steering Knuckle structure, it provides stability and control, it supports various suspension systems to let the wheel assembly rotate.
Chevrolet Colorado Steering Knuckle Parts Questions & Experts Answers
- Q: How to replace the steering knuckle on a 4WD on Chevrolet Colorado?A:Even though you're replacing the Steering Knuckle in your 4wd vehicle you must start by raising and supporting the vehicle followed by taking off the tire and wheel. Detach the wheel drive shaft nut before you support the lower Control Arm and throw the nut away. The wheel speed sensor harness requires disconnecting from the inner fender panel while also separating from the chassis harness before Brake Caliper Bracket removal. First disconnect the outer tie rod from the Steering Knuckle and remove upper Control Arm retaining nuts that hold the Ball Joint studs together before separating the lower Control Arm retaining nut. Use j 43631 Ball Joint remover (J 43631) to remove the lower Ball Joint from the Steering Knuckle before attaching the knuckle assembly to a bench for removal. Using the j 6627-a Ball Joint separator (J 6627-A) disassemble the Ball Joint followed by removal of the Wheel Hub and bearing assembly. Installation begins by assembling the Wheel Hub and bearing components although proper cleaning should occur of all grease and contaminants on the tapered sections of the upper Ball Joint and lower Ball Joint together with the Tie Rod End. Check the taper holes and mounting surfaces of the Steering Knuckle then replace the component when any tapered holes demonstrate elongation, out-of-round shape or damage. After connecting the lower Ball Joint to the Steering Knuckle install the retaining nut at 145 nm (107 ft. Lbs.) while the upper Ball Joint retention needs 75 nm (55 ft. Lbs.) for installation torques. Secure the outer tie rod to the Steering Knuckle followed by connecting the wheel speed sensor harness to both the chassis harness and the inner fender panel. After installing the Brake Caliper Bracket and wheel drive shaft nut, add new tire and wheel. Finish up by removing the Control Arm support then lowering the vehicle while checking wheel alignment.

Related Chevrolet Colorado Parts
 Chevrolet Colorado Sway Bar Link
 Chevrolet Colorado Alignment Bolt
 Chevrolet Colorado Coil Spring Insulator
 Chevrolet Colorado Coil Springs
 Chevrolet Colorado Control Arm
 Chevrolet Colorado Control Arm Bushing
 Chevrolet Colorado Shock Absorber
 Chevrolet Colorado Shock And Strut Mount
 Chevrolet Colorado Shock and Strut Boot
 Chevrolet Colorado Sway Bar Bracket
 Chevrolet Colorado Sway Bar Bushing
 Chevrolet Colorado Sway Bar Kit