ChevyParts
My Garage
My Account
Cart
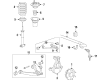
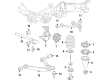
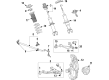
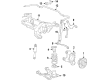
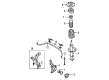
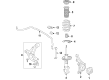
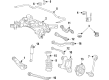
OEM Chevrolet Sway Bar Link
Stabilizer Sway Bar Link- Select Vehicle by Model
- Select Vehicle by VIN
Select Vehicle by Model
orMake
Model
Year
Select Vehicle by VIN
For the most accurate results, select vehicle by your VIN (Vehicle Identification Number).
126 Sway Bar Links found


Chevrolet Stabilizer Link Part Number: 84367821
$19.95 MSRP: $37.45You Save: $17.50 (47%)Ships in 1-3 Business DaysProduct Specifications- Other Name: Link, Stabilizer Shaft; Sway Bar Link; Link
- Position: Front


Chevrolet Stabilizer Link Part Number: 25918049
$29.06 MSRP: $54.60You Save: $25.54 (47%)Ships in 1-3 Business DaysProduct Specifications- Other Name: Link, Stabilizer Shaft; Suspension Stabilizer Bar Link Kit; Stabilizer Bar Link Kit; Sway Bar Link; Link
- Position: Front
- Replaces: 10395094


Chevrolet Stabilizer Link Part Number: 22945601
$35.64 MSRP: $69.18You Save: $33.54 (49%)Ships in 1-2 Business DaysProduct Specifications- Other Name: Link, Stabilizer Shaft; Suspension Stabilizer Bar Link Kit; Stabilizer Bar Link Kit; Sway Bar Link; Link
- Position: Front
- Replaces: 84369505


Chevrolet Stabilizer Link, Rear Part Number: 15129234
$48.17 MSRP: $86.02You Save: $37.85 (44%)Ships in 1-2 Business DaysProduct Specifications- Other Name: Link Assembly-Rear Stabilizer Shaft; Suspension Stabilizer Bar Link Kit; Stabilizer Bar Link Kit; Sway Bar Link; Link; Link, Stabilizer Shaft
- Position: Rear


Chevrolet Stabilizer Link Part Number: 95167261
$21.62 MSRP: $40.62You Save: $19.00 (47%)Ships in 1-2 Business DaysProduct Specifications- Other Name: Link, Stabilizer Shaft; Suspension Stabilizer Bar Link Kit; Stabilizer Bar Link Kit; Sway Bar Link; Link
- Position: Front


Chevrolet Stabilizer Link Part Number: 42342547
$23.61 MSRP: $44.36You Save: $20.75 (47%)Ships in 1-2 Business DaysProduct Specifications- Other Name: Link, Stabilizer Shaft; Suspension Stabilizer Bar Link Kit; Control Arm; Sway Bar Link; Link
- Position: Front
- Replaces: 95299172, 95941670, 95465758


Chevrolet Stabilizer Link, Rear Part Number: 20985982
$39.54 MSRP: $74.26You Save: $34.72 (47%)Ships in 1-2 Business DaysProduct Specifications- Other Name: Link-Rear Stabilizer Shaft; Suspension Stabilizer Bar Link Kit; Stabilizer Bar Link Kit; Sway Bar Link; Link; Link, Stabilizer Shaft
- Position: Rear
- Replaces: 10320234, 10402711, 10257811, 10410748, 10415034, 10413928, 10424646


Chevrolet Stabilizer Link, Green Line Part Number: 22670300
$53.17 MSRP: $94.94You Save: $41.77 (44%)Ships in 1-2 Business DaysProduct Specifications- Other Name: Link, Stabilizer Shaft; Suspension Stabilizer Bar Link Kit; Stabilizer Bar Link Kit; Sway Bar Link; Link
- Position: Front
- Replaces: 25846008


Chevrolet Stabilizer Link Part Number: 95994977
$37.31 MSRP: $70.07You Save: $32.76 (47%)Ships in 1-2 Business DaysProduct Specifications- Other Name: Link, Stabilizer Shaft; Suspension Stabilizer Bar Link Kit; Sway Bar Link.; Link
- Position: Front
- Replaces: 96391875


Chevrolet Stabilizer Link Part Number: 95942519
$28.77 MSRP: $54.03You Save: $25.26 (47%)Ships in 1-2 Business DaysProduct Specifications- Other Name: Link, Stabilizer Shaft; Suspension Stabilizer Bar Link Kit; Stabilizer Bar Link Kit; Sway Bar Link; Link
- Position: Front


Chevrolet Stabilizer Link Part Number: 15571395
$26.80 MSRP: $47.86You Save: $21.06 (44%)Ships in 1-3 Business DaysProduct Specifications- Other Name: Link, Stabilizer Shaft; Suspension Stabilizer Bar Link Kit; Sway Bar Link.; Link
- Position: Front


Chevrolet Stabilizer Link, Front Part Number: 19417578
$25.89 MSRP: $48.61You Save: $22.72 (47%)Ships in 1-2 Business DaysProduct Specifications- Other Name: Link Assembly, Front Stabilizer Shaft; Suspension Stabilizer Bar Link Kit; Stabilizer Bar Link Kit; Sway Bar Link; Link Kit; Link; Link, Stabilizer Shaft
- Position: Front
- Replaces: 10292672, 10285683, 10403402

Chevrolet Stabilizer Link Part Number: 15024511
$17.56 MSRP: $31.36You Save: $13.80 (45%)Ships in 1-2 Business DaysProduct Specifications- Other Name: Link, Stabilizer Shaft; Suspension Stabilizer Bar Link Kit; Stabilizer Bar Link Kit; Sway Bar Link
- Position: Front
- Replaces: 15996719

Chevrolet Stabilizer Link, Driver Side Part Number: 42784520
$13.53 MSRP: $24.16You Save: $10.63 (44%)Product Specifications- Other Name: Link, Stabilizer Shaft; Sway Bar Link; Link
- Position: Driver Side
- Replaces: 42514933, 42704412

Chevrolet Stabilizer Link Part Number: 85568816
$17.75 MSRP: $33.35You Save: $15.60 (47%)Ships in 1-2 Business DaysProduct Specifications- Other Name: Link, Stabilizer Shaft; Link
- Replaces: 84472981

Chevrolet Stabilizer Link Part Number: 95947829
$21.49 MSRP: $40.38You Save: $18.89 (47%)Ships in 1-2 Business DaysProduct Specifications- Other Name: Link, Stabilizer Shaft; Suspension Stabilizer Bar Link Kit; Sway Bar Link.; Link
- Position: Front

Chevrolet Link Part Number: 15722338
$23.62 MSRP: $42.18You Save: $18.56 (44%)Ships in 1-3 Business DaysProduct Specifications- Other Name: Link, Stabilizer Shaft; Suspension Stabilizer Bar Link Kit; Stabilizer Bar Link Kit; Sway Bar Link
- Position: Rear

Chevrolet Stabilizer Link, Rear Part Number: 87848812
$25.67 MSRP: $48.21You Save: $22.54 (47%)Product Specifications- Other Name: Link Assembly-Rear Stabilizer Shaft; Link; Link, Stabilizer Shaft
- Position: Rear
- Replaces: 22992986, 84378279, 84012690, 84810706, 84966811
Chevrolet Stabilizer Link Part Number: 85590925
$17.46 MSRP: $32.78You Save: $15.32 (47%)Ships in 1-3 Business DaysProduct Specifications- Other Name: Link, Stabilizer Shaft; Link
- Replaces: 84718747


Chevrolet Stabilizer Link Part Number: 15697702
$2.80 MSRP: $5.00You Save: $2.20 (44%)Product Specifications- Other Name: Link, Stabilizer Shaft; Suspension Stabilizer Bar Link Kit; Stabilizer Bar Link Kit
- Position: Rear
| Page 1 of 7 |Next >
1-20 of 126 Results
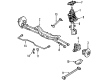
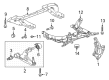
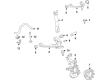
Chevrolet Sway Bar Link
Want to cut long-term maintenance and repair costs? Choose OEM Sway Bar Link. Those parts deliver top durability you can trust. On our site, you'll find a huge catalog of genuine Chevrolet parts. Prices are unbeatable, so you can keep more in your pocket. Every OEM Chevrolet Sway Bar Link includes a manufacturer's warranty. You can also get an easy return policy that keeps buying risk free. Fast delivery, get your car on the road quickly. It's simple to search, compare, and order. Stop guessing about quality or fit. Order today and save with parts that last.
Chevrolet Sway Bar Link Parts Questions & Experts Answers
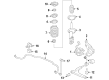
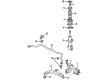
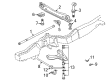
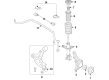
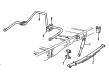
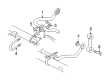
- Q: How to replace the Sway Bar Link (Z71) on Chevrolet Colorado?A:A proper method for Sway Bar Link (Z71) removal starts by raising and supporting the vehicle. The first step involves taking off the tire together with its wheel assembly. The link nut at the sway bar requires removal after detaching its counterpart from the lower Control Arm with proper wrenches on the link ball stud. Take out the Sway Bar Link from both its positions on the lower Control Arm and sway bar. First position the Sway Bar Link inside the lower Control Arm and sway bar before securing the lower link nut at the lower Control Arm then the link nut at the sway bar. Vehicle damage prevention requires special attention to fastener installations. Weld a proper wrench onto the link ball stud then use it to tighten the link nut up to 44 nm (32 lb ft). Finish the process by installing the tire along with the wheel assembly followed by removing vehicle supports before lowering the vehicle.
- Q: How to replace the front sway bar link on a 4WD on Chevrolet S10?A:The process of Sway Bar Link replacement on a 4wd vehicle starts by raising it using safety stands. Check for wear or damage after unbolting the Sway Bar Link bolt and following it with the Sway Bar Link insulator, spacer, and upper retainer. Installation of Sway Bar Link insulators begins with the bolt before inserting the Sway Bar Link through the sway bar. The Sway Bar Link spacer installation requires a bolt passed through both the lower Control Arm and above components which should remain properly layered. Put the Sway Bar Link upper retainer in place after which tighten the Sway Bar Link bolt to 15 nm (11 ft. Lbs.) and proceed to lower the vehicle.
- Q: How to replace the Sway Bar Link on Chevrolet Tahoe?A:Before replacing the sway bar link start by lifting and supporting the vehicle. Lift the vehicle above floor level to begin replacement of the sway bar link. Start by adjusting the sway bar nut on the link bolt then loosen the sway bar link bolt after removing sway bar link insulators along with spacers from their position. Look for damage or wear on every component. Reinstall sway bar link insulators and spacers before installing the sway bar link bolts. The sway bar nut requires torquing against the link bolt until it extends two to four threads beyond the nut surface. The vehicle needs its safety supports removed before lowering it to the ground.


Related Chevrolet Parts
 Chevrolet Torsion Bar
 Chevrolet Spindle
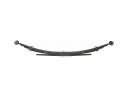 Chevrolet Leaf Spring
 Chevrolet CV Boot
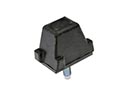 Chevrolet Control Arm Bumper
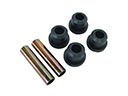 Chevrolet Leaf Spring Bushing
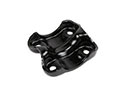 Chevrolet Leaf Spring Plate
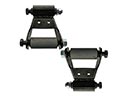 Chevrolet Leaf Spring Shackle
 Chevrolet Shock Absorber
 Chevrolet Shock and Strut Boot
 Chevrolet Sway Bar Bracket
 Chevrolet Trailing Arm Bushing
Browse Chevrolet Sway Bar Link by Models
S10 Colorado Tahoe Cruze Malibu Camaro Equinox Impala SS SSR Avalanche Silverado 1500 Silverado 2500 HD Caprice Classic Cobalt Suburban Traverse Blazer HHR Sonic Tracker Volt El Camino Spark Trax Trailblazer Astro Cavalier Corvette Aveo Beretta Bolt EUV Bolt EV C1500 C2500 C3500 Chevette City Express Corsica Express 1500 Express 2500 Express 3500 K1500 K2500 K3500 Lumina Metro Monte Carlo P30 Prizm S10 Blazer Silverado 2500 Uplander Venture Silverado 3500 Suburban 1500 Trailblazer EXT Avalanche 1500 Avalanche 2500 Aveo5 C1500 Suburban C2500 Suburban Captiva Sport Cruze Limited Impala Limited K1500 Suburban K2500 Suburban Malibu Limited Silverado 1500 Classic Silverado 1500 HD Silverado 1500 HD Classic Silverado 1500 LD Silverado 1500 LTD Silverado 2500 HD Classic Silverado 3500 Classic Silverado 3500 HD Spark EV Suburban 2500 Suburban 3500 HD