ChevyParts
My Garage
My Account
Cart
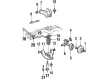
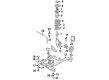
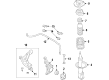
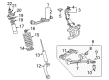
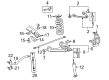
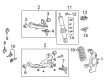
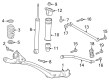
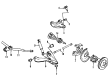
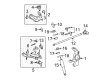
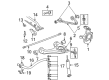
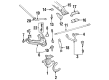
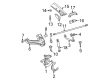
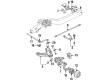
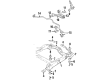
OEM Chevrolet Ball Joint
Control Arm Joint- Select Vehicle by Model
- Select Vehicle by VIN
Select Vehicle by Model
orMake
Model
Year
Select Vehicle by VIN
For the most accurate results, select vehicle by your VIN (Vehicle Identification Number).
56 Ball Joints found


Chevrolet Ball Joint, Front Upper Part Number: 88911387
$34.06 MSRP: $60.81You Save: $26.75 (44%)Ships in 1-3 Business DaysProduct Specifications- Other Name: Joint Kit, Front Upper Control Arm Ball; Suspension Ball Joint; Upper Ball Joint; Stud Kit, Steering Knuckle Control Arm; Ball Joint Kit
- Position: Front Upper
- Replaced by: 19460397


Chevrolet Ball Joint, Front Lower Part Number: 17989117
$45.54 MSRP: $71.33You Save: $25.79 (37%)Ships in 1-3 Business DaysProduct Specifications- Other Name: Stud Kit, Front Lower Control Arm Ball; Suspension Ball Joint; Lower Ball Joint; Stud Kit, Front Wheel Lower Control Arm
- Position: Front Lower


Chevrolet Ball Joint Part Number: 95907943
$29.15 MSRP: $46.26You Save: $17.11 (37%)Ships in 1-2 Business DaysProduct Specifications- Other Name: Stud Kit, Front Wheel Lower Control Arm; Suspension Ball Joint; Lower Ball Joint
- Position: Lower


Chevrolet Lower Ball Joint, Front Part Number: 19133670
$57.43 MSRP: $140.12You Save: $82.69 (60%)Ships in 1-2 Business DaysProduct Specifications- Other Name: Stud Kit, Front Lower Control Arm Ball; Suspension Ball Joint; Ball Joint; Stud, Steering Knuckle Lower Control Arm Pivot
- Position: Front Lower
- Replaces: 22157319


Chevrolet Lower Ball Joint, Front Part Number: 12475478
$103.35 MSRP: $161.18You Save: $57.83 (36%)Ships in 1-2 Business DaysProduct Specifications- Other Name: Stud Kit, Front Lower Control Arm Ball; Suspension Ball Joint; Ball Joint; Stud Kit, Steering Knuckle Lower Control Arm Pivot
- Position: Front Lower
- Replaces: 12472819


Chevrolet Upper Ball Joint Part Number: 89040242
$140.00 MSRP: $245.61You Save: $105.61 (43%)Ships in 1-2 Business DaysProduct Specifications- Other Name: Joint Kit, Front Upper Control Arm Ball; Suspension Ball Joint; Ball Joint; Upper Ball Joints; Joint Kit, Steering Knuckle Upper Control Arm
- Position: Front Upper

Chevrolet Lower Link Part Number: 42726528
$45.84 MSRP: $71.79You Save: $25.95 (37%)Ships in 1-3 Business DaysProduct Specifications- Other Name: Joint Assembly-Center Pivot Ball; Integral Link; Ball Joint; Joint; Joint, Rear Axle Control Arm

Chevrolet Lower Ball Joint, Front Part Number: 17980954
$65.21 MSRP: $107.41You Save: $42.20 (40%)Ships in 1-2 Business DaysProduct Specifications- Other Name: Stud Kit, Front Lower Control Arm Ball; Suspension Ball Joint; Ball Joint
- Position: Front Lower
- Replaced by: 88967425

Chevrolet Lower Ball Joint Part Number: 95916024
$74.11 MSRP: $122.10You Save: $47.99 (40%)Ships in 1-2 Business DaysProduct Specifications- Other Name: Stud Kit-Front Lower Control Arm Ball; Suspension Ball Joint; Ball Joint; Stud Kit, Front Wheel Lower Control Arm
- Position: Front Lower

Chevrolet Lower Ball Joint, Front Part Number: 19416896
$88.06 MSRP: $145.05You Save: $56.99 (40%)Ships in 1-2 Business DaysProduct Specifications- Other Name: Stud Kit, Front Lower Control Arm Ball; Ball Joint; Stud Kit, Steering Knuckle Lower Control Arm Pivot; Stud Kit, Front Wheel Lower Control Arm
- Position: Front Lower
- Replaces: 12480852, 15659724

Chevrolet Lower Ball Joint Part Number: 88967425
$65.21 MSRP: $107.41You Save: $42.20 (40%)Ships in 1-2 Business DaysProduct Specifications- Other Name: Stud Kit, Front Lower Control Arm Ball; Suspension Ball Joint; Ball Joint; Stud Kit, Steering Knuckle Lower Control Arm Pivot; Stud, Steering Knuckle Lower Control Arm Pivot
- Position: Front Lower
- Replaces: 22156908, 17980954

Chevrolet Ball Joint, Front Lower Part Number: 22156472
$40.37 MSRP: $77.00You Save: $36.63 (48%)Ships in 1-2 Business DaysProduct Specifications- Other Name: Stud Assembly, Front Lower Control Arm Ball; Ball Joints; Lower Ball Joint
- Position: Front Lower


Chevrolet Lower Ball Joint Part Number: 89040240
Product Specifications- Other Name: Joint Kit, Front Lower Control Arm Ball; Suspension Ball Joint; Ball Joint; Joint Kit, Steering Knuckle Lower Control Arm Pivot
- Position: Front Lower


Chevrolet Upper Ball Joint, Front Part Number: 12475486
$41.66 MSRP: $62.00You Save: $20.34 (33%)Product Specifications- Other Name: Stud Kit, Front Upper Control Arm Ball; Suspension Ball Joint; Ball Joint; Upper Ball Joints
- Position: Front Upper
- Replaces: 12474577


Chevrolet Upper Ball Joint Part Number: 19146901
Product Specifications- Other Name: Hose, Power Steering Gear Inlet; Ball Joint; Upper Ball Joints; Stud Kit, Steering Knuckle Upper Control Arm


Chevrolet Lower Ball Joint, Front Part Number: 12387682
Product Specifications- Other Name: Stud Kit, Front Lower Control Arm Ball; Suspension Ball Joint; Ball Joint
- Position: Front Lower


Chevrolet Lower Ball Joint, Front Part Number: 19416898
Product Specifications- Other Name: Stud Kit, Front Lower Control Arm Ball; Suspension Ball Joint; Ball Joint; Stud Kit, Steering Knuckle Lower Control Arm Pivot
- Position: Front Lower
- Replaces: 12380415, 12383410


Chevrolet Ball Joint Part Number: 94428683
Product Specifications- Other Name: Joint, Front Lower Control Arm Ball; Joint, Front Wheel Lower Control Arm
- Position: Front Lower
Chevrolet Ball Joint Part Number: 94133798
Product Specifications- Other Name: Joint, Front Lower Control Arm Ball; Suspension Ball Joint; Lower Ball Joint; Joint, Front Wheel Lower Control Arm
- Position: Front Lower

Chevrolet Ball Joint, Front Lower Part Number: 22113159
Product Specifications- Other Name: Stud, Front Lower Control Arm Ball; Lower Ball Joint; Stud, Front Wheel Lower Control Arm
- Position: Front Lower
- Replaces: 22112893
| Page 1 of 3 |Next >
1-20 of 56 Results
Chevrolet Ball Joint
Want to cut long-term maintenance and repair costs? Choose OEM Ball Joint. Those parts deliver top durability you can trust. On our site, you'll find a huge catalog of genuine Chevrolet parts. Prices are unbeatable, so you can keep more in your pocket. Every OEM Chevrolet Ball Joint includes a manufacturer's warranty. You can also get an easy return policy that keeps buying risk free. Fast delivery, get your car on the road quickly. It's simple to search, compare, and order. Stop guessing about quality or fit. Order today and save with parts that last.
Chevrolet Ball Joint Parts Questions & Experts Answers
- Q: How to replace the upper control arm ball joint on a 2WD (Z85, ZQ8) on Chevrolet Colorado?A:When replacing the upper Control Arm Ball Joint on 2wd z85 and zq8 vehicles start by lifting and supporting the vehicle followed by tire and wheel removal. Place the lower Control Arm onto a suitable stand and separate the front brake hose from the upper Control Arm area. First take off the wheel speed sensor bracket bolt before disconnecting the wheel speed sensor brackets. Use tool j-42188-b to disconnect the Ball Joint from the Steering Knuckle and remove the upper Ball Joint nut. Afterward pull the Ball Joint out of the upper Control Arm by removing the joint nuts and bolts. Insert the new Ball Joint into the Control Arm top slot then install factory bolts. Thread on the bolts first then twist nuts until you reach 16 nm torque value. Secure the Ball Joint to the Steering Knuckle by adding a replacement nut at the upper joint and torque it to 100 nm (74 lb ft). Secure the wheel speed sensor brackets and fasten the wheel speed sensor bracket bolt to 20 nm (15 lb ft). Fix the brake hose connection at the upper Control Arm then disconnect the lower support and put back the wheel assembly properly. Lower the vehicle and check if the wheels are aligned correctly in their final position.
- Q: How to replace the upper ball joint on Chevrolet S10?A:Secure a vehicle lift and safety stands underneath in preparation for replacing the upper Ball Joint. Take off the Torsion Bar and disconnect the wheel speed sensor wiring harness bracket and brake hose bracket by removing their mounting bolt and nut from the upper Control Arm. Take the brackets away from the upper Control Arm and remove the cotter pin before the retaining nut at the Ball Joint. With a pry bar under the Control Arm push up then a helper hits the knuckle stud near the Ball Joint to loosen it. Support the upper Control Arm and Steering Knuckle with a block to keep them aside when you take the upper Ball Joint from the Steering Knuckle before suspending the Steering Knuckle to prevent Brake Line damage. Pozisyon the upper Ball Joint from the Steering Knuckle by drilling 12.7 mm (1/2 inch) holes into rivet heads then removing them with a pin punch and upper Ball Joint. Insert the new upper Ball Joint onto the upper Control Arm and tighten retaining bolts and nuts to 23 nm (17 ft. Lbs.). Thread in the upper Ball Joint to the Steering Knuckle and bolt it with a retaining nut until it reaches 83 nm (61 ft lbs.), making sure the Ball Joint stays aligned for the cotter pin without going beyond the one sixth turn limit. Install a fresh cotter pin into the Ball Joint stud system and form both ends to engage with the nut facility. Reattach the wheel speed sensor wiring harness and brake hose bracket to their positions on the Control Arm using the mounting bolt and nut which needs 24 nm (18 ft. Lbs.) torque. Put the Torsion Bar back in place, mount the tire and wheel, lower the vehicle, then inspect the steering wheel alignment.
- Q: How to replace the lower ball joint on Chevrolet Tahoe?A:Begin replacement of the lower Ball Joint by lifting the vehicle and taking off the tire and wheel first. Take out bolt and nut that holds the bracket then reach the pinch bolt using this access point. Press off the metal ring around the Ball Joint stud. Starting at the lower Ball Joint take off its bolts that fasten the part to the Steering Knuckle then unscrew the pinch bolt holding it in place. Set the new lower Ball Joint inside the Steering Knuckle and bolt it tight at 110 nm (81 ft. Lbs.). Put on the lower Ball Joint pinch bolt first then torque it to 230 nm (169 ft. Lbs.). After that install the snap ring onto the lower Ball Joint. Attach the bolt and nut portions back to the axle bracket and torque them to 18 ft. Lbs. (25 Nm). Reinsert the tire and wheel onto your car before lowering the vehicle so a four-wheel alignment can be performed.


Related Chevrolet Parts
 Chevrolet Spindle
 Chevrolet Coil Springs
 Chevrolet Axle Beam Mount
 Chevrolet Axle Pivot Bushing
 Chevrolet Axle Support Bushings
 Chevrolet Control Arm Bumper
 Chevrolet Control Arm Bushing
 Chevrolet Lateral Arm
 Chevrolet Leaf Spring Plate
 Chevrolet Leaf Spring Shackle
 Chevrolet Shock Absorber
 Chevrolet Trailing Arm
Browse Chevrolet Ball Joint by Models
S10 Colorado C10 Tahoe Malibu Camaro Equinox Impala SSR Avalanche Silverado 1500 Silverado 2500 HD Caprice Classic Suburban Traverse Blazer Sonic El Camino K10 Trax Trailblazer Astro Cavalier Corvette C20 Aveo Beretta C1500 C2500 C30 C3500 Celebrity Chevette Corsica Express 1500 Express 2500 Express 3500 G10 G20 G30 K1500 K20 K2500 K30 K3500 Lumina Monte Carlo P30 Prizm S10 Blazer Silverado 2500 Uplander Venture Lumina APV Silverado 3500 Suburban 1500 Trailblazer EXT Avalanche 1500 Avalanche 2500 Aveo5 C10 Suburban C1500 Suburban C20 Suburban C2500 Suburban Captiva Sport Citation II Impala Limited K10 Suburban K1500 Suburban K20 Suburban K2500 Suburban P20 R10 R10 Suburban R1500 Suburban R20 R20 Suburban R2500 R2500 Suburban R30 R3500 Silverado 1500 Classic Silverado 1500 HD Silverado 1500 HD Classic Silverado 2500 HD Classic Silverado 3500 Classic Silverado 3500 HD Spectrum Suburban 2500 V10 V10 Suburban V1500 Suburban V20 V20 Suburban V2500 Suburban V30 V3500