ChevyParts
My Garage
My Account
Cart
OEM Chevrolet Monte Carlo Ball Joint
Control Arm Joint- Select Vehicle by Model
- Select Vehicle by VIN
Select Vehicle by Model
orMake
Model
Year
Select Vehicle by VIN
For the most accurate results, select vehicle by your VIN (Vehicle Identification Number).
4 Ball Joints found


Chevrolet Monte Carlo Ball Joint, Front Lower Part Number: 17989117
$45.54 MSRP: $71.33You Save: $25.79 (37%)Ships in 1-3 Business Days


Chevrolet Monte Carlo Ball Joint, Front Upper Part Number: 88911387
$34.06 MSRP: $60.81You Save: $26.75 (44%)Ships in 1-3 Business Days
Chevrolet Monte Carlo Ball Joint, Front Lower Part Number: 19416895
$20.58 MSRP: $50.23You Save: $29.65 (60%)
Chevrolet Monte Carlo Ball Joint Part Number: 88965333
$51.99 MSRP: $82.54You Save: $30.55 (38%)Ships in 1-2 Business Days
Chevrolet Monte Carlo Ball Joint
Want to cut long-term maintenance and repair costs? Choose OEM Ball Joint. Those parts deliver top durability you can trust. On our site, you'll find a huge catalog of genuine Chevrolet Monte Carlo parts. Prices are unbeatable, so you can keep more in your pocket. Every OEM Chevrolet Monte Carlo Ball Joint includes a manufacturer's warranty. You can also get an easy return policy that keeps buying risk free. Fast delivery, get your car on the road quickly. It's simple to search, compare, and order. Stop guessing about quality or fit. Order today and save with parts that last.
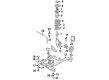
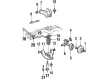
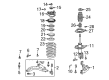
It is located in the suspension and steering parts of Chevrolet Monte Carlo cars and links the control arm to the steering knuckle, allowing it to rotate in two planes but stopping it from translating. Generally, an aspects of the Monte Carlo vehicle suspensions have both upper and lower Ball Joints with the lower ball joints commonly used to bear the mass of the vehicle. These ball joints are made of steel and comprise a bearing stud and socket shielded with a rubber boot to hide dirt and let lubricants through. Ball joints being used in current and developed cars have superior adjustability for the caster and camber but are not at the expense of the three major aspects in vehicles which are; handling, steadiness and comfort. Also, other improvements in the bearing area and, dust boot seals duration have increased the service interval, and ball joints that are being used today are sealed and do not require frequent greasing.
Chevrolet Monte Carlo Ball Joint Parts Questions & Experts Answers
- Q: How to replace the lower ball joint on Chevrolet Monte Carlo?A:The vehicle must lift up and get supported before starting replacement of the lower Ball Joint. The tire/wheel needs removal before drilling a pilot hole through rivets then moving onto the complete drilling of rivets. A combination of hammer and chisel enables users to eliminate rivet heads from the system. Begin by taking off the ball stud's cotter pin before turning the ball stud nut. You should fit the Ball Joint/stud separator (J 41820) between ball stud and lower Control Arm before turning the ball stud nut clockwise to split the ball stud from the Steering Knuckle. To proceed further remove the j 41820 device and detach both the ball stud nut and ball stud from the lower Control Arm. Install the ball stud onto the Control Arm then secure the new bolts underneath with the ball stud directed downward followed by new nuts fastened to 68 nm torque (50 ft. Lbs.). Operating on the ball stud you must install it to both the Steering Knuckle and then tighten the ball stud castle nut to 20 nm (15 ft. Lbs.) followed by an additional 120° angle. Finish the installation by adding a new cotter pin then bending the ends while reinstalling tires and wheels followed by lowering the vehicle before conducting a wheel alignment check.

Related Chevrolet Monte Carlo Parts
 Chevrolet Monte Carlo Axle Beam Mount
 Chevrolet Monte Carlo Axle Support Bushings
 Chevrolet Monte Carlo Coil Spring Insulator
 Chevrolet Monte Carlo Control Arm Bolt
 Chevrolet Monte Carlo Control Arm Bushing
 Chevrolet Monte Carlo Crossmember Bushing
 Chevrolet Monte Carlo Shock And Strut Mount
 Chevrolet Monte Carlo Steering Knuckle
 Chevrolet Monte Carlo Strut Bearing
 Chevrolet Monte Carlo Sway Bar Bracket
 Chevrolet Monte Carlo Sway Bar Bushing
 Chevrolet Monte Carlo Sway Bar Kit