ChevyParts
My Garage
My Account
Cart
OEM Chevrolet Express 3500 Ball Joint
Control Arm Joint- Select Vehicle by Model
- Select Vehicle by VIN
Select Vehicle by Model
orMake
Model
Year
Select Vehicle by VIN
For the most accurate results, select vehicle by your VIN (Vehicle Identification Number).
5 Ball Joints found


Chevrolet Express 3500 Lower Ball Joint, Front Part Number: 12475478
$103.35 MSRP: $161.18You Save: $57.83 (36%)Ships in 1-2 Business Days
Chevrolet Express 3500 Lower Ball Joint, Front Part Number: 19416896
$88.06 MSRP: $145.05You Save: $56.99 (40%)Ships in 1-2 Business Days
Chevrolet Express 3500 Lower Ball Joint, Front Part Number: 19210782
$47.17 MSRP: $115.09You Save: $67.92 (60%)Ships in 1-2 Business Days

Chevrolet Express 3500 Upper Ball Joint Part Number: 19146901
Chevrolet Express 3500 Upper Ball Joint, Front Part Number: 19416903
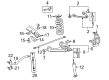
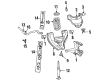
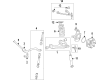
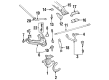
Chevrolet Express 3500 Ball Joint
Want to cut long-term maintenance and repair costs? Choose OEM Ball Joint. Those parts deliver top durability you can trust. On our site, you'll find a huge catalog of genuine Chevrolet Express 3500 parts. Prices are unbeatable, so you can keep more in your pocket. Every OEM Chevrolet Express 3500 Ball Joint includes a manufacturer's warranty. You can also get an easy return policy that keeps buying risk free. Fast delivery, get your car on the road quickly. It's simple to search, compare, and order. Stop guessing about quality or fit. Order today and save with parts that last.
Chevrolet Express 3500 Ball Joint Parts Questions & Experts Answers
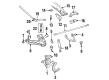
- Q: What tools are required to service and repair the lower ball joint on Chevrolet Express 3500?A:Service and repair of the lower Ball Joint requires using two specific tools: Ball Joint remover/installer set (J9519-E) plus Ball Joint separator (J23742). First put the vehicle on stands and then lift it to suitable height. Take off the wheel while sitting the floor jack beneath the lower Control Arm to hold its position and shield staff from harm. Set the floor jack beneath the lower Control Arm and lift it to stabilise the Control Arm. Use a wire to suspend the brake caliper before taking out the front braking unit. You need to unlock both lower Ball Joint parts before using the j23742 Ball Joint separator to free the joint from its spot on the Steering Knuckle. Use a screwdriver to move the lower Control Arm out of the splash shield as you lift the upper Control Arm with a pry bar and place a wooden block between the frame and upper Control Arm to block the knuckle assembly. Put the lower Ball Joint remover/installer set j9519-30 to work when disconnecting the lower Ball Joint from the lower Control Arm. Check the tapered opening in the Steering Knuckle for damage and debris before deciding to replace the part if needed. Press a new Ball Joint into the lower Control Arm until it reaches the lower part using j9519-30 set butts. Take out the wooden blocking tool from the knuckle assembly area. Put the Ball Joint stud into the Steering Knuckle followed by the nut and tighten it to 94 ft. Lbs. At 128 nm while lining up the slot with the hole. Push a new cotter pin through the nut slots to the Ball Joint hole before curving it to stop the nut from sliding loose. Place the grease fitting on the Ball Joint and lubricate it. After this put back the front brake caliper and tire wheel unit. Take the safety stands out and release the vehicle to test the front wheel alignment.

Related Chevrolet Express 3500 Parts
 Chevrolet Express 3500 Alignment Bolt
 Chevrolet Express 3500 Coil Spring Insulator
 Chevrolet Express 3500 Coil Springs
 Chevrolet Express 3500 Control Arm
 Chevrolet Express 3500 Control Arm Bumper
 Chevrolet Express 3500 Control Arm Bushing
 Chevrolet Express 3500 Spindle
 Chevrolet Express 3500 Steering Knuckle
 Chevrolet Express 3500 Sway Bar Bracket
 Chevrolet Express 3500 Sway Bar Bushing
 Chevrolet Express 3500 Sway Bar Kit
 Chevrolet Express 3500 Torsion Bar