ChevyParts
My Garage
My Account
Cart
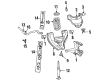
OEM Chevrolet Express 3500 Coil Springs
Strut Spring- Select Vehicle by Model
- Select Vehicle by VIN
Select Vehicle by Model
orMake
Model
Year
Select Vehicle by VIN
For the most accurate results, select vehicle by your VIN (Vehicle Identification Number).
11 Coil Springs found


Chevrolet Express 3500 Coil Spring, Front Part Number: 20760345
$66.36 MSRP: $118.50You Save: $52.14 (44%)Ships in 1-2 Business Days

Chevrolet Express 3500 Coil Spring, Front Part Number: 20760344
$71.05 MSRP: $126.88You Save: $55.83 (44%)Ships in 1-2 Business DaysChevrolet Express 3500 Coil Spring, Front Part Number: 22875261
$89.73 MSRP: $160.24You Save: $70.51 (44%)Ships in 1-2 Business DaysChevrolet Express 3500 Coil Spring, Front Part Number: 20760347
$66.37 MSRP: $118.53You Save: $52.16 (45%)Ships in 1-2 Business DaysChevrolet Express 3500 Coil Spring, Front Part Number: 20760346
$72.02 MSRP: $128.60You Save: $56.58 (44%)Ships in 1-3 Business Days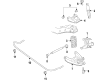
Chevrolet Express 3500 Coil Spring, Front Part Number: 15120843

Chevrolet Express 3500 Coil Spring, Front Part Number: 15120838

Chevrolet Express 3500 Coil Spring, Front Part Number: 15058106
Chevrolet Express 3500 Spring, Front Part Number: 15058105
Chevrolet Express 3500 Coil Spring, Front Part Number: 15058102
Chevrolet Express 3500 Coil Spring, Front Part Number: 20760340
$64.57 MSRP: $115.29You Save: $50.72 (44%)
Chevrolet Express 3500 Coil Springs
Want to cut long-term maintenance and repair costs? Choose OEM Coil Springs. Those parts deliver top durability you can trust. On our site, you'll find a huge catalog of genuine Chevrolet Express 3500 parts. Prices are unbeatable, so you can keep more in your pocket. Every OEM Chevrolet Express 3500 Coil Springs includes a manufacturer's warranty. You can also get an easy return policy that keeps buying risk free. Fast delivery, get your car on the road quickly. It's simple to search, compare, and order. Stop guessing about quality or fit. Order today and save with parts that last.
Chevrolet Express 3500 Coil Springs Parts and Q&A
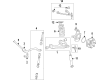
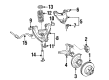
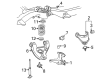
- Q: How to Service and Repair Coil Springs on Chevrolet Express 3500?A:The coil spring service begins by using equipment to lift the vehicle vertically using a hoist while safety stands support the lower Control Arms. Start by taking out the tire and wheel assembly before removing both stabilizer shaft link pins from the lower Control Arm and extracting the shock absorber. Rustproof your hands when using the coil spring remover (J23028-01) to secure onto a suitable jack's end for safely lifting the jack during lower Control Arm Bushing cradling until lower Control Arm pivot bolt tension is relieved. Free the lower Control Arm pivot bolts and nuts while lowering the Control Arm slightly before popping out the coil spring and insulator. The installation of the coil spring requires proper alignment of its gripper notch toward the bottom position so the taper sits at the upper position to match the spring insulator with the bottom of the coil spring resting atop. Use the coil spring remover (J23028-01) to stabilize the lower Control Arm through its bushings while you raise the installed car with a jack to guide the Control Arm into position using a pry bar. Tighten the Control Arm pivot bolts by following proper installation direction at z height. Begin installation of new lower Control Arm pivot bolts along with nuts and remove the vehicle's coil spring remover (J23028-01). After reattaching the shock absorber install the stabilizer shaft link pin and secure its retaining nut to 18 nm (13 ft. Lbs.). After installing the tire along with wheel assembly you should remove safety stands before lowering the vehicle to finish by tightening lower Control Arm pivot bolts at 155 nm (115 lb ft).
- Q: How to replace the front coil springs on Chevrolet Express 3500?A:The process starts by lifting the vehicle and securing it in place followed by wheel removal and shock absorber removal and front stabilizer shaft link removal. You should stable the lower Control Arm next to the lower Ball Joint using an appropriate safety jack. Prior to using the otc 7045-b (coil spring compressor tool) for spring compression make sure the retaining pin fully inserts into the upper plate slot to prevent any spring deformation. Lower the Control Arm until you can fit the otc 7045-b into the lower Control Arm's aperture. Use the tool to compress the spring until all tension leaves the lower Control Arm. Proceed by taking out the lower Control Arm pivot bolt retaining nuts and washers before removing the rear and front pivot bolts. To access the coil spring and insulator you must first lower the Control Arm before removing the otc 7045-b from the coil spring and then taking away the insulator. First attach the Coil Spring Insulator to the coil spring before you reinsert the otc 7045-b to compress the coil spring and position the flat end upward in the shock tower and the pointed end into the lower Control Arm pocket. After placing the coil spring with insulator on the lower Control Arm raise the Control Arm into position and position a suitable safety jack underneath the rear leg near the bushing. Follow this procedure to tighten the lower Control Arm pivot bolt retaining nuts and washers with a torque of 155 n.m (114 lb ft) for vehicles without 14050/12300 gvw and 240 n.m (177 lb ft) for vehicles with 14050/12300 gvw and diesel engines. Lower the vehicle and reinstall the front stabilizer shaft link as well as the shock absorber tire and wheel before removing the safety jacks and coil spring using otc 7045-b.


Related Chevrolet Express 3500 Parts
 Chevrolet Express 3500 Alignment Bolt
 Chevrolet Express 3500 Ball Joint
 Chevrolet Express 3500 Coil Spring Insulator
 Chevrolet Express 3500 Control Arm
 Chevrolet Express 3500 Shock Absorber
 Chevrolet Express 3500 Spindle
 Chevrolet Express 3500 Steering Knuckle
 Chevrolet Express 3500 Sway Bar Bracket
 Chevrolet Express 3500 Sway Bar Bushing
 Chevrolet Express 3500 Sway Bar Kit
 Chevrolet Express 3500 Sway Bar Link
 Chevrolet Express 3500 Torsion Bar