ChevyParts
My Garage
My Account
Cart
OEM Chevrolet Lumina Ball Joint
Control Arm Joint- Select Vehicle by Model
- Select Vehicle by VIN
Select Vehicle by Model
orMake
Model
Year
Select Vehicle by VIN
For the most accurate results, select vehicle by your VIN (Vehicle Identification Number).
1 Ball Joint found


Chevrolet Lumina Ball Joint, Front Lower Part Number: 17989117
$45.54 MSRP: $71.33You Save: $25.79 (37%)Ships in 1-3 Business Days
Chevrolet Lumina Ball Joint
Want to cut long-term maintenance and repair costs? Choose OEM Ball Joint. Those parts deliver top durability you can trust. On our site, you'll find a huge catalog of genuine Chevrolet Lumina parts. Prices are unbeatable, so you can keep more in your pocket. Every OEM Chevrolet Lumina Ball Joint includes a manufacturer's warranty. You can also get an easy return policy that keeps buying risk free. Fast delivery, get your car on the road quickly. It's simple to search, compare, and order. Stop guessing about quality or fit. Order today and save with parts that last.
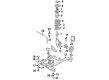
This Ball Joint is specifically used on the Chevrolet Lumina vehicles and is one of the parts that make these vehicles much reliable and efficient. With its functionality to connect the control arms to the steering knuckles, this ball joint supports rotation of a variety of planes, and is significant for excellent amalgamate control and steadiness. Made of high-quality steel and covered by a rubber guard, the Chevrolet Lumina Ball Joint can take the uncompromising usage and at the same time, shield the joint from dirt to contaminate it or provide it with necessary grease. Versatility is a major strength here, since the design integrates with numerous Chevrolet Lumina models produced between 1989 and 2013, for both reinforced and non-reinforced uses. This way the performance of the Lumina's suspension is improved not only by increasing the speed of its components, but also by helping to keep the vehicle safe and the tires' alignment free from abnormal wearing. In the field of vehicles and automotive, the Chevrolet Lumina Ball Joint has a unique selling proposition because of its reinforcement and the availability of the ability to create adjustable parts especially with regard to cars with altered suspension systems. The Chevrolet Lumina Ball Joint being one of its significant parts, it only proves that Chevrolet aims for longevity and efficiency in their automobiles, and this makes the ball joint an essential component for any Chevrolet Lumina owner who wished to preserve and enhance their car's efficiency and durability.
Chevrolet Lumina Ball Joint Parts and Q&A
- Q: How to service and repair a ball joint on Chevrolet Lumina?A:Start work on the Ball Joint after properly lifting and securing the vehicle under it. Take off the wheel and tire before removing the Ball Joint heat shield bolts then the heat shield itself. First loosen the stabilizer shaft bushing bolts but keep them installed. Then take out the lower Ball Joint cotter pin and nut. Boost your project with the Ball Joint remover/tie rod puller tool j 35917 to disconnect the Ball Joint from the lower Control Arm. When taking out the Ball Joint from its knuckle base make sure to avoid harming the drive axle boots. Begin with a 1/8 inch drill bit to create pilot holes before advancing to a 1/2 inch drill bit. Place the new Ball Joint in the knuckle/strut and secure it according to the Ball Joint kit instructions. Install and tighten the four Ball Joint bolts and nuts progressively to 19 nm (14 ft. Lbs.). Tighten the Ball Joint stud nut onto the lower Control Arm until its next slot fits the cotter pin hole on the Ball Joint near 1 flat (60 degrees) without exceeding 60 degrees of rotation. Fasten the new Ball Joint using the lower Control Arm and torque the stabilizer shaft bushing clamps to 48 nm (35 ft. Lbs.) and the lower Ball Joint nut to 85 nm (63 ft. Lbs.). Place a fresh cotter pin through the new Ball Joint nut and restock the Ball Joint shield before you secure its bolts at 7 nm (62 inch lbs.). Put back the tire and wheel assembly last as you bring the car down to ground level.

Related Chevrolet Lumina Parts
 Chevrolet Lumina CV Joint
 Chevrolet Lumina Coil Spring Insulator
 Chevrolet Lumina Coil Springs
 Chevrolet Lumina Control Arm
 Chevrolet Lumina Control Arm Bolt
 Chevrolet Lumina Crossmember Bushing
 Chevrolet Lumina Shock Absorber
 Chevrolet Lumina Shock And Strut Mount
 Chevrolet Lumina Steering Knuckle
 Chevrolet Lumina Sway Bar Bracket
 Chevrolet Lumina Sway Bar Bushing
 Chevrolet Lumina Sway Bar Kit