ChevyParts
My Garage
My Account
Cart
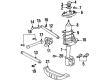
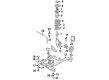
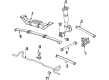
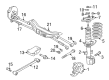
OEM Chevrolet Lumina Shock Absorber
Suspension Shock Absorber- Select Vehicle by Model
- Select Vehicle by VIN
Select Vehicle by Model
orMake
Model
Year
Select Vehicle by VIN
For the most accurate results, select vehicle by your VIN (Vehicle Identification Number).
6 Shock Absorbers found


Chevrolet Lumina Strut, Rear Part Number: 22064760

Chevrolet Lumina Strut Cartridge, Front Part Number: 22074850

Chevrolet Lumina Strut, Rear Part Number: 22064714

Chevrolet Lumina Strut Part Number: 88965469
Chevrolet Lumina Strut, Rear Part Number: 22064558

Chevrolet Lumina Strut, Rear Part Number: 22064554
Chevrolet Lumina Shock Absorber
Want to cut long-term maintenance and repair costs? Choose OEM Shock Absorber. Those parts deliver top durability you can trust. On our site, you'll find a huge catalog of genuine Chevrolet Lumina parts. Prices are unbeatable, so you can keep more in your pocket. Every OEM Chevrolet Lumina Shock Absorber includes a manufacturer's warranty. You can also get an easy return policy that keeps buying risk free. Fast delivery, get your car on the road quickly. It's simple to search, compare, and order. Stop guessing about quality or fit. Order today and save with parts that last.
Familiarity with the Chevrolet Lumina Shock Absorber is vital since it is part of the vehicle's suspension system and remains popular for numerous Lumina models manufactured from 1989 to 2013. The Shock Absorber is built for the purpose of receiving and minimizing shock impacts hence improving the ride quality and control. The Chevrolet Lumina Shock Absorber also restrain excessive deposition of movements by converting kinetic energy to heat and in cooperation with the capacities of springs control the vibrations and increases the efficiency and safety. The Lumina has used twin-tube as well as the mono-tube types where mono-tube has been considered the optimal in heat dissipation and performance in automotive markets. Higher features like PSD and ASD contribute towards the enhanced driving and additional superior technologies like electrorheological dampers or magnetorheological dampers help in improving the suspended system for superior comfort and control. Chevrolet Shock Absorber performs well with various models of Lumina, and thus extending the advantage of excellent performance to the drivers. As one of the strategic parts of Chevrolet Lumina Suspension System, Shock Absorber improves vehicle's handling as well as contributes to passengers safety, which is why it is crucial for every car owner. The Chevrolet Lumina Shock Absorber is another product that can speak volumes on how impressive engineering this car brand is, and how dedicated it is to producing quality vehicles.
Chevrolet Lumina Shock Absorber Parts Questions & Experts Answers
- Q: How should you safely handle gas charged shock absorbers during maintenance on Chevrolet Lumina?A:It is unsafe to unpickle the snap ring that resides in the shock absorber's top tube since high pressure gas would force out shock absorber contents with such force it could cause serious harm. Wear safety glasses for protection when drilling and centerpunching the shock absorber cylinder while being cautious to keep the tube from getting damaged. A centerpunch should form a 10 mm (0.4 inch) indentation at the bottom end of the tube. Position the shock absorber in a vise at horizontal orientation when it extends to its maximum length. Drill a 5 mm (3/16 inch) hole through the centerpunch mark to allow gas or gas/oil mixture expulsion while using shop towels to contain the oil. Drilling begins with creating an indentation at the tube center using the centerpunch and using this mark to drill a second hole with the same drill bit while treating the oil spill with shop towels. Before you remove the shock absorber from the vise position the tube horizontally with the hole facing down to drain the oil by moving the rod end-to-end through the tube opening.

Related Chevrolet Lumina Parts
 Chevrolet Lumina Ball Joint
 Chevrolet Lumina Coil Spring Insulator
 Chevrolet Lumina Coil Springs
 Chevrolet Lumina Control Arm Bolt
 Chevrolet Lumina Control Arm Bracket
 Chevrolet Lumina Crossmember Bushing
 Chevrolet Lumina Leaf Spring
 Chevrolet Lumina Steering Knuckle
 Chevrolet Lumina Sway Bar Bushing
 Chevrolet Lumina Sway Bar Kit
 Chevrolet Lumina Sway Bar Link
 Chevrolet Lumina Trailing Arm