ChevyParts
My Garage
My Account
Cart
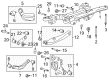
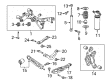
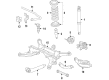
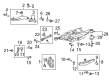
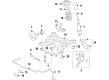
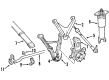
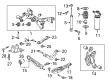
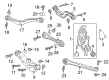
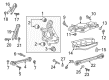
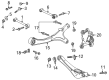
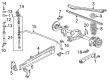
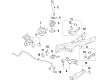
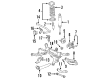
OEM Chevrolet Trailing Arm
Trailing Control Arm- Select Vehicle by Model
- Select Vehicle by VIN
Select Vehicle by Model
orMake
Model
Year
Select Vehicle by VIN
For the most accurate results, select vehicle by your VIN (Vehicle Identification Number).
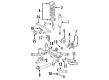
123 Trailing Arms found


Chevrolet Upper Control Arm, Rear Driver Side Part Number: 20900531
$108.12 MSRP: $188.43You Save: $80.31 (43%)Ships in 1-2 Business DaysProduct Specifications- Other Name: Arm, Rear Axle Control Arm; Suspension Control Arm; Rear Upper Control Arm; Control Arm
- Position: Rear Driver Side


Chevrolet Lower Control Arm, Rear Part Number: 84059879
$60.38 MSRP: $103.71You Save: $43.33 (42%)Ships in 1-2 Business DaysProduct Specifications- Other Name: Arm, Rear Axle Control Arm; Control Arm
- Position: Rear
- Replaced by: 87825466


Chevrolet Control Arm, Rear Driver Side Part Number: 22927292
$126.72 MSRP: $215.74You Save: $89.02 (42%)Ships in 1-2 Business DaysProduct Specifications- Other Name: Arm Assembly-Rear Suspension Control; Suspension Trailing Arm Bushing; Suspension Trailing Arm; Trailing Arm; Front Upper Control Arm; Arm, Rear Axle Control Arm
- Position: Rear Driver Side
- Replaces: 13219145


Chevrolet Trailing Arm, Rear Passenger Side Part Number: 23269736
$143.13 MSRP: $223.18You Save: $80.05 (36%)Ships in 1-2 Business DaysProduct Specifications- Other Name: Arm Assembly-Rear Suspension Trailing; Suspension Trailing Arm Bushing; Suspension Trailing Arm; Arm, Rear Axle Control Arm
- Position: Rear Passenger Side
- Replaces: 25896863


Chevrolet Upper Control Arm, Rear Passenger Side Part Number: 23110246
$97.78 MSRP: $167.93You Save: $70.15 (42%)Ships in 1-2 Business DaysProduct Specifications- Other Name: Arm, Rear Axle Control Arm; Suspension Control Arm; Control Arm
- Position: Rear Passenger Side
- Replaces: 22786034, 92240559, 92236926

Chevrolet Upper Control Arm Part Number: 92458015
$599.03 MSRP: $1079.35You Save: $480.32 (45%)Ships in 1-3 Business DaysProduct Specifications- Other Name: Arm, Rear Axle Control Arm; Suspension Control Arm; Control Arm
- Position: Rear Upper
- Replaces: 92199104, 92199105
Chevrolet Upper Control Arm, Rear Passenger Side Part Number: 20900532
$107.64 MSRP: $186.02You Save: $78.38 (43%)Ships in 1-2 Business DaysProduct Specifications- Other Name: Arm, Rear Axle Control Arm; Suspension Control Arm; Rear Upper Control Arm; Control Arm
- Position: Rear Passenger Side

Chevrolet Control Arm, Rear Driver Side Part Number: 10233635
$397.45 MSRP: $625.37You Save: $227.92 (37%)Ships in 1-3 Business DaysProduct Specifications- Other Name: Arm, Rear Axle Control Arm; Lower Control Arm
- Position: Rear Driver Side

Chevrolet Trailing Arm, Rear Passenger Side Part Number: 23463142
$63.28 MSRP: $100.46You Save: $37.18 (38%)Product Specifications- Other Name: Arm Assembly-Rear Suspension Trailing
- Position: Rear Passenger Side
Chevrolet Control Arm, Rear Passenger Side Part Number: 22927293
$126.41 MSRP: $215.20You Save: $88.79 (42%)Ships in 1-2 Business DaysProduct Specifications- Other Name: Arm Assembly-Rear Suspension Control; Suspension Trailing Arm; Trailing Arm; Front Upper Control Arm; Arm, Rear Axle Control Arm
- Position: Rear Passenger Side
- Replaces: 13219146

Chevrolet Trailing Arm, Rear Upper Driver Side Part Number: 84199653
$50.15 MSRP: $85.39You Save: $35.24 (42%)Ships in 1-2 Business DaysProduct Specifications- Other Name: Link Assembly-Rear Suspension Upper Trailing; Suspension Trailing Arm; Integral Link; Upper Link; Link, Rear Axle Control Arm
- Position: Rear Upper Driver Side

Chevrolet Trailing Arm, Rear Lower Part Number: 86804916
$29.50 MSRP: $48.61You Save: $19.11 (40%)Ships in 1-3 Business DaysProduct Specifications- Other Name: Link Assembly-Rear Suspension Lower Trailing; Lower Arm; Link, Rear Axle Control Arm
- Position: Rear Lower
- Replaces: 84933815, 23415095

Chevrolet Upper Control Arm Part Number: 92294160
$145.73 MSRP: $231.36You Save: $85.63 (38%)Ships in 1-2 Business DaysProduct Specifications- Other Name: Arm, Rear Axle Control Arm; Control Arm Bushing; Axle Beam Mount; Upper Control Arm Inner Bushing; Control Arm
- Position: Rear Upper
- Replaces: 92246196

Chevrolet Lower Control Arm, Rear Driver Side Part Number: 20763134
$204.95 MSRP: $337.63You Save: $132.68 (40%)Ships in 1-2 Business DaysProduct Specifications- Other Name: Arm, Rear Axle Control Arm; Suspension Control Arm; Control Arm
- Position: Rear Driver Side

Chevrolet Lower Control Arm, Rear Part Number: 84309090
$52.66 MSRP: $90.41You Save: $37.75 (42%)Ships in 1-2 Business DaysProduct Specifications- Other Name: Arm, Rear Axle Control Arm; Suspension Control Arm; Control Arm
- Position: Rear
- Replaces: 23350585, 84708923, 84149390

Chevrolet Upper Control Arm, Rear Driver Side Part Number: 10332514
$137.34 MSRP: $226.24You Save: $88.90 (40%)Ships in 1-2 Business DaysProduct Specifications- Other Name: Arm, Rear Axle Control Arm; Control Arm
- Position: Rear Driver Side

Chevrolet Lower Control Arm, Rear Passenger Side Part Number: 84728686
$83.20 MSRP: $142.87You Save: $59.67 (42%)Ships in 1-2 Business DaysProduct Specifications- Other Name: Arm, Rear Axle Control Arm; Control Arm
- Position: Rear Passenger Side

Chevrolet Control Arm, Rear Part Number: 10251391
$119.21 MSRP: $189.27You Save: $70.06 (38%)Ships in 1-2 Business DaysProduct Specifications- Other Name: Arm, Rear Axle Control Arm; Suspension Control Arm
- Position: Rear


Chevrolet Upper Control Arm, Green Line, Rear Part Number: 25850211
$73.64 MSRP: $131.50You Save: $57.86 (44%)Product Specifications- Other Name: Arm, Rear Axle Control Arm; Suspension Control Arm; Control Arm
- Position: Rear
- Replaces: 10384438

Chevrolet Trailing Arm, Rear Passenger Side Part Number: 20792698
Product Specifications- Other Name: Arm Assembly-Rear Suspension Trailing; Suspension Trailing Arm Bushing; Arm, Rear Axle Control Arm
- Position: Rear Passenger Side
- Replaces: 15240207
| Page 1 of 7 |Next >
1-20 of 123 Results
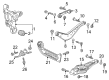
Chevrolet Trailing Arm
Want to cut long-term maintenance and repair costs? Choose OEM Trailing Arm. Those parts deliver top durability you can trust. On our site, you'll find a huge catalog of genuine Chevrolet parts. Prices are unbeatable, so you can keep more in your pocket. Every OEM Chevrolet Trailing Arm includes a manufacturer's warranty. You can also get an easy return policy that keeps buying risk free. Fast delivery, get your car on the road quickly. It's simple to search, compare, and order. Stop guessing about quality or fit. Order today and save with parts that last.
Chevrolet Trailing Arm Parts Questions & Experts Answers
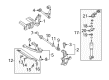
- Q: How to replace the trailing arm on Chevrolet Equinox?A:A mechanic must first lift and support the vehicle before replacing its Trailing Arm. Start by removing the Trailing Arm bracket bolts from the body then continue with the Trailing Arm Bushing bolts from the bracket. Disassembly begins with unfastening the Trailing Arm bolts attaching to the knuckle then proceeding to free the park brake cable clip and Trailing Arm. First install the Trailing Arm onto the knuckle before tightening all bolts to 110 nm (81 ft. Lbs.). Loosely mount the Trailing Arm Bushing to bracket nut and bolt after placing the bracket to the Trailing Arm. Push the Trailing Arm upward while installing the front bolt with loose tension but complete alignment with a drift on the other bolts. Tighten the Trailing Arm bracket to body bolts to 110 nm (81 ft. Lbs.) secure the Trailing Arm Bushing to bracket nut and bolt by applying 160 nm (118 ft. Lbs.) torque. Finally, install the park brake cable clip and tighten the bolt to 25 nm (18 ft. Lbs.) before lowering the vehicle.
- Q: How to service and repair the trailing arm on Chevrolet Impala?A:Support and elevate the car first before servicing and repairing the trailing arm. It is advisable to remove the tire and wheel assembly. Disconnect the ABS electric harness and then disconnect the trailing arm from knuckle and from the trailing arm bracket before trailing arm. To install, attach the trailing arm to the trailing arm bracket, making sure to install the bracket bolt/screw and nut, tighten the bracket nut to 105 Nm (77 ft. lbs.). Next, attach the trailing arm to the knuckle and use the trailing arm to knuckle nut leaving it at 260 Nm (192 ft. lbs.). And torque the ABS electrical harness, put the tire and wheel assembly and lastly the vehicle with lowering. The tool that is needed for this procedure is the Torque Angle Meter (J 36660-A).
- Q: How to properly align and replace the Lateral Link and Trailing Arm on a Chevrolet Malibu?A:The vehicle needs to be raised and supported before removing the tire and wheel to replace the rear lateral links and trailing arms. Berkeley ABS wire harness detachment takes precedence while the link-to-knuckle assembly should be removed with nut and bolt and washer . Push forward with bolt to make space for link removal. After that, remove link nut and bolt from rear suspension support. Extract the front front link from the vehicle. Service Precautions regarding Fastener Notice must be observed before attaching the front link to the vehicle during installation. Position the link bolt and nut at the rear suspension support afterward tightening the rear link bolt to 120 Nm (89 ft. lbs.). First reconnect the ABS wire harness to the lateral link before installing the front link using the knuckle bolt , washer and nut . Complete the installation by tightening the link to the knuckle nut correctly up to 100 Nm (74 ft. lbs.). Reinstall the tire and wheel before finalizing the adjustment of rear wheel alignment.


Related Chevrolet Parts
 Chevrolet Torsion Bar
 Chevrolet Coil Springs
 Chevrolet CV Boot
 Chevrolet Coil Spring Insulator
 Chevrolet Control Arm Bushing
 Chevrolet Lateral Arm
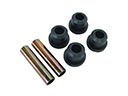 Chevrolet Leaf Spring Bushing
 Chevrolet Shock Absorber
 Chevrolet Shock and Strut Boot
 Chevrolet Sway Bar Bracket
 Chevrolet Sway Bar Bushing
 Chevrolet Trailing Arm Bushing
Browse Chevrolet Trailing Arm by Models
Nova Tahoe Malibu Camaro Equinox Impala SS SSR Avalanche Silverado 1500 Silverado 2500 HD Caprice Classic Suburban Traverse Blazer Tracker El Camino Trailblazer Corvette Lumina Metro Monte Carlo Prizm Silverado 2500 Uplander Venture Silverado 3500 Suburban 1500 Trailblazer EXT Avalanche 1500 Avalanche 2500 Captiva Sport Impala Limited Malibu Limited Silverado 1500 HD Suburban 2500