ChevyParts
My Garage
My Account
Cart
OEM Chevrolet Malibu Ball Joint
Control Arm Joint- Select Vehicle by Model
- Select Vehicle by VIN
Select Vehicle by Model
orMake
Model
Year
Select Vehicle by VIN
For the most accurate results, select vehicle by your VIN (Vehicle Identification Number).
1 Ball Joint found

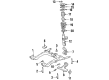
Chevrolet Malibu Ball Joint Part Number: 88967438
$53.24 MSRP: $106.88You Save: $53.64 (51%)
Chevrolet Malibu Ball Joint
Our website offers an extensive catalog of genuine Chevrolet Malibu Ball Joint at unbeatable prices. Every OEM Chevrolet Malibu Ball Joint comes with a manufacturer's warranty, an easy return policy, and rapid delivery service. Don't miss out on this great opportunity!
Chevrolet Malibu Ball Joint Parts Questions & Experts Answers
- Q: How to replace the lower ball joint on Chevrolet Malibu?A: Raise the vehicle to start replacing the lower Ball Joint. When servicing the drive axle joints make sure to avoid pushing too far which may trigger internal damage through breaking of the joint parts; install boot protectors to safeguard the joints. Turn off power to the wheel area by detaching the tire, wheel, wiring harness from the lower Control Arm, and stabilizer shaft link. Take out first the cotter pin before removing the nut from the Ball Joint stud. To separate the Steering Knuckle and Ball Joint stud you need to use the j 43828 Ball Joint separator tool. Separate the lower Control Arm from the front suspension crossmember by removing its bolts and nuts followed by withdrawing the front suspension crossmember rear bolt from the lower Control Arm. Fasten the Control Arm in a vise and remove the three rivets from the Control Arm to the lower Control Arm using a 3 mm and 13 mm drill bit set. Unscrew and take out the lower Control Arm Ball Joint. Insert the new Ball Joint into the Control Arm and fasten the three Ball Joint bolts with nuts according to the torque values specified in the Ball Joint package. Place the lower Control Arm on to the front suspension crossmember and fasten the front suspension crossmember rear bolt to the Control Arm with a torque of 245 nm (180 ft-lbs) plus 180 degrees rotation. Fasten the front suspension crossmember front bolts and nuts to the lower Control Arm. Tighten them to 115 nm (84 ft. Lbs.) with 120 degrees of rotation added. Install the knuckle to the joint stud and fasten it using the nut. Torque it at a minimum of 55 nm or 41 ft. Lbs. And a maximum of 65 nm or 55 ft. Lbs. Then add the cotter pin. Put back the stabilizer shaft link with the wiring harness to the lower Control Arm then reattach wheel wheels and tire assemblies before putting the vehicle down for a wheel alignment check.

Related Chevrolet Malibu Parts
 Chevrolet Malibu Control Arm
 Chevrolet Malibu Shock Absorber
 Chevrolet Malibu Coil Spring Insulator
 Chevrolet Malibu Coil Springs
 Chevrolet Malibu Control Arm Bolt
 Chevrolet Malibu Control Arm Bushing
 Chevrolet Malibu Crossmember Bushing
 Chevrolet Malibu Front Cross-Member
 Chevrolet Malibu Shock And Strut Mount
 Chevrolet Malibu Shock and Strut Boot
 Chevrolet Malibu Sway Bar Bracket
 Chevrolet Malibu Sway Bar Kit