
Popular OEM Chevrolet Malibu Parts
- Body & Hardware Parts View More >
- Steering Parts View More >
- Electrical Parts View More >
- Air & Fuel Delivery Parts View More >
- Charging & Starting Parts View More >
- Engine Parts View More >
- Belts & Cooling Parts View More >
- Suspension Parts View More >
- Emission Control & Exhaust Parts View More >
- Transmission Parts View More >
- Brakes Parts View More >
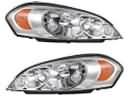
- Headlights & Lighting Parts View More >


Why Buy Genuine Chevrolet Malibu Parts From ChevyPartsGiant.com
Looking for real Chevrolet Malibu parts? ChevyPartsGiant.com may be a better choice to find genuine parts at wallet-friendly prices. We sell only OEM Chevrolet Malibu parts, ensuring perfect fit, reliability, and long-term performance. With our website, you can easily get access to the same parts found at local Chevrolet stores. All components are produced by Chevrolet and are exclusively fitted on Chevrolet Malibu automobiles. By shopping at our store, you can enjoy the quality of the Chevrolet factory without the high prices of brick-and-mortar facilities. We achieve this because we are an online store operating at lower costs, which we pass on to you. We also have a user-friendly platform where you can find and order genuine Chevrolet Malibu parts swiftly. We are here to make your process of restoring a Chevrolet Malibu or dealing with simple repairs quick and inexpensive. We also make it easy to obtain Chevrolet Malibu parts at competitive shipping prices and a team of knowledgeable staff ready to take your order. Choose ChevyPartsGiant.com to save time and money, as well as keep your Chevrolet Malibu in the good condition.
Since its introduction in 1964 the Chevrolet Malibu stands as a vital vehicle in Chevrolet's product range through its nine evolutionary generation changes. Standard Chevrolet Malibu vehicles use a turbocharged 1.5-liter four-cylinder engine that offers dual power ranges between 160 horsepower and 184 lb-ft torque because it joins with a CVT automatic transmission to enhance driving capabilities. Despite being the top-tier model of the Chevrolet Malibu lineup customers get access to the 2.0-liter four-cylinder engine featuring 250 horsepower and 260 lb-ft of torque and a nine-speed automatic transmission for enhanced shifting and speed capabilities. Front-wheel-drive has replaced rear-wheel-drive in the Chevrolet Malibu leading to improved steering stability during operation. The 2.0-liter engine model of Malibu reaches 60 mph in 7.8 seconds yet supports a maximum speed of 130 mph. With the 1.5-liter engine Malibu passengers can expect 32 mpg combined and 36 mpg highway and 29 mpg city performance based on EPA estimates. Supportive seating components along with ample cargo capacity mark the fundamental features of the Chevrolet Malibu interior space. The use of genuine parts for Chevrolet Malibu maintenance provides absolute optimal performance and vehicle lifespan because these components match original specifications during manufacturing which enhances overall stability and reliable handling.
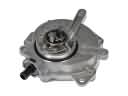
Chevrolet Malibu groups issues into ignition, body electronics, and fuel delivery. In ignition, the Chevrolet Malibu may misfire and flash the warning lamp. Failed wiring or an ignition coil often drops spark under load. Confirm codes, scope ignition patterns, and replace the ignition coil if weak. Verify plug and wire condition, noting any tracking or oil fouling. Verify coil power, ground, and driver with a meter. Chevrolet Malibu electrical glitches may be closely associated with the connectors of the body control module (BCM). Corroded areas should be fixed and checked, plugs replaced, check terminal tension adjusted to bring about stable indicators. Back probe BCM terminals for voltage drop under accessory loads. For fuel delivery, the Malibu can stall or crank long without starting. Low pressure from a failing fuel pump commonly causes these symptoms. Check rail pressure, power, and ground, and replace the fuel pump and relay. Listen for the prime at key on and check pressure decay. Replace the filter on schedule to protect pump loading and flow. The Malibu should then idle smoothly and pull cleanly through the revs. These groups align with starting reliability, electrical integrity, and power delivery on the Malibu. Tackle ignition issues first, address BCM connections next, then resolve fueling to maintain Chevrolet reliability.
Chevrolet Malibu Parts Questions & Answers
- Q: How to repair the emblem/nameplate on Chevrolet Malibu?A:Begin by cleaning the panel with soap and water followed by a dry towel. Clean both the panel surface and the adhesive side of the emblem/nameplate with a clean rag dipped in 3M General Purpose Adhesive Cleaner 08984. Use a clean cloth to wipe alcohol and water across all surfaces before cleaning the remaining parts with a soft alcohol/lukewarm water blend. Leave intact tape tape on the molding or nameplate panels when cleaning the installation surface and backing with Adhesive Cleaner. When tape damage occurs you should replace the emblem/nameplate directly. Place masking tape or a magnetic strip over the surface as a easy guideline if needed. Apply only enough adhesive for installing parts because excess material causes paint to discolor. Put a thin layer of adhesive on the nameplate and both sides of the molding before setting the emblem onto its space. You must maintain continuous pressure over 30 seconds or until full bonding occurs when you work with LOCTITE(TM) 414 adhesive GM P/N 1052621.
- Q: How to replace and install an alternator on Chevrolet Malibu?A:To replace the generator, start with the disconnection of the negative cable of the battery. The generator should be serviced as a whole unit. Next you take away the Drive Belt, finish the generator electric connections, and the generator mounting nuts and bolts to extract the generator. Position the generator and tighten the bolts at 50 n.m (37 lb ft) and nuts of 30 n.m (22 lb ft), refer to fastener notice in service precautions. Once you have secured the generator, reconnect the electrical connections, refresh the Drive Belt, and the to top of it, reconnect the negative batter cable.
- Q: How to replace the steering wheel on Chevrolet Malibu?A:To replace the Steering Wheel, one should remove the upper steering column trim cover and de-energize the sir system. Then you take out the inflator module and pull the Steering Wheel control electrical connector. There is no Steering Wheel nut; therefore, the Steering Wheel puller legs j 42578 (J 42578) and Steering Wheel puller j 1859-a (J 1859-A) are equipped to the Steering Wheel to remove the Steering Wheel. Utilize these tools to remove the Steering Wheel and then remove them. Remove the controls and the control harness attached to the Steering Wheel. For installation, the controls, the control harness, and the wiring for the steering column are mounted the Steering Wheel, passing the steering column's wiring through it and installing the Steering Wheel. Connect the Steering Wheel control electrical connector, and secure with nut, tighten to 32 nm(24 ft. Lbs.). Lastly, install the inflator module and the upper steering column trim and also allow the sir system.
- Q: How to replace the rear compartment lid overslam bumper and adjust the rear compartment lid torque on Chevrolet Malibu?A:You must remove both the rear compartment lid outer bumper and the side bumper before starting. After you put on the rear compartment side bumper install the outer bumper of the compartment lid. Turn the bumper until the lid touches the back quarter panel without making the closing process harder.


