ChevyParts
My Garage
My Account
Cart
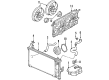
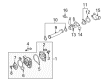
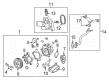
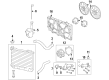
OEM Chevrolet Malibu Water Pump
H2O Pump- Select Vehicle by Model
- Select Vehicle by VIN
Select Vehicle by Model
orMake
Model
Year
Select Vehicle by VIN
For the most accurate results, select vehicle by your VIN (Vehicle Identification Number).
11 Water Pumps found


Chevrolet Malibu Water Pump Part Number: 89017269
$131.73 MSRP: $257.90You Save: $126.17 (49%)Ships in 1-2 Business Days


Chevrolet Malibu Water Pump Part Number: 12702111
$151.00 MSRP: $281.75You Save: $130.75 (47%)

Chevrolet Malibu Water Pump, Green Line Part Number: 12630084
$203.28 MSRP: $394.54You Save: $191.26 (49%)Ships in 1-3 Business Days
Chevrolet Malibu Water Pump Part Number: 25204309
$173.71 MSRP: $340.10You Save: $166.39 (49%)Ships in 1-2 Business Days
Chevrolet Malibu Water Pump Part Number: 12709178
$126.18 MSRP: $380.82You Save: $254.64 (67%)
Chevrolet Malibu Water Pump Part Number: 55582273
$148.78 MSRP: $279.41You Save: $130.63 (47%)Ships in 1-2 Business Days
Chevrolet Malibu Water Pump Part Number: 25201450
$237.44 MSRP: $464.89You Save: $227.45 (49%)Ships in 1-2 Business Days
Chevrolet Malibu Water Pump Part Number: 22965101
$114.12 MSRP: $206.55You Save: $92.43 (45%)Ships in 1-2 Business Days
Chevrolet Malibu Water Pump Part Number: 24577255

Chevrolet Malibu Water Pump Part Number: 12657197
Chevrolet Malibu Water Pump Part Number: 12371989
Chevrolet Malibu Water Pump
Want to cut long-term maintenance and repair costs? Choose OEM Water Pump. Those parts deliver top durability you can trust. On our site, you'll find a huge catalog of genuine Chevrolet Malibu parts. Prices are unbeatable, so you can keep more in your pocket. Every OEM Chevrolet Malibu Water Pump includes a manufacturer's warranty. You can also get an easy return policy that keeps buying risk free. Fast delivery, get your car on the road quickly. It's simple to search, compare, and order. Stop guessing about quality or fit. Order today and save with parts that last.
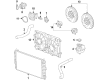
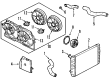
Chevrolet Malibu vehicles have specific Water Pump that is responsible for circulating coolant from the radiator and pumping it to the engine, and absorbs and expels heat produced during the combustion process. Nearly all Malibu models employ aluminum water pump with impellers and the function is to circulate coolant through the engine block and to the radiator. The older models are usually associated with the use of belt drives whereas the latest often come with an electric water pump. Standard appliances for high performance engines include the performance water pumps which also have hiked up features of better coolant flow and low power consumption in comparison to other water pumps. These pumps can be tailored to run for various engine types and power outputs and should offer improved cooling and possibly add to efficiency to automobiles.
Chevrolet Malibu Water Pump Parts Questions & Experts Answers
- Q: How to replace the water pump (L61) on Chevrolet Malibu?A:Before you work on the Water Pump l61 you must empty the coolant system. Set the sprocket and chain in the correct position by using the Water Pump holding tool (J 43651) before starting service. Take out the bolts linking thermostat pipe to cylinder unit and remove exhaust manifold shield plates from top and bottom. Disconnect the Water Pump access panel plus right-hand wheel assembly unit. Shutdown the internal push-pins and get rid of the splash shield parts. Detach the engine Coolant Temperature Sensor wiring and go ahead with Water Pump Drain Plug removal for additional fluid removal. Move the thermostat housing left while twisting its bolts to detach the water feed pipe but leave coolant hoses and housing cover joined. Set the water pipe seals apart and add the Water Pump holding tool (J 43651) to the Water Pump sprocket before tightening its bolts. Fasten the Water Pump tool while tightening the cover bolts followed by the removal of both engine block retaining bolts and sprocket bolts from within the Water Pump. Disconnect the Water Pump unit including its o-ring seal. First read through all steps of the procedure to prevent Water Pump re-timing problems during installation. Use a new Water Pump seal then make an alignment guide using an m6 m x 6 mm bolt. Put the Water Pump assembly against the engine block surface and start the bolts by hand. Replace the inner Water Pump sprocket bolts by removing the guide pin after tightening the first two bolts. Then apply 25 nm (18 ft. Lbs.) torque to all Water Pump bolts. Use a 10nm torque wrench to fasten and then take out the Water Pump holding tool (J43651) after tightening the Water Pump socket bolts. Fix the Water Pump access plate onto its position with bolts that require tightening to 10 nm (89 inch lbs). Apply silicone gel to the water feed pipe seals then put on a fresh o-ring seal and check that the thermostat housing block seal remains in place. Fit the water supply hose into the assembly while maintaining proper alignment to the thermostat opening then insert the o-ring seal gently. Set the thermostat housing on the engine space and secure the bolts at 10 nm torque (89 inch lbs). Rejoin the Coolant Temperature Sensor before attaching the inner splash shield with push pins and lastly the right-hand wheel assembly together with its wheel nuts at 125 nm (92 ft. Lbs.). Set the vehicle to its normal height before attaching the thermostat pipe bracket to the cylinder head bolt at 8 nm (71 inch lbs.) and placing the exhaust manifold heat shield bolts which need torqueing to 23 nm (17 ft. Lbs.). Check the vehicle level while closing all drain valves then fill the engine coolant system and look for any fluid leaks.

Related Chevrolet Malibu Parts
 Chevrolet Malibu Radiator
 Chevrolet Malibu Coolant Reservoir
 Chevrolet Malibu Radiator fan
 Chevrolet Malibu A/C Condenser Fan
 Chevrolet Malibu Automatic Transmission Oil Cooler Line
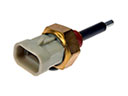 Chevrolet Malibu Coolant Level Sensor
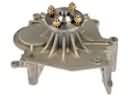 Chevrolet Malibu Cooling Fan Bracket
 Chevrolet Malibu Fan Motor
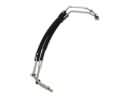 Chevrolet Malibu Oil Cooler Hose
 Chevrolet Malibu Thermostat Gasket
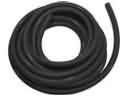 Chevrolet Malibu Transmission Oil Cooler Hose
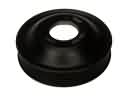 Chevrolet Malibu Water Pump Pulley