ChevyParts
My Garage
My Account
Cart
OEM Chevrolet Equinox Ball Joint
Control Arm Joint- Select Vehicle by Model
- Select Vehicle by VIN
Select Vehicle by Model
orMake
Model
Year
Select Vehicle by VIN
For the most accurate results, select vehicle by your VIN (Vehicle Identification Number).
2 Ball Joints found


Chevrolet Equinox Lower Ball Joint, Front Part Number: 19258791
$43.63 MSRP: $74.91You Save: $31.28 (42%)Ships in 1-2 Business Days
Chevrolet Equinox Ball Joint Part Number: 88965333
$51.99 MSRP: $82.54You Save: $30.55 (38%)Ships in 1-2 Business Days
Chevrolet Equinox Ball Joint
Want to cut long-term maintenance and repair costs? Choose OEM Ball Joint. Those parts deliver top durability you can trust. On our site, you'll find a huge catalog of genuine Chevrolet Equinox parts. Prices are unbeatable, so you can keep more in your pocket. Every OEM Chevrolet Equinox Ball Joint includes a manufacturer's warranty. You can also get an easy return policy that keeps buying risk free. Fast delivery, get your car on the road quickly. It's simple to search, compare, and order. Stop guessing about quality or fit. Order today and save with parts that last.
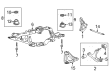
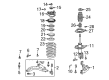
The Ball Joint of Chevrolet Equinox cars are imperative components in the suspension and steering systems of the cars where it links the control arms to the steering knuckles allowing free rotation in two planes but inhibiting translation. Usually, Equinox cars use upper and lower ball joints within their suspensions, and the upper ones normally act as the followers. Born of steel these eyebars have a bearing stud and socket with a rubber boot to shield from dirt and allow the passage of lubrication. Kingpin had earlier been used but has been replaced partly by ball joints where meeting of caster and camber can be adjusted significantly improving the behavior of the vehicle, stability and comfort of ride. Ball joint being one of the most significant constraints of this modern advancements is commonly manufactured as a sealed for life type that does not require frequent lubrication hence elongating the service interval.
Chevrolet Equinox Ball Joint Parts Questions & Experts Answers
- Q: How to replace the lower ball joint on Chevrolet Equinox?A:Before installing the new joint on the lower Control Arm you must first remove the component and anchor it in either a vise or appropriate fixture. Drill through the Ball Joint rivets using an 8 mm drill bit and continue drilling through the hole with a 12 mm drill bit. Use a standard drill bit to clean the Control Arm then take out the Ball Joint and note its position while preparation for reinstallation. Set the replacement Ball Joint onto its clean Control Arm according to the marked position. You must recognize the two ball stud types present to apply the right nut torque since selecting the wrong torque will harm the ball stud. Stick to the hardware included with your new Ball Joint and install all bolts with their heads facing upwards. You must adjust the nut torque to 60 n.m (44 lb-ft) when dealing with the lower Control Arm ball stud nut that has a silver cup at its bottom while adjusting the nut torque to 40 n.m (30 lb-ft) for the lower Control Arm ball stud nut with a black and flat base. Afterward install the lower Control Arm back.

Related Chevrolet Equinox Parts
 Chevrolet Equinox Control Arm
 Chevrolet Equinox Control Arm Bushing
 Chevrolet Equinox Coil Spring Insulator
 Chevrolet Equinox Coil Springs
 Chevrolet Equinox Crossmember Bushing
 Chevrolet Equinox Shock Absorber
 Chevrolet Equinox Shock And Strut Mount
 Chevrolet Equinox Steering Knuckle
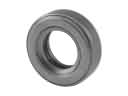 Chevrolet Equinox Strut Bearing
 Chevrolet Equinox Sway Bar Bushing
 Chevrolet Equinox Sway Bar Kit
 Chevrolet Equinox Sway Bar Link