ChevyParts
My Garage
My Account
Cart
OEM Chevrolet Equinox Shock Absorber
Suspension Shock Absorber- Select Vehicle by Model
- Select Vehicle by VIN
Select Vehicle by Model
orMake
Model
Year
Select Vehicle by VIN
For the most accurate results, select vehicle by your VIN (Vehicle Identification Number).
64 Shock Absorbers found


Chevrolet Equinox Shock Absorber, Rear Upper Part Number: 84293463
$75.34 MSRP: $141.48You Save: $66.14 (47%)Ships in 1-2 Business Days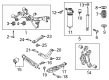
Chevrolet Equinox Shock Absorber, Rear Upper Part Number: 84912404
$83.72 MSRP: $149.49You Save: $65.77 (44%)Ships in 1-3 Business Days
Chevrolet Equinox Shock Absorber, Rear Upper Part Number: 84912458
$79.23 MSRP: $141.48You Save: $62.25 (44%)Ships in 1-3 Business Days
Chevrolet Equinox Strut, Driver Side Part Number: 84912398
$71.80 MSRP: $139.35You Save: $67.55 (49%)
Chevrolet Equinox Strut Part Number: 19208642
$73.76 MSRP: $202.76You Save: $129.00 (64%)Ships in 1-2 Business Days
Chevrolet Equinox Strut, Passenger Side Part Number: 84300600
$97.19 MSRP: $177.44You Save: $80.25 (46%)Ships in 1-2 Business DaysChevrolet Equinox Strut, Driver Side Part Number: 84300595
$95.46 MSRP: $172.78You Save: $77.32 (45%)Ships in 1-3 Business Days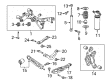
Chevrolet Equinox Shock Absorber, Rear Upper Part Number: 84912400
$95.83 MSRP: $185.99You Save: $90.16 (49%)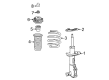
Chevrolet Equinox Strut, Passenger Side Part Number: 84912457
$78.33 MSRP: $139.87You Save: $61.54 (44%)Ships in 1-3 Business DaysChevrolet Equinox Strut, Passenger Side Part Number: 84912411
$77.65 MSRP: $152.01You Save: $74.36 (49%)Chevrolet Equinox Strut, Driver Side Part Number: 84300599
$95.41 MSRP: $179.18You Save: $83.77 (47%)Ships in 1-2 Business DaysChevrolet Equinox Shock Absorber, Rear Upper Part Number: 84912412
$99.18 MSRP: $192.49You Save: $93.31 (49%)
Chevrolet Equinox Strut, Passenger Side Part Number: 19208307
$114.13 MSRP: $202.89You Save: $88.76 (44%)Ships in 1-2 Business DaysChevrolet Equinox Strut, Driver Side Part Number: 84912410
$82.75 MSRP: $160.59You Save: $77.84 (49%)Chevrolet Equinox Strut Part Number: 19209414
$112.30 MSRP: $203.24You Save: $90.94 (45%)Ships in 1-2 Business DaysChevrolet Equinox Strut, Driver Side Part Number: 84912414
$78.41 MSRP: $140.02You Save: $61.61 (44%)Ships in 1-3 Business DaysChevrolet Equinox Strut, Passenger Side Part Number: 84300602
$94.49 MSRP: $177.44You Save: $82.95 (47%)Ships in 1-2 Business DaysChevrolet Equinox Strut, Driver Side Part Number: 84300597
$90.85 MSRP: $177.85You Save: $87.00 (49%)Ships in 1-2 Business DaysChevrolet Equinox Strut, Driver Side Part Number: 84912456
$78.33 MSRP: $139.87You Save: $61.54 (44%)Ships in 1-3 Business DaysChevrolet Equinox Strut Part Number: 19209412
$93.51 MSRP: $257.04You Save: $163.53 (64%)Ships in 1-2 Business Days
| Page 1 of 4 |Next >
1-20 of 64 Results
Chevrolet Equinox Shock Absorber
Want to cut long-term maintenance and repair costs? Choose OEM Shock Absorber. Those parts deliver top durability you can trust. On our site, you'll find a huge catalog of genuine Chevrolet Equinox parts. Prices are unbeatable, so you can keep more in your pocket. Every OEM Chevrolet Equinox Shock Absorber includes a manufacturer's warranty. You can also get an easy return policy that keeps buying risk free. Fast delivery, get your car on the road quickly. It's simple to search, compare, and order. Stop guessing about quality or fit. Order today and save with parts that last.
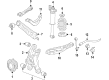
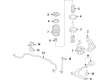
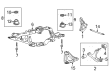
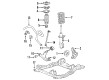
The Shock Absorber of Chevrolet Equinox vehicles is one of the important components of the vehicles suspension system, which supports it with the help of struts. They also assist in eliminating bounding and receiving impact forces, which enhances the car's steady and balanced driving. Through the years, Equinox vehicles have the usage of various types of shock absorbers that has twin-tube and mono-tube construction where the mechanisms that controls the flow of hydraulic fluid vastly differ providing better performance under different driving conditions. Still more enhanced versions are PSD and ASD that finely tune the shock absorber responses for particular driving conditions and electrorheological and magnetorheological dampers that make semi-active and adaptive suspension systems improving comfort and control in real time.
Chevrolet Equinox Shock Absorber Parts and Q&A
- Q: How to service and repair the front coil springs and shock absorber on Chevrolet Equinox?A:To service and repair the suspension strut, first install the strut assembly into the strut spring compressor j 45400, by way of adjusting the lower legs of the crimp to the lower coils in the spring, and upper legs of the crimp to the higher coils of the spring, and ensure the strut assembly is inline with bottom leg of the compressor. Squeeze the spring sufficiently to unload the upper strut mount, whilst ensuring that the absorber rod is not rotated during disassembly or assembly; use hand tools in an attempt not to rotate. Take off the strut shaft nut using the strut rod nut socket (J 42991) or a hand tool of similar capacity without removing the spring in the compressor. Lower the strut from the spring assembly keeping the top mount assembly by the top metal part to prevent awkwardness on the bearing parts. Check and replace the mount assembly, strut-dust shield, hollow Bumper, and spring when needed. For installation slide the strut to full extent of travel, then install the hollow Bumper and dust boot to the strut shaft with the tag on the spring near bottom. With the spring in the compressor, fit the strut in the spring so that the anti-rotation tab on the spring seat is 180 degrees away from the knuckle bracket. Mount the upper spring seat onto the strut shaft, the flat of the upper mounting being in alignment of the strut to knuckle mounting bracket then mount the top mount onto the strut shaft the flat of the top mount is a 180 degrees opposed to the upper spring seat. Loosely install the strut shaft nut and be sure that the absorber rod does not rotate. Then anchor the strut shaft and tighten the nut to 55 n.m (41 lb ft)(using the Strut Rod Nut Socket J 42991 or similar hand tools). Finally, depress the tension on the strut spring compressor (J 45400), then take the strut assembly from the compressor.
- Q: How to replace the front shock absorber assembly on Chevrolet Equinox?A:The replacement process starts with removing the 3 upper strut mount bolts first. Lift and maintain support for the vehicle during the operation. Detachment of wheel and tire assembly comes next. Start by detaching the bolt securing the brake hose bracket on the strut assembly before moving on to separate the link from the strut assembly by removing its stabilizer link nut. You will have to remove the lower strut bolts while taking out the strut assembly from the vehicle. Position the strut assembly on the vehicle while making sure to tighten 3 upper strut mount bolts to 25 Nm (18 lb ft). Screw and tighten both lower strut bolts until they reach torque specifications of 200 Nm (148 lb ft). The stabilizer link seals need inspection for damage with replacement as needed because stabilizer link ball stud rotation must be prevented while tightening the link nut to 65 Nm (48 lb ft). Fasten the brake hose bracket to the strut assembly using a bolt with torque set at 15 Nm (11 lb ft). After restoring the wheel and tire in place, the vehicle needs to be lowered for a wheel alignment procedure.


Related Chevrolet Equinox Parts
 Chevrolet Equinox Control Arm
 Chevrolet Equinox Axle Pivot Bushing
 Chevrolet Equinox Axle Support Bushings
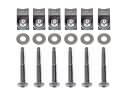 Chevrolet Equinox Bed Mounting Hardware
 Chevrolet Equinox Coil Spring Insulator
 Chevrolet Equinox Coil Springs
 Chevrolet Equinox Front Cross-Member
 Chevrolet Equinox Lateral Arm
 Chevrolet Equinox Lateral Link
 Chevrolet Equinox Strut Bearing
 Chevrolet Equinox Sway Bar Bracket
 Chevrolet Equinox Trailing Arm