ChevyParts
My Garage
My Account
Cart
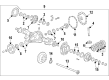
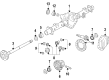
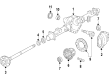
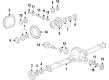
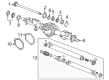
OEM Chevrolet Drive Shaft
Axle Shaft- Select Vehicle by Model
- Select Vehicle by VIN
Select Vehicle by Model
orMake
Model
Year
Select Vehicle by VIN
For the most accurate results, select vehicle by your VIN (Vehicle Identification Number).
451 Drive Shafts found


Chevrolet Drive Shaft Part Number: 84369125
$457.49 MSRP: $723.07You Save: $265.58 (37%)Product Specifications- Other Name: Shaft Assembly-Propeller; Driveshaft; Shaft, Propeller
- Replaces: 84059646, 94769073
Chevrolet Drive Shaft Part Number: 84369124
$467.83 MSRP: $739.42You Save: $271.59 (37%)Ships in 1-3 Business DaysProduct Specifications- Other Name: Shaft Assembly-Propeller; Driveshaft; Shaft, Propeller
- Replaces: 84059645, 23464082

Chevrolet Drive Shaft Part Number: 84620594
$842.57 MSRP: $1331.41You Save: $488.84 (37%)Ships in 1-3 Business DaysProduct Specifications- Other Name: Shaft Assembly-Propeller; Driveshaft; Shaft, Propeller
- Replaced by: 84922968

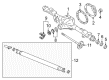
Chevrolet Drive Shaft Part Number: 84042514
$597.20 MSRP: $943.69You Save: $346.49 (37%)Ships in 1-3 Business DaysProduct Specifications- Other Name: Shaft Assembly-Front & Rear Propeller; Driveshaft; Shaft, Propeller
- Position: Front and Rear
- Replaced by: 84813294

Chevrolet Drive Shaft Part Number: 84346716
$151.43 MSRP: $238.27You Save: $86.84 (37%)Ships in 1-3 Business DaysProduct Specifications- Other Name: Shaft Assembly-Front & Rear Propeller; Driveshaft; Shaft, Propeller
- Position: Front and Rear
- Replaces: 23251127, 22772389, 22886996, 23396451
Chevrolet Drive Shaft Part Number: 85109713
$502.92 MSRP: $794.89You Save: $291.97 (37%)Product Specifications- Other Name: Shaft Assembly-Propeller; Shaft, Propeller
- Replaces: 84148488, 84946091, 84369126

Chevrolet Drive Shaft Part Number: 23251160
$291.12 MSRP: $458.06You Save: $166.94 (37%)Ships in 1-3 Business DaysProduct Specifications- Other Name: Shaft Assembly-Propeller; Driveshaft; Shaft, Propeller
- Replaces: 23147493
Chevrolet Drive Shaft Part Number: 84042523
$628.02 MSRP: $992.37You Save: $364.35 (37%)Ships in 1-3 Business DaysProduct Specifications- Other Name: Shaft Assembly-Front & Rear Propeller; Driveshaft; Shaft, Propeller
- Position: Front and Rear
Chevrolet Drive Shaft Part Number: 84688710
$589.34 MSRP: $931.28You Save: $341.94 (37%)Ships in 1-3 Business DaysProduct Specifications- Other Name: Shaft Assembly-Front & Rear Propeller; Driveshaft; Shaft, Propeller
- Position: Front and Rear
- Replaces: 84042529
Chevrolet Drive Shaft, Front Part Number: 84940461
$289.18 MSRP: $454.90You Save: $165.72 (37%)Ships in 1-3 Business DaysProduct Specifications- Other Name: Shaft Assembly-Front Axle Propeller; Shaft, Propeller
- Position: Front
- Replaces: 84387742
Chevrolet Drive Shaft Part Number: 84346709
$433.85 MSRP: $682.49You Save: $248.64 (37%)Ships in 1-3 Business DaysProduct Specifications- Other Name: Shaft Assembly-Front & Rear Propeller; Driveshaft
- Position: Front and Rear
- Replaced by: 84669677
Chevrolet Drive Shaft Part Number: 85521122
$703.51 MSRP: $1111.93You Save: $408.42 (37%)Ships in 1-3 Business DaysProduct Specifications- Other Name: Shaft Assembly-Front & Rear Propeller; Shaft, Propeller
- Position: Rear
- Replaces: 84042517, 85521118

Chevrolet Drive Shaft Part Number: 84922958
$597.79 MSRP: $944.61You Save: $346.82 (37%)Ships in 1-3 Business DaysProduct Specifications- Other Name: Shaft Assembly-Propeller; Shaft, Propeller
- Replaces: 84620584

Chevrolet Drive Shaft Assembly Part Number: 84346703
$547.60 MSRP: $865.49You Save: $317.89 (37%)Ships in 1-3 Business DaysProduct Specifications- Other Name: Shaft Assembly-Front & Rear Propeller; Driveshaft; Shaft, Propeller
- Position: Front and Rear
- Replaces: 84078034

Chevrolet Drive Shaft Part Number: 84669662
$339.86 MSRP: $534.75You Save: $194.89 (37%)Ships in 1-3 Business DaysProduct Specifications- Other Name: Shaft Assembly-Propeller; Driveshaft; Shaft, Propeller
- Replaces: 23251143, 25824494, 22918609, 84042201

Chevrolet Drive Shaft Assembly Part Number: 84202528
$369.48 MSRP: $599.63You Save: $230.15 (39%)Product Specifications- Other Name: Shaft Assembly-Propeller; Driveshaft; Shaft, Propeller
- Replaces: 22760939, 23251122

Chevrolet Drive Shaft Part Number: 87821403
$559.53 MSRP: $884.36You Save: $324.83 (37%)Ships in 1-2 Business DaysProduct Specifications- Other Name: Shaft Assembly-Propeller; Shaft, Propeller

Chevrolet Drive Shaft Part Number: 84202534
$306.00 MSRP: $481.46You Save: $175.46 (37%)Ships in 1-3 Business DaysProduct Specifications- Other Name: Shaft Assembly-Propeller; Driveshaft; Shaft, Propeller
- Replaces: 23147490, 23251157


Chevrolet Drive Shaft Part Number: 84521712
$444.19 MSRP: $702.06You Save: $257.87 (37%)Ships in 1-2 Business DaysProduct Specifications- Other Name: Shaft Assembly-Propeller; Shaft, Propeller

Chevrolet Drive Shaft Part Number: 84041624
$602.39 MSRP: $956.39You Save: $354.00 (38%)Product Specifications- Other Name: Shaft Assembly-Propeller; Driveshaft; Shaft, Propeller
- Replaces: 23251141, 22853218, 22918607
| Page 1 of 23 |Next >
1-20 of 451 Results
Chevrolet Drive Shaft
Choose OEM Drive Shaft, you're making the optimal decision for superior quality and perfect performance. You can feel confident because each component goes through stringent quality checks. Every part is carefully built to comply with Chevrolet's factory specifications. You'll enjoy a smooth, worry-free installation that fits just right. At ChevyPartsGiant.com, you'll find it easy to get top-quality OEM Chevrolet Drive Shaft. You can shop at highly competitive prices and protect your budget. All our genuine Chevrolet parts include a dependable manufacturer's warranty. You'll also appreciate our straightforward return policy and swift delivery services for extra convenience.
Chevrolet Drive Shaft Parts and Q&A
- Q: How to replace the front drive shaft on Chevrolet Colorado?A:Raising and properly supporting the vehicle is the first step to replace the front propeller shaft. Note down the position of the front u-joint relative to the front Differential pinion yoke and the rear u-joint position relative to the transfer case drive flange. Unfasten drive flange retaining nuts and bolts while removing clamps and bolts from front drive axle pinion flange to pull out the front propeller shaft from the vehicle. Tape or a rubber band should be used to cover front u-joint bearing caps for protection against separation. To install the front propeller shaft you need to eliminate tape or rubber band from the front u-joint and correctly align the reference marks of the front u-joint during installation. Use only your fingers to tighten retaining bolts at the front propeller shaft position before adding front u-joint bolts and clamps using rear u-joint reference mark alignment. Fasten the pinion flange to propeller shaft bolts at 20 nm (15 ft. Lbs.) together with the front u-joint clamp bolts. All bolts must receive this torque value. Finally, lower the vehicle.
- Q: How to replace the front drive shaft on Chevrolet S10?A:Before installing the front propeller shaft requires precise positioning observation of driveline components including both shafts and drive axles along with pinion flanges and output shafts to achieve the same absolute placement as when the components were originally detached. Start by hoisting the vehicle and next proceed with marking the propeller shaft position. The process begins with front propeller shaft bolt removal from the front drive axle together with the yoke clamp followed by transferring the propeller shaft from the Transfer Case. Place the previously marked reference points together before inserting the shaft to the Transfer Case where the complete engagement produces a snapping sound to confirm proper installation. You should install the front propeller shaft yoke clamp bolts to the front drive axle where you should tighten them to 20 nm (15 ft. Lbs.). Finally, lower the vehicle.


Related Chevrolet Parts
 Chevrolet Ball Joint
 Chevrolet Spindle
 Chevrolet Coil Springs
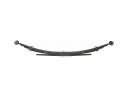 Chevrolet Leaf Spring
 Chevrolet Axle Pivot Bushing
 Chevrolet Coil Spring Insulator
 Chevrolet Control Arm Bracket
 Chevrolet Control Arm Bumper
 Chevrolet Lateral Link
 Chevrolet Leaf Spring Shackle
 Chevrolet Shock and Strut Boot
 Chevrolet Trailing Arm Bushing
Browse Chevrolet Drive Shaft by Models
S10 Colorado C10 Tahoe Cruze Camaro Equinox Impala SS SSR Avalanche Silverado 1500 Silverado 2500 HD Caprice Suburban Traverse Blazer Tracker Volt K10 Trax Trailblazer Astro Cavalier Corvette Beretta C1500 C2500 C3500 Celebrity City Express Corsica Express 1500 Express 2500 Express 3500 K1500 K2500 K3500 K5 Blazer Lumina Monte Carlo P30 Prizm S10 Blazer Silverado 2500 Uplander Venture Lumina APV Silverado 3500 Suburban 1500 Avalanche 1500 Avalanche 2500 C10 Suburban C1500 Suburban C2500 Suburban Captiva Sport Citation II K10 Suburban K1500 Suburban K2500 Suburban R10 R10 Suburban R1500 Suburban R2500 Suburban Silverado 1500 LD Silverado 1500 LTD Silverado 2500 HD Classic Silverado 3500 Classic Silverado 3500 HD Suburban 2500 Suburban 3500 HD V10 V10 Suburban V1500 Suburban V2500 Suburban