ChevyParts
My Garage
My Account
Cart
OEM Chevrolet K3500 Drive Shaft
Axle Shaft- Select Vehicle by Model
- Select Vehicle by VIN
Select Vehicle by Model
orMake
Model
Year
Select Vehicle by VIN
For the most accurate results, select vehicle by your VIN (Vehicle Identification Number).
2 Drive Shafts found

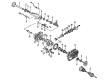
Chevrolet K3500 Axle Shaft, Front Part Number: 26056795

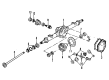
Chevrolet K3500 Axle Shaft, Rear Part Number: 26020040
Chevrolet K3500 Drive Shaft
Want to cut long-term maintenance and repair costs? Choose OEM Drive Shaft. Those parts deliver top durability you can trust. On our site, you'll find a huge catalog of genuine Chevrolet K3500 parts. Prices are unbeatable, so you can keep more in your pocket. Every OEM Chevrolet K3500 Drive Shaft includes a manufacturer's warranty. You can also get an easy return policy that keeps buying risk free. Fast delivery, get your car on the road quickly. It's simple to search, compare, and order. Stop guessing about quality or fit. Order today and save with parts that last.
The Chevrolet K3500 Drive Shaft is well respected for its efficiency and durability; it is a component that is very vital in the Chevrolet K3500 vehicles. Due to the fact that the drive shaft is expected to pass on mechanical power and torque from the engine to the drive wheels while at the same time be as light as possible to ensure low inertial the K3500 Drive Shaft is intended to be able to handle torsion and shear forces. This flexibility is seen in cases of Drive Shafts used in K3500 models, which includes a one-piece Drive Shaft, two-piece Drive Shaft or the slip-in-tube type depending on the exemplary alignment and distance. More specifically, it is possible to notice the use of the slip-in-tube Drive Shaft which contributes to better crash safety while at the same time allowing automakers to stand out in this industry. The Chevrolet K3500 is an available type from 1988 to 2002 which can be fitted to four-wheel and all-wheel systems; numerous Drive Shafts to make the power distribution efficient. This design not only avails the use of a vehicle but also increases safety of the vehicle while in use. Chevrolet K 3500 Drive Shaft proves Chevrolet's adherence to deliver the optimal quality to their vehicles for intense use. The Chevrolet K3500 Drive Shaft is one of the examples of how Chevrolet has perfected its vehicles and it's built: strong and with interesting features, announcing the company as one of the forces to be reckoned with on the automotive market.
Chevrolet K3500 Drive Shaft Parts Questions & Experts Answers
- Q: How to Replace a Drive Shaft on the Front Axle (All Except NP8) on Chevrolet K3500?A:The first step to replace the propeller shaft on the front axle for all models except np8 is to raise the whole vehicle and remove the front differential carrier cover if it's there. Each driveline element such as the propeller shafts, axles, pinion and output shafts, needs to be marked so that they all go back in the same order after removal. First, tag which bolts are connected to the front axle and the transfer case flange and then remove all the bolts and retainers from these parts. Keep the injection joints safe by not banging on the yoke ears and making sure to avoid using any tool in that space. Gently remove the propeller shaft, move it forward to open up and afterward move it backward, making sure not to let the bearing cap go. After using an approved solvent to clean up the parts, look at the splines, Universal Joint bearings and propeller shaft to see if anything is wrong. For the installation, bring the propeller shaft out completely and then pull it back in around half its original stroke. Put the propeller shaft on the front axle by matching the references you made earlier, then put in the retainers and bolts and lock them with 20 nm (15 ft. Lbs.) of tightness. The next step is to install the propeller shaft into the transfer case, fix the reference marks, change the length and prop the shaft before putting in the retainers and bolts, tightening them to 20 nm (15 ft. Lbs.). If the shield is available, put it back on the front differential. Whenever the slip spline appears corroded or dry, disconnect the propeller shaft before you clean it. Lastly, keep applying the chassis lubricant to the slip spline grease fitting until you see grease appearing through the vent hole.

Related Chevrolet K3500 Parts
 Chevrolet K3500 4WD Actuator
 Chevrolet K3500 Axle Shaft Retainer
 Chevrolet K3500 Axle Support Bushings
 Chevrolet K3500 Ball Joint
 Chevrolet K3500 CV Boot
 Chevrolet K3500 Control Arm Bolt
 Chevrolet K3500 Control Arm Bushing
 Chevrolet K3500 Shock Absorber
 Chevrolet K3500 Spindle
 Chevrolet K3500 Steering Knuckle
 Chevrolet K3500 Sway Bar Bushing
 Chevrolet K3500 Sway Bar Link