ChevyParts
My Garage
My Account
Cart
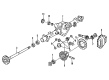
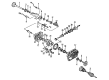
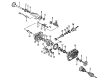
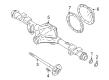
OEM Chevrolet Suburban 2500 Drive Shaft
Axle Shaft- Select Vehicle by Model
- Select Vehicle by VIN
Select Vehicle by Model
orMake
Model
Year
Select Vehicle by VIN
For the most accurate results, select vehicle by your VIN (Vehicle Identification Number).
17 Drive Shafts found


Chevrolet Suburban 2500 Slip Yoke Part Number: 10390404
$1526.36 MSRP: $1964.46You Save: $438.10 (23%)Ships in 1-3 Business Days
Chevrolet Suburban 2500 Drive Shaft Part Number: 84675732
$454.37 MSRP: $780.39You Save: $326.02 (42%)Ships in 1-2 Business Days
Chevrolet Suburban 2500 Drive Shaft, Front Part Number: 84669663
$313.29 MSRP: $624.71You Save: $311.42 (50%)Ships in 1-2 Business Days


Chevrolet Suburban 2500 Drive Shaft, Front Part Number: 22845694


Chevrolet Suburban 2500 Drive Shaft Part Number: 20912713


Chevrolet Suburban 2500 Drive Shaft Part Number: 15814474


Chevrolet Suburban 2500 Drive Shaft, Front Part Number: 15182094


Chevrolet Suburban 2500 Drive Shaft Assembly Part Number: 15109397

Chevrolet Suburban 2500 Shaft, Front Part Number: 26059170

Chevrolet Suburban 2500 Drive Shaft Part Number: 25804152
Chevrolet Suburban 2500 Drive Shaft Part Number: 22922244
Chevrolet Suburban 2500 Drive Shaft Part Number: 22845688
Chevrolet Suburban 2500 Drive Shaft Part Number: 15791197

Chevrolet Suburban 2500 Drive Shaft Part Number: 15791184
Chevrolet Suburban 2500 Drive Shaft, Front Part Number: 15182096
Chevrolet Suburban 2500 Drive Shaft Part Number: 15093867
Chevrolet Suburban 2500 Drive Shaft, Front Part Number: 22845693
$277.89 MSRP: $437.25You Save: $159.36 (37%)
Chevrolet Suburban 2500 Drive Shaft
Want to cut long-term maintenance and repair costs? Choose OEM Drive Shaft. Those parts deliver top durability you can trust. On our site, you'll find a huge catalog of genuine Chevrolet Suburban 2500 parts. Prices are unbeatable, so you can keep more in your pocket. Every OEM Chevrolet Suburban 2500 Drive Shaft includes a manufacturer's warranty. You can also get an easy return policy that keeps buying risk free. Fast delivery, get your car on the road quickly. It's simple to search, compare, and order. Stop guessing about quality or fit. Order today and save with parts that last.
Chevrolet Suburban 2500 Drive Shaft Parts Questions & Experts Answers
- Q: How to replace the front drive shaft on Chevrolet Suburban 2500?A:Use the clamp pliers narrow jaw (J 43218) as well as other necessary tools to replace the front propeller shaft. Establish clear markings on all driveline parts which include propeller shafts and wheel drive shafts and pinion flanges and output shafts. Mark the relationships of these elements before start of disassembly process. A vehicle lift procedure should begin by removing the transfer case shield when present. Use a flat-bladed tool to pry open the exposed end of the clamp at the transfer case before removing it. Start by taking off the bolts alongside the yoke retainers installed on the front axle pinion yoke. Disconnect the propeller shaft properly from its position at the front axle pinion yoke but maintain safe control of the bearing cap assemblies. Glide the propeller shaft forward to take it out from the transfer case output shaft. Use the gm p/n 12345879 (Canadian P/N 10953511) or equivalent lubricant to service the splined area of the transfer case output shaft. The recommended gm specification is 9985830. Fit the new clamp inside the propeller shaft boot groove before sliding the propeller shaft splines through the transfer case output shaft to join it with the front axle pinion yoke keeping reference marks in place from removal. Secure the yoke retainers in place using bolts that require torquing to 25 nm (19 ft. Lbs. Tighten the Clamp Pliers Narrow Jaw (J 43218) to crimp the clamp while it is attached to the transfer case output shaft until it enters into the boot groove. To complete the installation the transfer case shield and lower the vehicle if present.

Related Chevrolet Suburban 2500 Parts
 Chevrolet Suburban 2500 4WD Actuator
 Chevrolet Suburban 2500 Axle Shaft
 Chevrolet Suburban 2500 CV Boot
 Chevrolet Suburban 2500 CV Joint
 Chevrolet Suburban 2500 Coil Spring Insulator
 Chevrolet Suburban 2500 Coil Springs
 Chevrolet Suburban 2500 Control Arm Bushing
 Chevrolet Suburban 2500 Lateral Link
 Chevrolet Suburban 2500 Ride Height Sensor
 Chevrolet Suburban 2500 Steering Knuckle
 Chevrolet Suburban 2500 Torsion Bar
 Chevrolet Suburban 2500 Wheel Cover