ChevyParts
My Garage
My Account
Cart
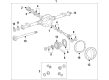
OEM Chevrolet Express 3500 Drive Shaft
Axle Shaft- Select Vehicle by Model
- Select Vehicle by VIN
Select Vehicle by Model
orMake
Model
Year
Select Vehicle by VIN
For the most accurate results, select vehicle by your VIN (Vehicle Identification Number).
24 Drive Shafts found

Chevrolet Express 3500 Drive Shaft Part Number: 84675737
$554.99 MSRP: $877.17You Save: $322.18 (37%)Ships in 1-3 Business Days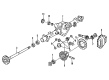
Chevrolet Express 3500 Drive Shaft Part Number: 84675732
$454.37 MSRP: $780.39You Save: $326.02 (42%)Ships in 1-2 Business Days
Chevrolet Express 3500 Drive Shaft Part Number: 84675731
$627.45 MSRP: $991.70You Save: $364.25 (37%)Ships in 1-3 Business DaysChevrolet Express 3500 Drive Shaft Part Number: 84216410
$518.78 MSRP: $819.95You Save: $301.17 (37%)Ships in 1-3 Business Days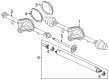
Chevrolet Express 3500 Drive Shaft Assembly Part Number: 84786719
$423.62 MSRP: $666.57You Save: $242.95 (37%)Ships in 1-2 Business DaysChevrolet Express 3500 Drive Shaft Part Number: 84675726
$588.40 MSRP: $1001.76You Save: $413.36 (42%)
Chevrolet Express 3500 Drive Shaft Part Number: 84675741
$493.79 MSRP: $780.46You Save: $286.67 (37%)Ships in 1-3 Business DaysChevrolet Express 3500 Drive Shaft Part Number: 84309107
$460.71 MSRP: $731.46You Save: $270.75 (38%)Ships in 1-2 Business DaysChevrolet Express 3500 Drive Shaft Assembly Part Number: 84862873
$461.33 MSRP: $729.14You Save: $267.81 (37%)Ships in 1-2 Business DaysChevrolet Express 3500 Drive Shaft Part Number: 23432390
$646.70 MSRP: $1021.90You Save: $375.20 (37%)Ships in 1-3 Business DaysChevrolet Express 3500 Drive Shaft Part Number: 84216411
$530.40 MSRP: $838.14You Save: $307.74 (37%)Ships in 1-3 Business DaysChevrolet Express 3500 Drive Shaft Part Number: 84675740
$401.85 MSRP: $632.29You Save: $230.44 (37%)Ships in 1-3 Business Days
Chevrolet Express 3500 Drive Shaft Part Number: 84675734
$724.70 MSRP: $1145.15You Save: $420.45 (37%)Ships in 1-3 Business Days

Chevrolet Express 3500 Axle Shaft, Rear Passenger Side Part Number: 19210693
$168.86 MSRP: $265.68You Save: $96.82 (37%)Ships in 1-3 Business DaysChevrolet Express 3500 Drive Shaft Part Number: 84675730
$638.68 MSRP: $1009.46You Save: $370.78 (37%)Ships in 1-3 Business DaysChevrolet Express 3500 Drive Shaft Part Number: 84216299
$674.45 MSRP: $868.01You Save: $193.56 (23%)Ships in 1-3 Business DaysChevrolet Express 3500 Drive Shaft Part Number: 84675739
$413.17 MSRP: $650.10You Save: $236.93 (37%)Ships in 1-3 Business DaysChevrolet Express 3500 Drive Shaft Part Number: 84675727
$727.45 MSRP: $1047.83You Save: $320.38 (31%)Ships in 1-2 Business Days
Chevrolet Express 3500 Axle Assembly, Rear Part Number: 84391925
$2880.93 MSRP: $3708.87You Save: $827.94 (23%)Ships in 1-3 Business DaysChevrolet Express 3500 Axle Assembly, Rear Part Number: 84391926
$2897.80 MSRP: $3730.58You Save: $832.78 (23%)Ships in 1-3 Business Days
| Page 1 of 2 |Next >
1-20 of 24 Results
Chevrolet Express 3500 Drive Shaft
Want to cut long-term maintenance and repair costs? Choose OEM Drive Shaft. Those parts deliver top durability you can trust. On our site, you'll find a huge catalog of genuine Chevrolet Express 3500 parts. Prices are unbeatable, so you can keep more in your pocket. Every OEM Chevrolet Express 3500 Drive Shaft includes a manufacturer's warranty. You can also get an easy return policy that keeps buying risk free. Fast delivery, get your car on the road quickly. It's simple to search, compare, and order. Stop guessing about quality or fit. Order today and save with parts that last.
Chevrolet Express 3500 Drive Shaft Parts and Q&A
- Q: How to replace a one-piece Drive Shaft on Chevrolet Express 3500?A:The first step to replace a one-piece propeller shaft requires vehicle support through safety stands alongside the requirement to keep the center Slip Yokes and spline shafts and end yokes and companion flanges in their original position during reassembly. The initial balance of the factory requires that you properly note all component positions of propeller shafts and drive axles and pinion flanges and output shafts preceding disassembly so they can be correctly reassembled. The propeller shaft requires marking at its connection point with the pinion flange or yoke before placing it on the support device. Both companion flange bolts should be discarded and replaced with new ones during re-installation. When removing the flange bolts perform the operation without striking propeller shaft yoke ears or prying between a yoke and Universal Joint to safeguard bearing seals; apply tape to yokes and universal joints to stop bearing rollers from escaping. The propeller shaft should slide forwards while reducing the rear section to a controlled position without unsupported lean to avoid joint fracture before pulling it from the transmission area. Installations of slip joints require lubrication before inserting the propeller shaft transmission along with installing the companion flange onto the rear axle. The reference marks of the pinion flange and the rear yoke of the propeller shaft need to be aligned to verify full rear yoke seating. Discard existing bolts from the companion flange and add new ones before tightening them to 102 nm (75 ft. Lbs.). Lastly move the safety stands from the vehicle and lower it back on the ground.

Related Chevrolet Express 3500 Parts
 Chevrolet Express 3500 Alignment Bolt
 Chevrolet Express 3500 Axle Shaft
 Chevrolet Express 3500 Axle Shaft Retainer
 Chevrolet Express 3500 CV Boot
 Chevrolet Express 3500 CV Joint
 Chevrolet Express 3500 Control Arm Bolt
 Chevrolet Express 3500 Leaf Spring Plate
 Chevrolet Express 3500 Spindle
 Chevrolet Express 3500 Steering Knuckle
 Chevrolet Express 3500 Sway Bar Bracket
 Chevrolet Express 3500 Sway Bar Kit
 Chevrolet Express 3500 Torsion Bar