ChevyParts
My Garage
My Account
Cart
OEM GMC Safari Differential
Front Differential- Select Vehicle by Model
- Select Vehicle by VIN
Select Vehicle by Model
orMake
Model
Year
Select Vehicle by VIN
For the most accurate results, select vehicle by your VIN (Vehicle Identification Number).
8 Differentials found


GMC Safari Differential Case Part Number: 26033477


GMC Safari Differential Case Part Number: 19256751
GMC Safari Axle Assembly Part Number: 26046172

GMC Safari Differential Carrier Part Number: 26035258
GMC Safari Differential Case Part Number: 26026251
GMC Safari Differential Case Part Number: 26026250
GMC Safari Case Part Number: 26022180
GMC Safari Differential Carrier, Front Part Number: 12471599
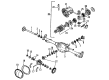
GMC Safari Differential
Want to cut long-term maintenance and repair costs? Choose OEM Differential. Those parts deliver top durability you can trust. On our site, you'll find a huge catalog of genuine GMC Safari parts. Prices are unbeatable, so you can keep more in your pocket. Every OEM GMC Safari Differential includes a manufacturer's warranty. You can also get an easy return policy that keeps buying risk free. Fast delivery, get your car on the road quickly. It's simple to search, compare, and order. Stop guessing about quality or fit. Order today and save with parts that last.
A crucial component that helps in the overall structure of the GMC Safari is the Differential since it is fundamental to the GMC Safari's drivetrain; it is responsible for allotting the engine power to the driving wheels to intensify performance and safety. This gm safari differential has gained popularity due to its dependability for sharp turns and good grip, and can support the respected safari models manufactured from 1985 to 2005. This differential comes in different varieties, the open and the limited slip varieties each of which has unique benefits that would suit a particular driving environment. Especially, the limited slip differential is preferred for the better distribution of torque, which has a positive effect on the car's handling and stability on various terrains, which is particularly important for the GMC Safari, which is both a passenger and a cargo van. Differential needs to be often checked and maintained as a failure to do it results in significant expenses to repair the car. The very fact that the Safari has LT pickup truck components incorporated into its powertrain contributes to the differential's functionality to advance towing capacity and fuel economy as well. All told, the GMC Safari hit the road at something over 3,200,000 units, and the differential speaks for itself in terms of engineering savvy and power potentialities. In total, the Differential not only increases its performance, but also emphasizes its safety and, thus, strengthens the position of the GMC Safari among other models on the car market.
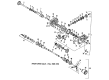
GMC Safari Differential Parts Questions & Experts Answers
- Q: How to replace the Differential Carrier Assembly on GMC Safari?A:Before you replace the Differential carrier assembly, unlock the Steering Column in order to free the steering linkage and raise the vehicle. Drain the fluid from the axle by removing the Drain Plug and flat washer, as well as removing the vent hose from the Differential carrier. Next, take out the bolts of the idler arm, and reposition the steering linkage prior to removal of carriers. Remove the front propeller shaft, thereafter the left and right wheel Drive Shafts, and hold the Differential carrier assembly with its hub bearings removed. Remove the inner Axle Shaft housing and inner Axle Shaft, don the upper mounting bolt and nut, and the lower mounting nuts and bolt on the Differential carrier assembly. Gently take out the assembly from the vehicle, if necessary, rolling it to free the mounting brackets, Oil Pan, and the steering linkage. For installation, secure the Differential carrier assembly back on the vehicle making sure that the mounting bolts and nuts are installed and tightened to 85 nm (63 ft. Lbs.). Reinstall the inner Axle Shaft housing, inner Axle Shaft and left and right wheel drive shafts and the front propeller shaft. Reposition the steering linkage and attach the idler arms to the frame, the idler arm bolts to tighten to 105 nm (77 ft. Lbs.). Connect the axle vent hose, replace the Drain Plug and the flat washer and tighten the Drain Plug to 30 nm (22 ft. Lbs.). Finally, install tires and wheels, check the axle lubricant level, add them if required, and then lower the vehicle.


