ChevyParts
My Garage
My Account
Cart
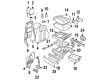
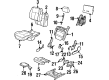
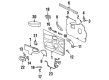
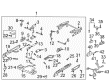
OEM Oldsmobile Seat Switch
Seat Adjust Switch- Select Vehicle by Model
- Select Vehicle by VIN
Select Vehicle by Model
orMake
Model
Year
Select Vehicle by VIN
For the most accurate results, select vehicle by your VIN (Vehicle Identification Number).
42 Seat Switches found


Oldsmobile Memory Switch, Driver Side Part Number: 15908702
Product Specifications- Other Name: Switch, Seat Adjuster/Recliner
- Position: Driver Side
- Replaces: 15180651, 15225940


Oldsmobile Seat Switch, Driver Side Part Number: 22609397
Product Specifications- Other Name: Switch Assembly, Driver Seat Adjuster *Pewter; Power Seat Switch; Switch, Front Seat Adjuster
- Position: Driver Side


Oldsmobile Seat Switch, Driver Side Part Number: 22543666
Product Specifications- Other Name: Switch, Seat Adjuster/Recliner; Power Seat Switch; Adjuster Switch; Switch; Switch, Front Seat Adjuster
- Position: Driver Side
- Replaces: 12515487


Oldsmobile Seat Switch, Gray, Driver Side Part Number: 88894979
Product Specifications- Other Name: Switch Assembly, Driver Seat Adjuster *Gray; Power Seat Switch; Adjuster Switch; Switch, Seat Adjuster/Recliner; Switch, Front Seat Adjuster
- Position: Driver Side


Oldsmobile Adjuster Switch, Passenger Side Part Number: 88949480
Product Specifications- Other Name: Switch, Passenger Seat Adjuster; Power Seat Switch; Adjust Switch; Switch; Switch, Seat Adjuster/Recliner
- Position: Passenger Side

Oldsmobile Switch Part Number: 10422544
Product Specifications- Other Name: Seat Heater Switch
- Position: Passenger Side

Oldsmobile Seat Switch, Front Part Number: 16604884
Product Specifications- Other Name: Switch, Front Seat Adjuster; Power Seat Switch; Adjuster Switch
- Position: Front

Oldsmobile Switch, Driver Side Part Number: 25708732
Product Specifications- Other Name: Switch Assembly-Driver Seat Lumbar Control *Neutral; Power Seat Switch; Switch, Front Seat Lumbar
- Position: Driver Side

Oldsmobile Switch, Driver Side Part Number: 25690241
Product Specifications- Other Name: Switch Assembly-Driver Seat Adjuster Memory *Neutral; Window Switch; Switch, Front Seat Adjuster
- Position: Driver Side


Oldsmobile Switch, Front Passenger Side Part Number: 25663856
Product Specifications- Other Name: Switch, Front Seat Adjuster; Power Seat Switch; Window Switch
- Position: Front Passenger Side
- Replaces: 25606314
Oldsmobile Switch, Driver Side Part Number: 10422598
Product Specifications- Other Name: Switch Assembly-Driver Seat Heater; Seat Heater Switch
- Position: Driver Side
Oldsmobile Switch, Front Part Number: 25708730
Product Specifications- Other Name: Switch, Front Seat Lumbar; Power Seat Switch
- Position: Front
Oldsmobile Switch, Gray, Front Part Number: 25708729
Product Specifications- Other Name: Switch, Front Seat Lumbar; Power Seat Switch
- Position: Front
Oldsmobile Switch, Gray, Front Part Number: 25690243
Product Specifications- Other Name: Switch, Front Seat Adjuster; Window Switch
- Position: Front
Oldsmobile Adjuster Switch Part Number: 10099012
Product Specifications- Other Name: Power Seat Switch
- Position: Passenger Side


Oldsmobile Switch, Front Part Number: 16606471
Product Specifications- Other Name: Switch, Front Seat Adjuster; Power Seat Switch
- Position: Front


Oldsmobile Control Switch Part Number: 12381575
Product Specifications- Other Name: Switch, Seat Adjuster/Recliner
- Position: Driver Side

Oldsmobile Seat Switch, Front Passenger Side Part Number: 12450264
Product Specifications- Other Name: Switch, Front Seat Adjuster; Power Seat Switch; Adjuster Switch; Switch
- Position: Front Passenger Side

Oldsmobile Control Switch, Driver Side Part Number: 88949415
Product Specifications- Other Name: Switch, Seat Adjuster/Recliner; Power Seat Switch; Lumbar Switch; Switch
- Position: Driver Side


Oldsmobile Switch, Passenger Side Part Number: 25554278
Product Specifications- Other Name: Switch Assembly-Passenger Seat Adjuster; Power Seat Switch; Window Switch; Switch, Front Seat Adjuster
- Position: Passenger Side
| Page 1 of 3 |Next >
1-20 of 42 Results
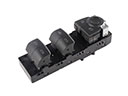
Oldsmobile Seat Switch
Choose OEM Seat Switch, you're making the optimal decision for superior quality and perfect performance. You can feel confident because each component goes through stringent quality checks. Every part is carefully built to comply with Oldsmobile's factory specifications. You'll enjoy a smooth, worry-free installation that fits just right. At ChevyPartsGiant.com, you'll find it easy to get top-quality OEM Oldsmobile Seat Switch. You can shop at highly competitive prices and protect your budget. All our genuine Oldsmobile parts include a dependable manufacturer's warranty. You'll also appreciate our straightforward return policy and swift delivery services for extra convenience.
Oldsmobile Seat Switch enables owners to control the seat position with fingernips and connects to memory and safety circuits and offers fast and secure comfort. Oldsmobile was established in 1897 and was known to be the pioneer in the moving assembly line that brought reliable cars such as the Curved Dash to the possession of many families. The company continued to advance technology with the Hydra-Matic automatic transmission in 1940 that allowed owners to make their way across the traffic without using a manual gear lever. Powerful engines, silent interiors and smooth suspensions demonstrated how Oldsmobile combined performance with daily comfort enabling individuals to travel more miles without apprehension. Couple of decades of stable development created a brand of consistency that remains a pride of place among the drivers who appreciate smooth rides and ingenious designs of the Oldsmobile classic. It is a simple electrical device known as the Seat Switch, which is installed in the seat trim and communicates to the motors in which part to move so that it can perfectly fit with each type of body. In order to change or repair the Seat Switch, it is essential to park safely, unscrew the battery to prevent sparking, and slide the seat back, pop the plastic side trim and reveal the switch body. Unscrew the wiring harness and take out the screws keeping order so as not to lose anything. Install the new unit and tighten the fasteners and the connector and then snap-on. Attach the trim again, connect the battery, set up whatever you need in the memory and lastly test the new Seat Switch in all directions until the movement is smooth and all the buttons work.
Related Oldsmobile Parts
 Oldsmobile Power Window Switch
 Oldsmobile ABS Relay
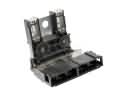 Oldsmobile Battery Fuse
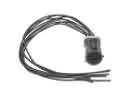 Oldsmobile Body Wiring Harness Connector
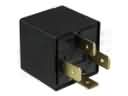 Oldsmobile Daytime Running Light Relay
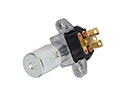 Oldsmobile Dimmer Switch
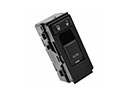 Oldsmobile Door Lock Switch
 Oldsmobile Fuel Pump Relay
 Oldsmobile Headlight Switch
 Oldsmobile Instrument Cluster
 Oldsmobile Tailgate Latch
 Oldsmobile Window Regulator