ChevyParts
My Garage
My Account
Cart
OEM Saturn Cooling Fan Bracket
Raidator Fan Bracket- Select Vehicle by Model
- Select Vehicle by VIN
Select Vehicle by Model
orMake
Model
Year
Select Vehicle by VIN
For the most accurate results, select vehicle by your VIN (Vehicle Identification Number).
1 Cooling Fan Bracket found

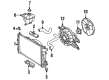
Saturn Shroud Part Number: 22091941
Product Specifications- Other Name: Bracket, Engine Air Cooling (Electrical); Fan Shroud; Bracket, Engine Air Cooling(Electrical)
Saturn Cooling Fan Bracket
Choose OEM Cooling Fan Bracket, you're making the optimal decision for superior quality and perfect performance. You can feel confident because each component goes through stringent quality checks. Every part is carefully built to comply with Saturn's factory specifications. You'll enjoy a smooth, worry-free installation that fits just right. At ChevyPartsGiant.com, you'll find it easy to get top-quality OEM Saturn Cooling Fan Bracket. You can shop at highly competitive prices and protect your budget. All our genuine Saturn parts include a dependable manufacturer's warranty. You'll also appreciate our straightforward return policy and swift delivery services for extra convenience.
Saturn Cooling Fan Bracket is a firm fastener that ensures the engine fan does not move, and the motor is not subjected to heat spikes and rattles. When Saturn launched the market in 1991 it had a mindset that would value intelligent engineering, appealing to the drivers with dent resistant plastic body panels that shook off parking lot dings, and gave the cars a sharp look, which lasted years. Weight saving lost foam casting was also applied to the engine by Saturn to eke out an extra mile of efficiency by each drop of fuel, and a tough multistage paint process fixed in polish and rust shield. These decisions created a fan club that continues to hail the fact that the car is light, tough and easy to live with. One of the minor yet important mounts that hold the radiator fan is a Cooling Fan Bracket that ensures the fan is positioned in a stable way and depends on the airflow and also eliminates vibration. To install a Saturn Cooling Fan Bracket is not a difficult task, you must start off by parking the car and disconnecting the battery and letting the engine cool off before getting the right sockets and the new bracket itself. Take off the upper shroud, unbolt the mount that is worn and slide the fan assembly to a position that it comes out. Place the new Cooling Fan Bracket and line all the holes and begin to connect the bolts by hand to prevent cross threading and then tighten. Install the fan and shroud back, re-snip the wires and rotate the blades manually to clear, reconnect the battery and idled the engine with a clear hum that indicates success.