Make sure this part fits

GM 19418519
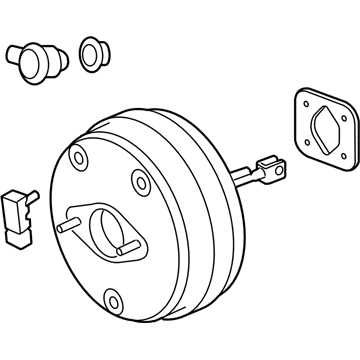
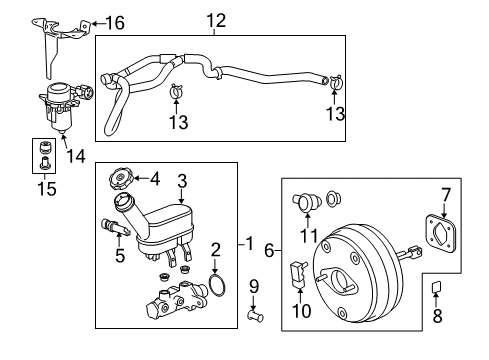
Brake Booster

2007-2014 GM

Customer Questions & Expert Answers (4)
GM 19418519 Brake Booster
  • Part Description
    Booster, Hydraulic Power Brake Booster
  • Replaced By
    19432799
  • Manufacturer
    General Motors
Make sure this part fits
$483.73 MSRP: $947.08
You Save: $463.35 (49%)
Ships in 1-3 Business Days
1
ADD TO CART
  • Related Parts
  • Product Specifications
  • Vehicle Fitment
  • Customer Questions & Expert Answers
  • Product Specifications

    BrandGenuine GM
    Manufacturer Part Number19418519
    Part DescriptionBooster, Hydraulic Power Brake Booster
    Other NamesPower Booster
    ConditionNew
    ManufacturerGeneral Motors
    SKU19418519
    WarrantyThis genuine GM part is guaranteed by GM's factory warranty.
    Shipping & ReturnShipping Policy Return Policy
    Warning: California's Proposition 65
  • Vehicle Fitment

    Year Make Model Trim Engine
    2012-2014, 2008-2009 Buick EnclaveBase, Convenience, CX, CXL, Leather, Premium6 Cyl 3.6 L GAS
    2012-2014, 2009 Chevrolet TraverseLS, LT, LTZ6 Cyl 3.6 L GAS
    2012-2014, 2007-2009 GMC AcadiaDenali, SL, SLE, SLT6 Cyl 3.6 L GAS
    2007-2009 Saturn OutlookXE, XR6 Cyl 3.6 L GAS
  • Customer Questions & Expert Answers

    Q:
    Is this 19418519 designed for my car? Posted by ChevyPartsGiant Specialist
    A:
    Please Select Your Vehicle model to see if part number 19418519 is suitable before ordering.
    Posted by ChevyPartsGiant Specialist
    Q:
    How to replace the power vacuum brake booster on Buick Enclave? Posted by Customer
    A:
    Find a leveled space to work and engage the parking brake to replace the power vacuum Brake Booster. Press and release the brake pedal while the engine is off to use up all brake vacuum pressure until the pedal responds firmly. Disconnect the air cleaner assembly while taking off the master cylinder fluid level sensor connection and brakeduster components from their place. Take out and put aside the vacuum Brake Booster vacuum sensor. Take off the brake pipes from their anchorage point on the frame rail but keep the harnesses connected. Then uninstall the bpmv nuts without unhooking the brake pipes. Shift the bpmv setup ahead before unscrewing both master cylinder nuts while keeping brake tubes linked to their ports in the cylinder. Hold up the master cylinder unit from its base with heavy mechanics wire for support. First take out the left side instrument panel insulator panel plus both steering column opening filler and brake pedal pushrod retaining clip. Remove the clevis pin from the brake pedal pushrod to disconnect the system and then take out the intermediate Steering Shaft. Push vacuum Brake Booster forward and raise it up until mounting studs clear dash panel before you uninstall the device. Check the vacuum Brake Booster gasket for damages before installing it. Replace damaged sections when needed. Place the vacuum Brake Booster mounting studs on the dash panel and fasten the vacuum Brake Booster in place at 25 n.m (18 lb ft). Install the intermediate Steering Shaft and attach the brake pedal pushrod to the pedal using the clevis pin while installing the retaining clip. Place back the steering column opening filler plus the left side instrument panel insulator panel. Install the master cylinder first by checking the seal condition then fitting it into the vacuum booster unit. Secure the 2 Brake Master Cylinder nuts with 20 n.m (15 lb ft) torque. Place the bpmv assembly on top of the studs then fasten the two nuts to both the bracket and bpmv before tightening them to 20 n.m (15 lb ft). Mold the brake pipes back into their frame rail slot then connect the hydraulic fluid sensor wiring to its designated part. Use a bit of denatured alcohol as needed when setting up the Brake Booster vacuum sensor and Brake Booster check valve and hose assembly. Recover the air filter housing in its proper location.
    Posted by ChevyPartsGiant Specialist
    Q:
    How to replace the vacuum brake booster on GMC Acadia? Posted by Customer
    A:
    Start by putting the car on a flat surface then engage the parking brake before working on the replacement. When the engine is off press and let go of the brake pedal multiple times until the brake pedal feels solid to empty the vacuum storage. Pull out the air cleaner while disconnecting the service lamp for the master cylinder fluid sensor. First take off the vacuum Brake Booster check valve hose from the vacuum Brake Booster. Then disconnect its vacuum sensor electrical connector. Take off brake pipes from frame rail routing clip until removing 2 bpmv nuts without disconnecting the brake lines. Securely place the bpmv assembly forward on the studs before removing the cupped Brake Master Cylinder nuts which keep the brake pipes attached. Position the master cylinder assembly upright by hanging it with heavy wire during removal steps. First take off the knee bolster along with the brake pedal pushrod retaining clip and the left side instrument panel insulator panel. Take off the brake pedal pushrod by pulling its clevis pin and then remove all 4 vacuum Brake Booster nuts. Press the vacuum Brake Booster toward the front while elevating it until the mounting studs pass above the dash panel before you take out the Brake Booster. Before putting the booster in place you should check the vacuum Brake Booster to dash panel gasket for problems and replace it if found damaged. Install the vacuum Brake Booster studs on the dash panel and place the unit before installing all four nuts to 25 n.m (18 lb ft). Install the brake pedal pushrod onto its fitting on the pedal then insert the clevis pin. Apply the brake pedal pushrod retaining clip last. Put back the left side instrument panel insulator and knee bolster. Check the master cylinder seal to vacuum Brake Booster lay against the master cylinder flange rear side. Replace the seal if damaged before installation. Install the master cylinder to the booster and fasten its 2 nuts to 20 n.m (15 lb ft). Place the bpmv assembly over the studs before tightening the 2 nuts of the brake pressure modulator valve (BPMV) bracket assembly until they reach 20 n.m (15 lb ft). Establish the brake pipes to the routing clip on the frame and join the fluid level sensor wires to master cylinder plus vacuum sensor wires to the booster. The Brake Booster check valve hose installation requires a limited amount of denatured alcohol when needed but avoid using soap for this process. Reattach the vacuum Brake Booster check valve hose to its mating point before putting back the air cleaner assembly.
    Posted by ChevyPartsGiant Specialist
    Q:
    How to replace the power vacuum brake booster on GMC Acadia? Posted by Customer
    A:
    Park the vehicle on a flat spot and put the parking brake on before you began working. Before starting the replacement press and release the brake pedal until it becomes hard to use all the vacuum reserve. Take out the air filter assembly and the windshield washer solvents container from its compartment. Detach the master cylinder fluid level sensor electrical connection before removing the vacuum Brake Booster's check valve and hose units along with its vacuum sensor. Move the 2 brake pipes free from their routing clip on the frame rails. Then take off the bpmv valve's 2 nuts without disconnecting the pipes. Move the bpmv assembly forward when above the studs before removing its 2 master cylinder nuts yet keeping brake tubes connected. Set the master cylinder assembly on mechanics wire stands to maintain its upright position. Uninstall the left panel insulator and driver knee bolster from their places. Disconnect the brake pedal pushrod components by removing the clip and clevis pin. Take away the steering module and secure the 4 Brake Booster bolts. Shift the vacuum Brake Booster up and forward for the mounting studs to exit underneath the dash panel before you detach the vacuum Brake Booster. Check the vacuum Brake Booster gasket for damage against the dash panel and replace it when necessary. Thread the mounting studs of the vacuum Brake Booster onto the dash panel and fasten it with 4 nuts tightened to 25 nm (18 lb ft). Fit the intermediate Steering Shaft back in place and attach the brake pedal pushrod to its pedal base before setting the clevis pin with its retaining clip. Closely fit the driver knee bolster and left panel insulator so the master cylinder seal connects correctly with the vacuum Brake Booster while checking for damage. Check the Brake Master Cylinder seal connection to the vacuum booster unit and replace if detected damaged before installing both Brake Master Cylinder nuts at 20 nm torque. Carefully place the bpmv assembly over the studs while installing both bpmv nuts to their bracket. Tighten them to 20 nm (15 lb ft). Reattach the brake pipes through their path to the frame rail routing clip before reconnecting the master cylinder fluid level sensor power connection. You should attach the vacuum Brake Booster vacuum sensor and vacuum Brake Booster check valve and hose assembly to their proper positions on the vacuum Brake Booster. Put back the windshield washer solvent heater and the air cleaner unit last.
    Posted by ChevyPartsGiant Specialist
    If you have any questions about this product, please don't hesitate to ask us. We will be happy to help you!

OEM GM 19418519, Excellent Performance and Perfect Fitment

To ensure reliability, purchase GM part # 19418519 Brake Booster. It is sometimes referred to as GM Brake Booster. Choosing OEM parts is the optimal decision for guaranteeing superior quality and perfect performance. These components undergo stringent quality checks and are carefully constructed to comply with GM's factory specifications, ensuring a smooth installation process.

ChevyPartsGiant.com is a leading supplier of genuine GM parts such as GM 19418519 Brake Booster. Our website boasts an extensive inventory of OEM GM parts, available at highly competitive prices in the market. Should you require any new genuine GM parts, rest assured we will deliver them swiftly and efficiently to your doorstep. Furthermore, all our parts come with the assurance of a manufacturer's warranty. For detailed Chevy parts information, click here.
Choose ChevyPartsGiant for discounted prices, exceptional service and fast delivery