ChevyParts
My Garage
My Account
Cart
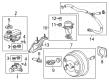
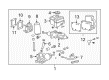
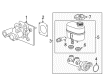
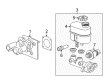
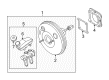
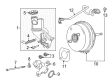
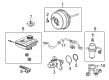
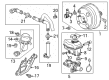
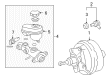
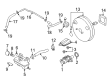
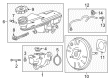
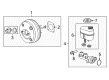
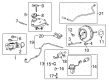
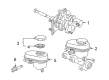
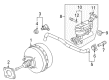
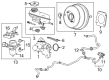
OEM Chevrolet Brake Booster
Brake Power Booster- Select Vehicle by Model
- Select Vehicle by VIN
Select Vehicle by Model
orMake
Model
Year
Select Vehicle by VIN
For the most accurate results, select vehicle by your VIN (Vehicle Identification Number).
183 Brake Boosters found


Chevrolet Brake Booster Part Number: 20996840
$156.64 MSRP: $303.97You Save: $147.33 (49%)Ships in 1-2 Business DaysProduct Specifications- Other Name: Booster, Power Brake; Power Booster; Booster; Booster, Hydraulic Power Brake Booster
- Replaces: 25847530


Chevrolet Brake Booster Part Number: 19371354
$912.61 MSRP: $1644.37You Save: $731.76 (45%)Product Specifications- Other Name: Booster, Hydraulic Power Brake Booster; Hydro-Boost Assembly; Booster Assembly; Power Brake Booster
- Replaces: 15190585, 15706056, 15861643, 15126289, 15757280, 15813688, 15212823


Chevrolet Brake Booster Part Number: 84472897
$507.00 MSRP: $913.52You Save: $406.52 (45%)Product Specifications- Other Name: Booster, Hydraulic Power Brake Booster; Hydro-Boost Assembly; Booster Assembly; Power Brake Booster
- Replaces: 22872386, 84031701


Chevrolet Brake Booster Part Number: 19371361
$391.30 MSRP: $701.88You Save: $310.58 (45%)Ships in 1-3 Business DaysProduct Specifications- Other Name: Booster, Hydraulic Power Brake Booster; Hydro-Boost Assembly; Booster Assembly; Power Brake Booster
- Replaces: 20940394


Chevrolet Brake Booster Part Number: 22807708
$156.64 MSRP: $303.97You Save: $147.33 (49%)Ships in 1-2 Business DaysProduct Specifications- Other Name: Booster, Hydraulic Power Brake Booster; Power Booster
- Replaces: 20849578, 20985652, 20990926


Chevrolet Brake Booster Part Number: 93744988
$169.86 MSRP: $318.99You Save: $149.13 (47%)Ships in 1-3 Business DaysProduct Specifications- Other Name: Booster, Hydraulic Power Brake Booster; Booster

Chevrolet Brake Booster Part Number: 84667588
$72.42 MSRP: $151.22You Save: $78.80 (53%)Ships in 1-3 Business DaysProduct Specifications- Other Name: Booster Kit-Power Brake (Vacuum); Power Booster; Booster Kit, Vacuum Power Brake
- Replaces: 84104228

Chevrolet Brake Booster Part Number: 84614768
$123.43 MSRP: $239.54You Save: $116.11 (49%)Ships in 1-2 Business DaysProduct Specifications- Other Name: Booster, Hydraulic Power Brake Booster; Booster
- Replaces: 22897671, 23337593, 84434502

Chevrolet Brake Booster Part Number: 23209402
$135.48 MSRP: $265.27You Save: $129.79 (49%)Ships in 1-2 Business DaysProduct Specifications- Other Name: Booster, Hydraulic Power Brake Booster; Power Booster
- Replaces: 20864348

Chevrolet Brake Booster Part Number: 20819294
$118.82 MSRP: $223.14You Save: $104.32 (47%)Ships in 1-2 Business DaysProduct Specifications- Other Name: Booster, Hydraulic Power Brake Booster; Power Booster
- Replaces: 20759876, 25908491, 25981047


Chevrolet Master Cylinder Part Number: 85543518
$1227.26 MSRP: $2394.64You Save: $1167.38 (49%)Ships in 1-3 Business DaysProduct Specifications- Other Name: Cylinder, Brake Master Cylinder; Master Cylinder Assembly
- Replaces: 84926393, 85124747

Chevrolet Brake Booster Part Number: 19316630
$207.34 MSRP: $368.60You Save: $161.26 (44%)Ships in 1-2 Business DaysProduct Specifications- Other Name: Booster Kit, Vacuum Power Brake; Booster


Chevrolet Booster Assembly Part Number: 96652680
$202.08 MSRP: $379.51You Save: $177.43 (47%)Ships in 1-2 Business DaysProduct Specifications- Other Name: Booster, Hydraulic Power Brake Booster; Brake Booster
- Replaced by: 95983232

Chevrolet Brake Booster Part Number: 42704202
$81.08 MSRP: $157.35You Save: $76.27 (49%)Ships in 1-2 Business DaysProduct Specifications- Other Name: Booster Kit-Power Brake (Vacuum); Booster; Booster Kit, Vacuum Power Brake
- Replaces: 13486140

Chevrolet Brake Booster Part Number: 19417222
$370.72 MSRP: $675.24You Save: $304.52 (46%)Ships in 1-2 Business DaysProduct Specifications- Other Name: Booster, Hydraulic Power Brake Booster; Power Booster
- Replaces: 20758337, 25940428, 84162710

Chevrolet Brake Booster Part Number: 84626897
$101.58 MSRP: $197.15You Save: $95.57 (49%)Ships in 1-2 Business DaysProduct Specifications- Other Name: Booster Kit-Power Brake (Vacuum); Booster Assembly; Booster; Booster, Hydraulic Power Brake Booster
- Replaces: 23303848, 22951779, 23176887, 23117499, 84020552, 84437896

Chevrolet Brake Booster Part Number: 19371359
$415.06 MSRP: $743.00You Save: $327.94 (45%)Ships in 1-3 Business DaysProduct Specifications- Other Name: Booster, Hydraulic Power Brake Booster; Hydro-Boost Assembly; Booster Assembly; Power Brake Booster
- Replaces: 15112793, 15870649, 15225284, 15814984, 25739959, 25749265

Chevrolet Brake Booster Part Number: 18045787
$323.88 MSRP: $608.23You Save: $284.35 (47%)Ships in 1-2 Business DaysProduct Specifications- Other Name: Booster, Power Brake; Booster Assembly; Booster, Hydraulic Power Brake Booster
- Replaces: 18029880

Chevrolet Brake Booster Part Number: 84614710
$130.40 MSRP: $236.02You Save: $105.62 (45%)Ships in 1-2 Business DaysProduct Specifications- Other Name: Booster, Hydraulic Power Brake Booster; Booster Assembly
- Replaced by: 85520931


Chevrolet Brake Booster Part Number: 91174788
$253.16 MSRP: $429.36You Save: $176.20 (42%)Ships in 1-2 Business DaysProduct Specifications- Other Name: Booster, Hydraulic Power Brake Booster; Booster Assembly
| Page 1 of 10 |Next >
1-20 of 183 Results
Chevrolet Brake Booster
Want to cut long-term maintenance and repair costs? Choose OEM Brake Booster. Those parts deliver top durability you can trust. On our site, you'll find a huge catalog of genuine Chevrolet parts. Prices are unbeatable, so you can keep more in your pocket. Every OEM Chevrolet Brake Booster includes a manufacturer's warranty. You can also get an easy return policy that keeps buying risk free. Fast delivery, get your car on the road quickly. It's simple to search, compare, and order. Stop guessing about quality or fit. Order today and save with parts that last.
Chevrolet Brake Booster Parts Questions & Experts Answers
- Q: How to Service and Repair the Brake Booster on Chevrolet Colorado?A:Start replacing the vacuum Brake Booster by taking off first the master cylinder assembly followed by the knee bolster trim panel. Remove the clips from the Brake Booster Pushrod and Pushrod itself. Then separate the clevis pin before detaching the Pushrod from the Brake Pedal. Unscrew the booster mounting nuts and remove the booster from the vehicle. Center the Brake Booster into the bulkhead space and screw its mounting nuts to 20 n.m (15 lb ft) torque setting. Reconnect the Pushrod with the Brake Pedal while placing the clevis pin through both components and the clip. Install the knee bolster trim panel and master cylinder assembly after you adjust both the stop lamp switch and cruise control release switch.
- Q: How to replace the Vacuum Brake Booster (ABS) on Chevrolet Malibu?A:Begin the vacuum Brake Booster replacement task by securing power off the vehicle to defend from ebcm/ebtcm malfunction. Supported under the vehicle position your left front wheel assembly to access its installation point. Use a socket to remove 3 wireless ebcm/bpmv bracket nuts on the left front wheelhouse and lower the entire automobile. Pull the ebcm electrical connector back while discharging Brake Booster vacuum through the vacuum check valve on its grommet retaining spot without breaking the vacuum hose connection. Insert bleeder valve caps into each of the 4 brake pipes at the bpmv to stop fluid loss while maintenance. Remove the vacuum Brake Booster master cylinder nuts then detach the ebcm/bpmv bracket assembly together with the brake master cylinder. Take out the two Brake Pedal assembly to cowl nuts and remover the brake apply sensor and closeout panel from the electrical connector. To free the pushrod from the Brake Pedal pin remove the connection parts including the pushrod retaining clip , wave washers and booster pushrod while tilting the booster to separate the parts without forceful side pressure. Take out the booster unit from the vehicle. Return the booster to its position and tilt the unit to match the pushrod with the Brake Pedal pin while installing without pressing too hard. Thread the Brake Booster pushrod retaining clip, wave washers, and Brake Pedal pushrod connections back to the Brake Pedal pin. Install the 2 Brake Pedal assembly to cowl mounting nuts but tighten them to 15 nm (11 ft. Lbs.). Put back the electrical brake apply sensor connector before mounting the master cylinder gasket side with the jp1 and ebcm/bpmv bracket. Fasten the master cylinder screws to the vacuum Brake Booster securing unit with 25 nm (18 foot lbs.) torque. Continuing with the vehicle raised put on the 3 bracket assembly ebcm/bpmv nuts to the left wheelhouse, snug down to 10 nm (86 inch lbs.) before reattaching the wheel and tire apparatus left front. Seal-free brake pipe ends and match up the 4 connections to the bpmv unit. Tighten each connection to 20 nm (15 ft. Lbs). Plug in the electrical connector to its place on the ebcm and attach the vacuum Brake Booster check valve to the new grommet at the vacuum Brake Booster. Close the hydraulic brake system and adjust the Brake Pedal position sensor after doing this step.
- Q: How to replace the hydraulic brake booster on Chevrolet Tahoe?A:Wheels must be blocked while applying the park brake as the first step for hydraulic Brake Booster replacement. The installation requires users to detach the inlet hose plus steering gear while releasing the booster assembly hoses and extracting the master cylinder along with the stop lamp switch. You must remove the 4 booster to bulkhead nuts before taking out the booster assembly and its gasket. Place the gasket and then install the booster assembly according to the fastener notice in service precautions. The 4 booster to bulkhead nuts require tightening to 36 nm (26 ft. Lbs.) while the stop lamp switch and master cylinder need to be installed. The final steps include reattaching return hoses together with steering gear before bleed the hydraulic booster and finally free up wheels through releasing the park brake.


Related Chevrolet Parts
 Chevrolet Wheel Bearing
 Chevrolet ABS Sensor
 Chevrolet Wheel Cylinder
 Chevrolet ABS Wheel Speed Sensor Connector
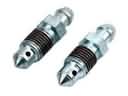 Chevrolet Brake Bleeder Screw
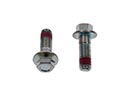 Chevrolet Brake Caliper Bolt
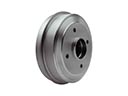 Chevrolet Brake Drum
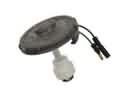 Chevrolet Brake Fluid Level Sensor
 Chevrolet Brake Pad
 Chevrolet Brake Shoe
 Chevrolet Parking Brake Shoe
 Chevrolet Spindle Nut
Browse Chevrolet Brake Booster by Models
S10 Colorado C10 Tahoe Cruze Malibu Camaro Equinox Impala SS SSR Avalanche Silverado 1500 Silverado 2500 HD Caprice Classic Cobalt Suburban Traverse Blazer HHR Sonic Tracker El Camino K10 Spark Trax Trailblazer Astro Cavalier Corvette C20 Aveo Beretta C1500 C2500 C30 C3500 Celebrity City Express Corsica Express 1500 Express 2500 Express 3500 G10 G20 G30 K1500 K20 K2500 K30 K3500 K5 Blazer Lumina Metro Monte Carlo P30 Prizm S10 Blazer Silverado 2500 Uplander Venture Lumina APV Silverado 3500 Suburban 1500 Trailblazer EXT Avalanche 1500 Avalanche 2500 Aveo5 C10 Suburban C1500 Suburban C20 Suburban C2500 Suburban Captiva Sport Citation II Cruze Limited Impala Limited K10 Suburban K1500 Suburban K20 Suburban K2500 Suburban Malibu Limited R10 R10 Suburban R1500 Suburban R20 R20 Suburban R2500 R2500 Suburban R30 R3500 Silverado 1500 Classic Silverado 1500 HD Silverado 1500 HD Classic Silverado 1500 LD Silverado 1500 LTD Silverado 2500 HD Classic Silverado 3500 Classic Silverado 3500 HD Spectrum Suburban 2500 Suburban 3500 HD V10 V10 Suburban V1500 Suburban V20 V20 Suburban V2500 Suburban V30 V3500