ChevyParts
My Garage
My Account
Cart
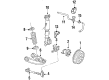
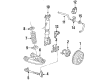
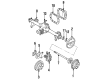
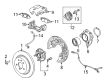
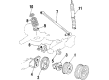
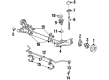
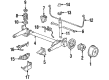
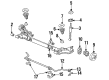
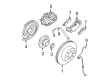
OEM Chevrolet Wheel Cylinder
Brake Wheel Cylinder- Select Vehicle by Model
- Select Vehicle by VIN
Select Vehicle by Model
orMake
Model
Year
Select Vehicle by VIN
For the most accurate results, select vehicle by your VIN (Vehicle Identification Number).
77 Wheel Cylinders found


Chevrolet Wheel Cylinder, Rear Part Number: 19175552
$13.50 MSRP: $24.11You Save: $10.61 (45%)Ships in 1-3 Business DaysProduct Specifications- Other Name: Cylinder Assembly, Rear Brake; Wheel Cylinder Repair Kit; Cylinder, Wheel Brake Cylinder/Caliper
- Position: Rear
- Replaces: 18029237, 18060025, 18004793


Chevrolet Wheel Cylinder, Rear Part Number: 19175609
$11.38 MSRP: $20.32You Save: $8.94 (44%)Product Specifications- Other Name: Cylinder Assembly, Rear Brake; Wheel Cylinder Repair Kit; Cylinder, Wheel Brake Cylinder/Caliper
- Position: Rear
- Replaces: 18029230, 18060027, 18004888

Chevrolet Wheel Cylinder, Rear Part Number: 19175836
$10.09 MSRP: $18.02You Save: $7.93 (45%)Ships in 1-3 Business DaysProduct Specifications- Other Name: Cylinder Assembly, Rear Brake; Wheel Cylinder Repair Kit
- Position: Rear
- Replaces: 18010106, 18029389
Chevrolet Wheel Cylinder, Rear Part Number: 18029563
$14.37 MSRP: $25.66You Save: $11.29 (44%)Ships in 1-3 Business DaysProduct Specifications- Other Name: Cylinder Assembly, Rear Brake; Wheel Cylinder Repair Kit
- Position: Rear
- Replaces: 18060174

Chevrolet Wheel Cylinder, Rear Part Number: 18047641
$10.25 MSRP: $18.56You Save: $8.31 (45%)Ships in 1-2 Business DaysProduct Specifications- Other Name: Cylinder Assembly, Rear Brake; Wheel Cylinder Repair Kit
- Position: Rear

Chevrolet Wheel Cylinder Part Number: 95910911
$40.31 MSRP: $71.98You Save: $31.67 (44%)Ships in 1-2 Business DaysProduct Specifications- Other Name: Cylinder, Wheel Brake Cylinder/Caliper; Wheel Cylinder Repair Kit
- Position: Rear
Chevrolet Wheel Cylinder Overhaul Kit Part Number: 18031304
$4.04 MSRP: $7.22You Save: $3.18 (45%)Ships in 1-3 Business DaysProduct Specifications- Other Name: Cylinder Kit, Wheel Brake Cylinder/Caliper; Wheel Cylinder Repair Kit
- Position: Rear
Chevrolet Wheel Cylinder, Rear Part Number: 19175563
$13.66 MSRP: $24.41You Save: $10.75 (45%)Ships in 1-3 Business DaysProduct Specifications- Other Name: Cylinder Assembly, Rear Brake; Wheel Cylinder Repair Kit; Cylinder Assembly, Wheel Brake Cylinder/Caliper; Cylinder, Wheel Brake Cylinder/Caliper
- Position: Rear
- Replaces: 18004890, 18029236, 18060028

Chevrolet Wheel Cylinder Assembly, Rear Part Number: 19175808
$15.04 MSRP: $26.87You Save: $11.83 (45%)Ships in 1-3 Business DaysProduct Specifications- Other Name: Cylinder Assembly, Rear Brake; Wheel Cylinder Repair Kit; Wheel Cylinder
- Position: Rear
- Replaces: 18012304, 18029422

Chevrolet Wheel Cylinder, Rear Part Number: 19175861
$9.30 MSRP: $16.59You Save: $7.29 (44%)Product Specifications- Other Name: Cylinder Assembly, Rear Brake; Wheel Cylinder Repair Kit; Cylinder, Wheel Brake Cylinder/Caliper
- Position: Rear
- Replaces: 18029357, 18007981
Chevrolet Wheel Cylinder, Rear Part Number: 19175769
$10.34 MSRP: $18.46You Save: $8.12 (44%)Ships in 1-3 Business DaysProduct Specifications- Other Name: Cylinder Assembly, Rear Brake; Wheel Cylinder Repair Kit
- Position: Rear
- Replaces: 18029470, 18060097, 18014499
Chevrolet Wheel Cylinder, Rear Part Number: 18029359
$11.22 MSRP: $20.03You Save: $8.81 (44%)Ships in 1-3 Business DaysProduct Specifications- Other Name: Cylinder Assembly, Rear Brake; Wheel Cylinder Repair Kit
- Position: Rear
- Replaces: 19175860, 18008649


Chevrolet Wheel Cylinder Part Number: 19133369
$47.69 MSRP: $85.16You Save: $37.47 (44%)Product Specifications- Other Name: Cylinder Kit, Wheel Brake Cylinder/Caliper; Wheel Cylinder Repair Kit
- Position: Rear
- Replaces: 89059126

Chevrolet Wheel Cylinder, Rear Part Number: 19213355
Product Specifications- Other Name: Cylinder Assembly, Rear Brake; Wheel Cylinder Repair Kit; Cylinder, Wheel Brake Cylinder/Caliper
- Position: Rear
- Replaces: 18060090


Chevrolet Wheel Cylinder, Rear Part Number: 19213357
Product Specifications- Other Name: Cylinder Assembly, Rear Brake; Wheel Cylinder Repair Kit; Cylinder, Wheel Brake Cylinder/Caliper
- Position: Rear
- Replaces: 18017570, 18060160

Chevrolet Wheel Cylinder Part Number: 19133370
Product Specifications- Other Name: Cylinder Kit, Wheel Brake Cylinder/Caliper; Wheel Cylinder Repair Kit
- Position: Rear
- Replaces: 89059127

Chevrolet Wheel Cylinder Part Number: 10379247
Product Specifications- Other Name: Cylinder, Wheel Brake Cylinder/Caliper; Wheel Cylinder Repair Kit
- Position: Rear

Chevrolet Wheel Cylinder Overhaul Kit Part Number: 18012274
Product Specifications- Other Name: Repair Kit; Wheel Cylinder Repair Kit; Repair Kit, Wheel Cylinder Piston
Chevrolet Wheel Cylinder Overhaul Kit Part Number: 18031209
Product Specifications- Other Name: Cylinder Kit, Wheel Brake Cylinder/Caliper; Wheel Cylinder Repair Kit
- Position: Rear
Chevrolet Wheel Cylinder Overhaul Kit Part Number: 18014699
Product Specifications- Other Name: Wheel Cylinder Repair Kit; Cylinder Kit, Wheel Brake Cylinder/Caliper Piston
- Position: Rear
| Page 1 of 4 |Next >
1-20 of 77 Results
Chevrolet Wheel Cylinder
Want to cut long-term maintenance and repair costs? Choose OEM Wheel Cylinder. Those parts deliver top durability you can trust. On our site, you'll find a huge catalog of genuine Chevrolet parts. Prices are unbeatable, so you can keep more in your pocket. Every OEM Chevrolet Wheel Cylinder includes a manufacturer's warranty. You can also get an easy return policy that keeps buying risk free. Fast delivery, get your car on the road quickly. It's simple to search, compare, and order. Stop guessing about quality or fit. Order today and save with parts that last.
Chevrolet Wheel Cylinder Parts Questions & Experts Answers
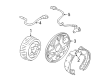
- Q: How to replace the wheel cylinder on Chevrolet Cobalt?A:The procedure starts by raising the vehicle and supporting it while you remove the tire along with the wheel assembly and Brake Drum. Begin by cleaning the Wheel Cylinder area before removing the bleeder cap and valve while disconnecting the brake pipe fitting from the Wheel Cylinder and applying a cap to the exposed brake pipe end to avert fluid loss and contamination. The next step involves removing all Wheel Cylinder mounting bolts. The j 38400 (Brake Shoe Spanner and Spring Remover) tool allows technicians to spread the brake shoes and extract the Wheel Cylinder from the Brake Backing Plate. To install a new Wheel Cylinder fit it to the Brake Backing Plate by using the j 38400 (Brake Shoe Spanner and Spring Remover) to spread apart the top brake shoes once again. Screw in the Wheel Cylinder mounting bolts and follow up with a torque of 16 nm (12 lb ft). Approach the brake pipe end with caution then install the fitting and torque it to 19 nm (14 lb ft). Tighten the Wheel Cylinder bleeder valve to 8 nm (71 lb in) torque. Install the Brake Drum before completing the bleeding of the hydraulic brake system along with installing the bleeder valve cap. Drum brake adjustment should follow before you install the tire-wheel combination and lower the vehicle.
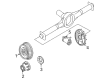
- Q: How to properly service and replace a wheel cylinder on Chevrolet Colorado?A:Start the Wheel Cylinder replacement by raising the vehicle and taking out the rear brake shoes. When removing a Wheel Cylinder to avoid brake damage plug the Brake Line before disconnecting it. Remove all mounting bolts on the Wheel Cylinder then detach the unit from the backing plate. Join the new Wheel Cylinder onto the backing plate and fasten it with the mounting bolts before applying 18 n.m (13 lb ft) of torque. Insert the Brake Line into the Wheel Cylinder and fasten it with a 19 n.m torque setting (14 lb ft). Replace the parts then install the new brake shoes while using proper bleeding methods for the brake system before testing the fluid level in the brake master cylinder.
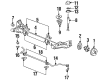
- Q: How to replace the wheel cylinder on Chevrolet Malibu?A:Before replacing the Wheel Cylinder you need to raise the vehicle and position support stands under it. Take off the tire and wheel unit first and then take off the Brake Drum. Take out dirt and contamination from the area surrounding the brake hose banjo bolt and Wheel Cylinder link. Place the lower Control Arm assembly over a jack stand to protect it during this work. You can replace the Wheel Cylinder when you remove both the upper Control Arm Bolt and wheel speed sensor connector while positioning abs-equipped systems away from the brake hose. To avoid contamination you must cap the exposed brake hose after removing its banjo bolt and gaskets made from copper. Detach the Wheel Cylinder mounting screws from each end of the Wheel Cylinder. The j 38400 Brake Shoe spanner and spring remover tool allows you to open the brake shoes while you remove the Wheel Cylinder from its position on the Brake Backing Plate. Position the brake Wheel Cylinder on the backing plate using j38400 and tighten the two mounting bolts to 10 nm. Install new copper brake hose gaskets along the banjo bolt and Wheel Cylinder then thread the banjo bolt onto the brake hose end and tighten it to 37 ft. Lbs of torque. When abs exists on the vehicle, join the wheel speed sensor port. Then add the upper Control Arm Bolt and nut before torquing the nut to 180 nm (133 foot pounds). Put in the Brake Drum then take the jack stand off from the lower Control Arm assembly while also performing brake fluid bleeding and putting on the wheel and tire assembly before lowering the vehicle and testing the rear alignment.


Related Chevrolet Parts
 Chevrolet Brake Calipers
 Chevrolet Wheel Bearing
 Chevrolet ABS Control Module
 Chevrolet Wheel Hub
 Chevrolet Wheel Speed Sensor
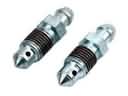 Chevrolet Brake Bleeder Screw
 Chevrolet Brake Caliper Bracket
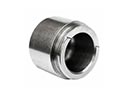 Chevrolet Brake Caliper Piston
 Chevrolet Brake Dust Shields
 Chevrolet Brake Pad
 Chevrolet Parking Brake Shoe
 Chevrolet Spindle Nut
Browse Chevrolet Wheel Cylinder by Models
Nova S10 Colorado Tahoe Cruze Malibu Camaro Equinox Impala Silverado 1500 Silverado 2500 HD Caprice Classic Cobalt Blazer HHR Sonic Tracker El Camino Spark Trax Astro Cavalier C20 Aveo Beretta C1500 C2500 C30 C3500 Celebrity Chevette City Express Corsica Express 1500 Express 2500 Express 3500 G10 G20 G30 K1500 K20 K2500 K30 K3500 K5 Blazer Lumina Metro Monte Carlo P30 Prizm S10 Blazer Sprint Venture Lumina APV Silverado 3500 Aveo5 C1500 Suburban C20 Suburban C2500 Suburban Citation II Cruze Limited K1500 Suburban K20 Suburban K2500 Suburban R20 R20 Suburban R2500 R2500 Suburban R30 R3500 Silverado 1500 Classic Silverado 1500 HD Silverado 1500 HD Classic Silverado 2500 HD Classic Silverado 3500 Classic Silverado 3500 HD Spectrum V20 V20 Suburban V2500 Suburban V30 V3500