ChevyParts
My Garage
My Account
Cart
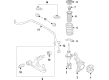
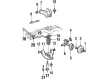
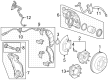
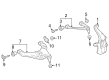
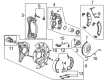
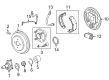
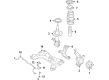
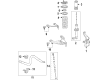
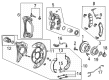
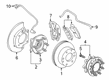
OEM Chevrolet Wheel Bearing
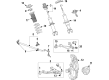
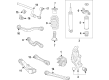
Hub Bearing- Select Vehicle by Model
- Select Vehicle by VIN
Select Vehicle by Model
orMake
Model
Year
Select Vehicle by VIN
For the most accurate results, select vehicle by your VIN (Vehicle Identification Number).
235 Wheel Bearings found


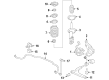
Chevrolet Hub Assembly, Front Part Number: 15793213
$68.21 MSRP: $310.63You Save: $242.42 (79%)Ships in 1-2 Business DaysProduct Specifications- Other Name: Bearing, Front Wheel; Wheel Hub Assembly; Disc Brake Hardware Kit; Wheel Hub Repair Kit; Axle Bearing.; Front Hub; Hub & Bearing; Bearing, Front Wheel Inner
- Position: Front
- Replaces: 22706967, 21995732


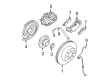
Chevrolet Hub, Rear Part Number: 15715055
$162.84 MSRP: $318.82You Save: $155.98 (49%)Product Specifications- Other Name: Hub-Rear Wheel; Wheel Hub; Hub, Rear Wheel
- Position: Rear


Chevrolet Rear Hub, Green Line Part Number: 20907864
$126.00 MSRP: $372.94You Save: $246.94 (67%)Ships in 1-2 Business DaysProduct Specifications- Other Name: Bearing, Rear Axle Shaft; Wheel Bearing & Hub Assembly.; Hub & Bearing; Bearing, Rear Wheel
- Position: Rear


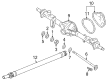
Chevrolet Hub & Bearing, Rear Part Number: 13585741
$168.64 MSRP: $327.30You Save: $158.66 (49%)Ships in 1-3 Business DaysProduct Specifications- Other Name: Bearing Assembly-Rear Wheel; Wheel Bearing; Axle Bearing; Wheel Hub; Hub & Bearing Assembly; Hub, Rear Wheel
- Position: Rear


Chevrolet Wheel Bearings, Rear Part Number: 15042155
$34.70 MSRP: $102.70You Save: $68.00 (67%)Ships in 1-2 Business DaysProduct Specifications- Other Name: Bearing, Rear Wheel; Axle Bearing; Inner Bearing
- Position: Rear


Chevrolet Hub Assembly, Front Part Number: 13517459
$184.64 MSRP: $507.48You Save: $322.84 (64%)Ships in 1 Business DayProduct Specifications- Other Name: Hub Assembly-Front Wheel; Disc Brake Hardware Kit; Wheel Hub Repair Kit; Wheel Bearing; Axle Bearing; Wheel Hub; Hub & Bearing; Hub, Front Wheel
- Position: Front
- Replaces: 13580305, 13527694


Chevrolet Hub, Rear Part Number: 20945052
$170.11 MSRP: $467.54You Save: $297.43 (64%)Ships in 1-2 Business DaysProduct Specifications- Other Name: Hub Assembly-Rear Wheel; Wheel Hub; Hub, Rear Wheel
- Position: Rear
- Replaced by: 85023271


Chevrolet Wheel Bearing, Front Outer Part Number: 14066918
$11.29 MSRP: $20.16You Save: $8.87 (44%)Ships in 1-2 Business DaysProduct Specifications- Other Name: Bearing, Front Wheel Outer; Axle Bearing; Front Wheel Bearing; Front Bearing; Outer Bearing; Bearing
- Position: Front Outer

Chevrolet Hub Assembly, Front Part Number: 13512700
$233.48 MSRP: $438.46You Save: $204.98 (47%)Ships in 1-2 Business DaysProduct Specifications- Other Name: Hub Assembly-Front Wheel; Wheel Hub Repair Kit; Wheel Bearing; Axle Bearing; Wheel Hub; Hub & Bearing; Hub, Front Wheel
- Position: Front

Chevrolet Hub Assembly, Front Part Number: 13542340
$105.96 MSRP: $189.22You Save: $83.26 (44%)Ships in 1-2 Business DaysProduct Specifications- Other Name: Hub, Front Wheel; Front Hub & Bearing
- Position: Front

Chevrolet Rear Hub Part Number: 85003007
$170.11 MSRP: $467.54You Save: $297.43 (64%)Ships in 1-3 Business DaysProduct Specifications- Other Name: Hub Assembly-Rear Wheel (W/Bearing); Hub; Hub, Rear Wheel
- Position: Rear
- Replaced by: 85023271
- Replaces: 84080158

Chevrolet Wheel Bearing Part Number: 94535214
$97.69 MSRP: $189.61You Save: $91.92 (49%)Ships in 1-2 Business DaysProduct Specifications- Other Name: Bearing, Rear Axle Shaft; Wheel Bearing Kit; Axle Bearing; Wheel Bearings; Bearing; Bearing, Rear Wheel
- Position: Rear


Chevrolet Axle Bearings Part Number: 88982517
$70.52 MSRP: $125.92You Save: $55.40 (44%)Ships in 1-2 Business DaysProduct Specifications- Other Name: Ring, Rear Wheel Bearing; Axle Bearing; Bearing, Rear Axle Shaft; Wheel Bearing
- Position: Rear

Chevrolet Hub Assembly, Front Part Number: 19318332
$210.51 MSRP: $377.60You Save: $167.09 (45%)Ships in 1-3 Business DaysProduct Specifications- Other Name: Bearing Assembly, Front Wheel; Front Hub; Bearing, Front Wheel Inner
- Position: Front
- Replaces: 19318302, 19316545, 19318306

Chevrolet Front Hub & Bearing Part Number: 84654063
$142.25 MSRP: $276.10You Save: $133.85 (49%)Ships in 1-2 Business DaysProduct Specifications- Other Name: Hub, Front Wheel; Wheel Bearing and Hub Assembly; Wheel Bearing & Hub Assembly; Hub & Bearing
- Position: Front
- Replaces: 84141645, 94775723, 23251497

Chevrolet Hub Assembly, Front Part Number: 23291487
$90.87 MSRP: $162.26You Save: $71.39 (44%)Ships in 1-3 Business DaysProduct Specifications- Other Name: Hub, Front Wheel; Wheel Bearing; Axle Bearing; Front Hub & Bearing
- Position: Front
- Replaced by: 85120533

Chevrolet Rear Hub Part Number: 84844409
$213.21 MSRP: $382.44You Save: $169.23 (45%)Ships in 1-3 Business DaysProduct Specifications- Other Name: Hub Assembly-Rear Wheel; Hub; Hub, Rear Wheel
- Position: Rear
- Replaced by: 85003008

Chevrolet Hub Assembly, Rear Part Number: 13544387
$84.90 MSRP: $166.22You Save: $81.32 (49%)Ships in 1-3 Business DaysProduct Specifications- Other Name: Hub Assembly-Rear Wheel; Rear Hub & Bearing; Hub & Bearing Assembly
- Position: Rear
- Replaced by: 13552420

Chevrolet Hub & Bearing Part Number: 84915033
$182.57 MSRP: $354.35You Save: $171.78 (49%)Ships in 1-2 Business DaysProduct Specifications- Other Name: Hub Assembly-Front Wheel (W/ Bearing & Wheel Speed Sensor)
- Position: Front
- Replaced by: 85137057


Chevrolet Hub & Bearing, Front Part Number: 15731627
Product Specifications- Other Name: Hub, Front Wheel (W/Wheel Speed Sensor); Wheel Bearing & Hub Assembly; Repair Kit; Axle Bearing.; Hub; Hub, Front Wheel
- Position: Front
| Page 1 of 12 |Next >
1-20 of 235 Results
Chevrolet Wheel Bearing
Want to cut long-term maintenance and repair costs? Choose OEM Wheel Bearing. Those parts deliver top durability you can trust. On our site, you'll find a huge catalog of genuine Chevrolet parts. Prices are unbeatable, so you can keep more in your pocket. Every OEM Chevrolet Wheel Bearing includes a manufacturer's warranty. You can also get an easy return policy that keeps buying risk free. Fast delivery, get your car on the road quickly. It's simple to search, compare, and order. Stop guessing about quality or fit. Order today and save with parts that last.
Chevrolet Wheel Bearing Parts Questions & Experts Answers
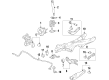
- Q: What Tools Are Required to Service and Repair the Rear Wheel Bearing and Axle Shaft Seal on Chevrolet Colorado?A:Tools needed for service and repair of the rear drive axle, namely the rear Axle Shaft seal or bearing change will include: universal driver handle (J 8092), axle pinion oil seal installer (J 21128), bearing installer (J 23690), slide hammer(J 2619-01), and rear axle seal and bearing remover (J 44685). Start by lifting the vehicle and removing the tire and wheel assembly. Next, remove the Axle Shaft. Use the rear axle seal and bearing remover (J 44685) and the slide hammer (J 2619-01) to remove Axle Shaft bearing and seal. For installation, use the bearing installer (J 23690) and universal driver handle (J 8092) to install the axle bearing to install it further with the use of axle pinion oil seal installer (J 21128) to install the Axle Shaft seal. Rebolt the Axle Shaft and the tire and wheel assembly. Lastly, take the appropriate axle lubricant and fill the rear axle, and bring down the vehicle.
- Q: How to replace the rear wheel bearing/hub on Chevrolet Malibu?A:Starting with the rear Wheel Bearing/hub replacement process require vehicle support along with the removal of tire and wheel assembly. After raising and supporting the vehicle you should remove the brake rotor then disconnect the Wheel Speed Sensor electrical connector if your abs system is installed. Position the stabilizer link out of the knuckle's way by removing its stabilizer link bolt to access the Wheel Bearing/hub nuts. Begin by taking out the Wheel Bearing/hub assembly from the knuckle after removing its 4 nuts. Place the Wheel Bearing/hub assembly on the knuckle before you install the 4 Wheel Bearing/hub assembly nuts to a torque of 63 n.m (47 lb ft). The next step includes reconnecting the stabilizer link bolt at the knuckle and restoring power to the Wheel Speed Sensor's electrical connector during abs-equipped installations. The last step includes reinstalling the brake rotor before placing the tire and wheel assembly on. Then, properly lower the vehicle.
- Q: How to replace the front wheel bearing, hub, and seal on a 4WD pickup or utility on Chevrolet S10?A:To replace the front Wheel Hub as well as part and the seal on a 4wd pickup or utility vehicle, the vehicle has to be lifted and supported by safe stands, the tire and wheel to be removed. Install a punch in the rotor vanes to stop turning, and remove the drive axle nut and washer. Next, take out the rotor and separate the wheel drive shaft from the Wheel Hub and bearing by hitting its outer end with a hammer while the wheel drive shaft of the wheel is not removed at this point using a brass drift pressed against it. Unfasten the Wheel Speed Sensor mounting bolt and the Wheel Speed Sensor from the Wheel Hub and the bearing, followed by the Wheel Hub and the bearing to the Steering Knuckle mounting bolts while making sure to lay the Wheel Hub and the bearing on the Wheel Hub studs on the outboard side to prevent a possibility of damaging the bearing seal or contamination of the same. Unscrew the Wheel Hub and bearing off the Steering Knuckle and remove the splash shield, then pedal the Wheel Hub and bearing seal. For installation, begin by putting the Wheel Hub and bearing seal on the Wheel Hub and bearing, and attach the splash shield to the Steering Knuckle, ensuring proper alignment. Mount the Wheel Hub and bearing assembly to the Steering Knuckle, align the threaded holes, and tighten the mount bolts to the value of 105 nm (77 ft. Lbs.). Then, install the Wheel Speed Sensor and mounting bolt and bear tight 18 nm (13 ft. Lbs). Replace the rotor, retouch the rotor vanes using punch in the rotor vanes, then put in the drive axle washer and nut, causing the nut to be tightened to 140 nm (103 ft. Lbs.). Finally, install the tire and wheel before the vehicle is lowered.


Related Chevrolet Parts
 Chevrolet Brake Calipers
 Chevrolet ABS Sensor
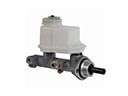 Chevrolet Brake Master Cylinder
 Chevrolet Wheel Speed Sensor
 Chevrolet Brake Backing Plate
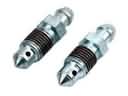 Chevrolet Brake Bleeder Screw
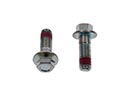 Chevrolet Brake Caliper Bolt
 Chevrolet Brake Caliper Bracket
 Chevrolet Brake Caliper Piston
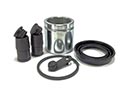 Chevrolet Brake Caliper Repair Kit
 Chevrolet Brake Dust Shields
 Chevrolet Brake Line
Browse Chevrolet Wheel Bearing by Models
Nova S10 Colorado C10 Tahoe Cruze Malibu Camaro Equinox Impala SS SSR Avalanche Silverado 1500 Silverado 2500 HD Caprice Classic Cobalt Suburban Traverse Blazer HHR Sonic Tracker Volt El Camino K10 Spark Trax Trailblazer Astro Cavalier Corvette C20 Aveo Beretta Bolt EUV Bolt EV C1500 C2500 C30 C3500 Celebrity Chevette City Express Corsica Express 1500 Express 2500 Express 3500 G10 G20 G30 K1500 K20 K2500 K30 K3500 K5 Blazer Lumina Metro Monte Carlo P30 Prizm S10 Blazer Silverado 2500 Sprint Uplander Venture Lumina APV Silverado 3500 Suburban 1500 Trailblazer EXT Avalanche 1500 Avalanche 2500 Aveo5 C10 Suburban C1500 Suburban C20 Suburban C2500 Suburban Captiva Sport Citation II Cruze Limited Impala Limited K10 Suburban K1500 Suburban K20 Suburban K2500 Suburban Malibu Limited P20 R10 R10 Suburban R1500 Suburban R20 R20 Suburban R2500 R2500 Suburban R30 R3500 Silverado 1500 Classic Silverado 1500 HD Silverado 1500 HD Classic Silverado 1500 LD Silverado 2500 HD Classic Silverado 3500 Classic Silverado 3500 HD Spark EV Spectrum Suburban 2500 Suburban 3500 HD V10 V10 Suburban V1500 Suburban V20 V20 Suburban V2500 Suburban V30 V3500