ChevyParts
My Garage
My Account
Cart
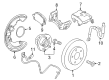
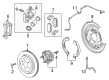
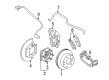
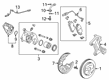
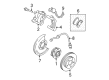
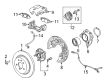
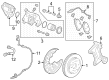
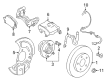
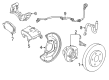
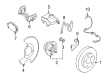
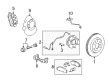
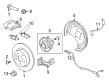
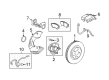
OEM Chevrolet Brake Backing Plate
Brake Dust Shield- Select Vehicle by Model
- Select Vehicle by VIN
Select Vehicle by Model
orMake
Model
Year
Select Vehicle by VIN
For the most accurate results, select vehicle by your VIN (Vehicle Identification Number).
371 Brake Backing Plates found


Chevrolet Backing Plate, Front Part Number: 22802367
$32.12 MSRP: $52.90You Save: $20.78 (40%)Ships in 1-2 Business DaysProduct Specifications- Other Name: Shield-Front Brake; Brake Dust Shield; Splash Shield; Shield, Brake Flange Plate
- Position: Front

Chevrolet Backing Plate, Front Part Number: 22802366
$33.78 MSRP: $52.90You Save: $19.12 (37%)Ships in 1-2 Business DaysProduct Specifications- Other Name: Shield-Front Brake; Brake Dust Shield; Splash Shield; Shield, Brake Flange Plate
- Position: Front


Chevrolet Backing Plate, Rear Passenger Side Part Number: 23316765
$41.18 MSRP: $60.48You Save: $19.30 (32%)Ships in 1-2 Business DaysProduct Specifications- Other Name: Plate-Rear Parking Brake Anchor Backing; Brake Dust Shield; Plate, Brake Flange/Backing
- Position: Rear Passenger Side


Chevrolet Backing Plate, Rear Driver Side Part Number: 23316764
$45.15 MSRP: $67.20You Save: $22.05 (33%)Ships in 1-2 Business DaysProduct Specifications- Other Name: Plate-Rear Parking Brake Anchor Backing; Brake Dust Shield; Plate, Brake Flange/Backing
- Position: Rear Driver Side


Chevrolet Splash Shield Part Number: 15716364
$50.69 MSRP: $95.21You Save: $44.52 (47%)Ships in 1 Business DayProduct Specifications- Other Name: Shield, Brake Flange Plate; Brake Dust Shield
- Position: Front


Chevrolet Backing Plate, Rear Part Number: 22775568
$67.59 MSRP: $131.18You Save: $63.59 (49%)Ships in 1-2 Business DaysProduct Specifications- Other Name: Shield-Rear Brake; Brake Dust Shield; Shield, Brake Flange Plate
- Position: Rear


Chevrolet Splash Shield, Passenger Side Part Number: 15001401
$105.40 MSRP: $198.01You Save: $92.61 (47%)Ships in 1 Business DayProduct Specifications- Other Name: Shield, Brake Flange Plate; Brake Dust Shield; Dust Shield
- Position: Passenger Side

Chevrolet Backing Plate Part Number: 94553901
$70.52 MSRP: $132.43You Save: $61.91 (47%)Product Specifications- Other Name: Plate, Brake Flange/Backing; Brake Dust Shield
- Position: Rear
- Replaces: 95490435

Chevrolet Backing Plate, Rear Part Number: 87821842
$26.76 MSRP: $47.78You Save: $21.02 (44%)Ships in 1-2 Business DaysProduct Specifications- Other Name: Shield-Rear Brake; Shield, Brake Flange Plate
- Position: Rear

Chevrolet Backing Plate, Front Passenger Side Part Number: 84064846
$12.60 MSRP: $23.66You Save: $11.06 (47%)Ships in 1-2 Business DaysProduct Specifications- Other Name: Shield-Front Brake; Brake Dust Shield; Splash Shield; Shield, Brake Flange Plate
- Position: Front Passenger Side
- Replaces: 23320280

Chevrolet Splash Shield, Front Driver Side Part Number: 13324458
$11.81 MSRP: $22.19You Save: $10.38 (47%)Ships in 1-2 Business DaysProduct Specifications- Other Name: Shield-Front Brake; Brake Dust Shield; Shield, Brake Flange Plate
- Position: Front Driver Side

Chevrolet Splash Shield, Front Driver Side Part Number: 22877576
$12.62 MSRP: $22.84You Save: $10.22 (45%)Ships in 1-3 Business DaysProduct Specifications- Other Name: Shield-Front Brake; Brake Dust Shield; Shield, Brake Flange Plate
- Position: Front Driver Side
- Replaces: 13219205

Chevrolet Splash Shield, Front Driver Side Part Number: 20971877
$49.69 MSRP: $97.31You Save: $47.62 (49%)Ships in 1-2 Business DaysProduct Specifications- Other Name: Shield-Front Brake; Brake Dust Shield; Shield, Brake Flange Plate
- Position: Front Driver Side


Chevrolet Backing Plate, Front Part Number: 23432227
$17.42 MSRP: $32.73You Save: $15.31 (47%)Ships in 1-2 Business DaysProduct Specifications- Other Name: Shield-Front Brake; Brake Dust Shield; Shield, Brake Flange Plate
- Position: Front
Chevrolet Splash Shield, Front Passenger Side Part Number: 20971878
$50.17 MSRP: $94.25You Save: $44.08 (47%)Ships in 1-2 Business DaysProduct Specifications- Other Name: Shield-Front Brake; Brake Dust Shield; Shield, Brake Flange Plate
- Position: Front Passenger Side

Chevrolet Backing Plate, Rear Driver Side Part Number: 42480002
$7.20 MSRP: $12.89You Save: $5.69 (45%)Ships in 1-3 Business DaysProduct Specifications- Other Name: Shield-Rear Brake; Brake Dust Shield; Splash Shield; Dust Shield; Shield, Brake Flange Plate
- Position: Rear Driver Side


Chevrolet Backing Plate Part Number: 92199929
Product Specifications- Other Name: Shield-Front Brake; Brake Dust Shield; Splash Shield; Shield, Brake Flange Plate
- Position: Front


Chevrolet Backing Plate Part Number: 92199930
Product Specifications- Other Name: Shield-Front Brake; Brake Dust Shield; Splash Shield; Shield, Brake Flange Plate
- Position: Front

Chevrolet Splash Shield, Driver Side Part Number: 14026873
Product Specifications- Other Name: Shield, Brake Flange Plate; Brake Dust Shield
- Position: Driver Side
Chevrolet Splash Shield, Passenger Side Part Number: 14026874
Product Specifications- Other Name: Shield, Brake Flange Plate; Brake Dust Shield
- Position: Passenger Side
| Page 1 of 19 |Next >
1-20 of 371 Results
Chevrolet Brake Backing Plate
Want to cut long-term maintenance and repair costs? Choose OEM Brake Backing Plate. Those parts deliver top durability you can trust. On our site, you'll find a huge catalog of genuine Chevrolet parts. Prices are unbeatable, so you can keep more in your pocket. Every OEM Chevrolet Brake Backing Plate includes a manufacturer's warranty. You can also get an easy return policy that keeps buying risk free. Fast delivery, get your car on the road quickly. It's simple to search, compare, and order. Stop guessing about quality or fit. Order today and save with parts that last.
Chevrolet Brake Backing Plate Parts Questions & Experts Answers
- Q: How to replace the rear brake backing plate on Chevrolet Colorado?A:The first step to replace the rear Brake Backing Plate requires raising and supporting the vehicle. Detach the park brake cable from the rear Brake Backing Plate while you remove the rear Wheel Speed Sensor. The second stage requires Wheel Cylinder and rear Axle Shaft removal from the vehicle components. Extract the rear Brake Backing Plate bolts followed by removing the rear Brake Backing Plate itself. Begin installation by mounting the rear Brake Backing Plate then tighten the rear Brake Backing Plate bolts to 135 nm (100 lb ft). Begin by installing the rear Axle Shaft then install the Wheel Cylinder. The installation process ends by connecting the park brake cable to the rear Brake Backing Plate followed by reinstallation of the rear Wheel Speed Sensor.
- Q: How to replace the drum brake backing plate on Chevrolet Malibu?A:Before replacing the drum Brake Backing Plate start by taking off the Brake Drum while observing brake dust protocols. Position a jack stand or appropriate support fixture under the lower Control Arm before removing the brake shoes together with the universal spring. Detach abs wheel speed sensor connector and upper Control Arm Bolt before positioning the arm so it created a safe distance from brake hose to Wheel Cylinder linkage. Use 2 copper gaskets to remove the brake hose banjo bolt then apply caps or plugs to protect the exposed brake hose from leaking while preventing contamination. Take out the bolts securing the Wheel Cylinder to the backing plate assembly to remove the Wheel Cylinder from its location. You must disconnect the park brake cable from both the park brake lever and backing plate through pulling open the locking tabs. Secure the Wheel Bearing, backing plate assembly, and spacer plate to the knuckle by removing the 4 nuts before separating the assembly. Take the plugs off of the backing plate assembly. Installation begins by inserting backing plate plugs into the new assembly before mounting the Wheel Bearing and backing plate assembly and spacer plate onto the knuckle using 4 nuts torqued to 47 ft. Lbs (63 Nm). Connect the park brake cable to the backing plate assembly until two locking tabs engage before fixing it to the park brake lever. Install the Wheel Cylinder onto the backing plate assembly before tightening its mounting bolts to 10 nm (89 inch lbs.). Seal the brake hose end by replacing the cap or plug followed by installing the brake hose banjo bolt and two new copper gaskets. Tighten the banjo bolt to 50 nm (37 ft. Lbs.). Install the upper Control Arm Bolt followed by the nut before tightening it to 180 nm (133 ft. Lbs.) when abs is present. Replace the universal spring and brake shoes before removing the lower Control Arm assembly support fixture and jack stand. The mechanic will need to adjust the drum brakes followed by installing the Brake Drum while performing brake hydraulic system bleeding and lowering the vehicle for rear alignment inspection.
- Q: How to replace the disc brake backing plate on Chevrolet Tahoe?A:Start the backing plate replacement by loosening the parking brake and elevating the vehicle. Take the tire off and remove the wheel unit before taking the caliper with its mounting bracket as one piece. Release park brake cable tension by unscrewing the equalizer nut and separate the cable from the lever and bracket through its locking tabs. Remove both the rotor and Axle Shaft before proceeding to take out the Parking Brake Shoe. Disassemble the backing plate bolts and pull off the backing plate from the axle housing flange. After preparing the threads with brake parts cleaner apply threadlock gm p/n 12345493 or red loctite (TM) #272 product and fasten the new backing plate to the axle housing flange with proper torque of 135 n.m (100 lb ft). Fit back the Parking Brake Shoe and set it to required position. Put on the Axle Shaft and rotor then attach the park brake cable back to its mounting bracket and lever. Tighten the equalizing nut to 3.5 nm (31 lb in) when complete. Completing the process means you reinstall the caliper along its mount while placing back the tire and wheel combo then take safety stands off and lower down your vehicle while readjusting the park brake cable.


Related Chevrolet Parts
 Chevrolet ABS Sensor
 Chevrolet Brake Proportioning Valve
 Chevrolet Wheel Cylinder
 Chevrolet Wheel Hub
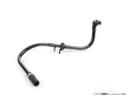 Chevrolet Brake Booster Vacuum Hose
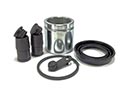 Chevrolet Brake Caliper Repair Kit
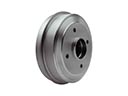 Chevrolet Brake Drum
 Chevrolet Brake Dust Shields
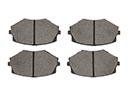 Chevrolet Brake Pad
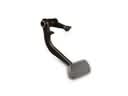 Chevrolet Brake Pedal
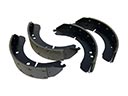 Chevrolet Brake Shoe
 Chevrolet Spindle Nut
Browse Chevrolet Brake Backing Plate by Models
Nova S10 Colorado C10 Tahoe Cruze Malibu Camaro Equinox Impala SS SSR Avalanche Silverado 1500 Silverado 2500 HD Caprice Classic Cobalt Suburban Traverse Blazer HHR Sonic Tracker Volt El Camino K10 Spark Trax Trailblazer Astro Cavalier Corvette C20 Aveo Beretta Bolt EUV Bolt EV C1500 C2500 C30 C3500 Celebrity Chevette City Express Corsica Express 1500 Express 2500 Express 3500 G10 G20 G30 K1500 K20 K2500 K30 K3500 K5 Blazer Lumina Metro Monte Carlo P30 Prizm S10 Blazer Silverado 2500 Uplander Venture Lumina APV Silverado 3500 Suburban 1500 Trailblazer EXT Avalanche 1500 Avalanche 2500 Aveo5 C10 Suburban C1500 Suburban C20 Suburban C2500 Suburban Captiva Sport Citation II Cruze Limited Impala Limited K10 Suburban K1500 Suburban K20 Suburban K2500 Suburban Malibu Limited P20 R10 R10 Suburban R1500 Suburban R20 R20 Suburban R2500 R2500 Suburban R30 R3500 Silverado 1500 Classic Silverado 1500 HD Silverado 1500 HD Classic Silverado 1500 LD Silverado 1500 LTD Silverado 2500 HD Classic Silverado 3500 Classic Silverado 3500 HD Spark EV Spectrum Suburban 2500 Suburban 3500 HD V10 V10 Suburban V1500 Suburban V20 V20 Suburban V2500 Suburban V30 V3500