ChevyParts
My Garage
My Account
Cart
OEM Chevrolet Brake Pedal
Brake Pedal Pad- Select Vehicle by Model
- Select Vehicle by VIN
Select Vehicle by Model
orMake
Model
Year
Select Vehicle by VIN
For the most accurate results, select vehicle by your VIN (Vehicle Identification Number).
9 Brake Pedals found


Chevrolet Pedal Travel Sensor Part Number: 84378256
$60.77 MSRP: $88.47You Save: $27.70 (32%)Ships in 1-2 Business DaysProduct Specifications- Other Name: Pedal Assembly-Brake; Accelerator Pedal Position Sensor; Pedal, Brake
- Replaces: 22850742

Chevrolet Pedal Travel Sensor Part Number: 22786029
$35.87 MSRP: $46.66You Save: $10.79 (24%)Ships in 1-2 Business DaysProduct Specifications- Other Name: Pedal Assembly-Brake; Accelerator Pedal Position Sensor; Pedal, Brake

Chevrolet Stoplamp Switch Part Number: 25847531
$46.22 MSRP: $170.77You Save: $124.55 (73%)Ships in 1-2 Business DaysProduct Specifications- Other Name: Pedal Assembly-Brake (W/Bracket); Brake Light Switch; Pedal, Brake

Chevrolet Parking Brake Control Part Number: 42706372
$61.53 MSRP: $88.80You Save: $27.27 (31%)Ships in 1-2 Business DaysProduct Specifications- Other Name: Pedal Assembly-Parking Brake Lever; Pedal, Brake
- Replaces: 39067358, 39094338


Chevrolet Parking Brake Control Part Number: 15155147
Product Specifications- Other Name: Lever, Parking Brake Apply; Pedal, Brake
- Replaces: 15986103


Chevrolet Pedal Assembly Part Number: 84374588
$53.36 MSRP: $79.42You Save: $26.06 (33%)Product Specifications- Other Name: Pedal Assembly-Brake; Pedal, Brake
- Replaces: 22850745

Chevrolet Pedal Travel Sensor Part Number: 25902025
Product Specifications- Other Name: Pedal Assembly-Brake & Clutch (W/Bracket); Accelerator Pedal Position Sensor; Pedal, Brake

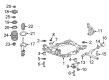
Chevrolet Strut, Driver Side Part Number: 15861900
Product Specifications- Other Name: Pedal Assembly-Brake & Accelerator (W/ Bracket); Shock Absorber; Pedal, Accelerator Pedal; Pedal, Brake
- Position: Driver Side
- Replaces: 15827739

Chevrolet Parking Brake Control Part Number: 14038626
Product Specifications- Other Name: Pedal Assembly-Brake; Pedal, Brake
Chevrolet Brake Pedal
Want to cut long-term maintenance and repair costs? Choose OEM Brake Pedal. Those parts deliver top durability you can trust. On our site, you'll find a huge catalog of genuine Chevrolet parts. Prices are unbeatable, so you can keep more in your pocket. Every OEM Chevrolet Brake Pedal includes a manufacturer's warranty. You can also get an easy return policy that keeps buying risk free. Fast delivery, get your car on the road quickly. It's simple to search, compare, and order. Stop guessing about quality or fit. Order today and save with parts that last.
Chevrolet Brake Pedal Parts Questions & Experts Answers
- Q: How to Service and Repair the Brake Pedal Assembly for an Automatic Transaxle on Chevrolet HHR?A:Place the Steering Column lower and set it to the side before moving on to Brake Pedal assembly replacement for automatic transaxles. Undo the connections of the Brake Pedal position sensor and break-free the power brake booster pushrod at the Brake Pedal assembly. First separate the Brake Pedal pushrod washer and vacuum brake booster nuts. Take off the rh upper Brake Pedal bracket bolt and the two bolts from the lh upper pedal bracket before removing the instrument panel tie bar. Lower the Brake Pedal unit off the vehicle. Set the Brake Pedal assembly on top of the power brake booster studs and insert the instrument panel tie bar. Set the two left-hand upper Brake Pedal bolts and the right-hand bolt along with the vacuum brake booster nuts loosely. Coat the Brake Pedal pushrod pin with high temperature grease gm p/n 12345996, attach the pushrod to the pedal pivot pin and put on the brake washer. Use 22 nm torque when securing the vacuum brake booster nuts and apply 25 nm torque to both upper Brake Pedal bracket bolts. Fasten the Brake Pedal pushrod turret with a torque of 10 nm while connecting the pedal position sensor electrical connections. Remove the Steering Column and install the Brake Pedal position sensor before putting back the steering assembly.
- Q: How to replace the Brake Pedal Assembly on Chevrolet Equinox?A:To remove Brake Pedal assembly remove the left side of instrument panel insulator panel, in order to remove the communication interface module if equipped. Remove accelerator pedal assembly electrical connector, followed by the retaining clip and washer from the Brake Pedal. Remove the Brake Booster pushrod from the Brake Pedal and disconnect the electrical connector of the Brake Pedal position sensor. Unscrew the Brake Pedal bracket-to-steering column bracket bolt & the Brake Booster mounting-nuts & position the Brake Booster forward to clear the studs from the front of the dash. Unscrew the steering column bracket to cowl nut but do not take it out. When disconnecting the Brake Pedal bracket pilot bushings from the foam insulation panel, pull back and to the center of the vehicle Brake Pedal assembly, and then removing it off of the vehicle. Next, pull out the accelerator pedal assembly from the Brake Pedal bracket. For installation, connect the accelerator pedal assembly with the Brake Pedal bracket and then install the Brake Pedal assembly into the vehicle by allowing the Brake Pedal bracket pilot bushings to enter the panel of foam insulator. Position the booster studs through the dash panel, allow the Brake Pedal bracket to steering column bracket bolt to be tightened at 25 nm (18 lb ft), and loosely install the Brake Booster mounting nuts. Uk: apply a thin layer of lithium grease onto the pushrod pin Brake Pedal turn to the Brake Booster pushrod, attach the Brake Booster pushrod to the Brake Pedal, and install washer and retaining clip to the Brake Pedal. Apply more pressure on the vacuum Brake Booster mounting nuts to the point of 25 nm (18 lb ft) after fitting the steering column bracket to cowl nut and screwing it to the power of 25 nm (18 lb ft). Lastly, reconnect the Brake Pedal position sensor, electrical connection, connect the accelerator pedal assembly electrical connection and reinstall the communication interface module if equipped, and reconnect the left side instrument panel insulator panel.
- Q: How to replace the automatic adjustment park brake pedal assembly and the front park brake cable on Chevrolet Malibu?A:The first step to replace the automatic park Brake Pedal assembly and front park brake cable involves taking away the left sound insulator panel with the left front sill plate. You should remove the 3 assembly nuts of the park Brake Pedal assembly before pulling back the carpet to access the front park brake cable. First disconnect the electrical connector attached to the park brake warning lamp switch before removing the front cable retaining screw and the 2 front park brake cable plastic retainers fixed to the body frame. The operator should first detach the floor console then disassemble both right and left rear park brake cables from the crush bracket. You must take out the park Brake Pedal assembly from the vehicle after removing the 2 nuts holding the front brake cable mounting bracket. Place the park Brake Pedal assembly into the original position of the vehicle and attach the 2 mounting bracket nuts to the front brake cable assembly while tightening them to 10 nm (89 inch lbs.). Connect the left rear park brake cable together with the right rear park brake cable to the crush bracket before replacing the floor console along with the 2 front cable plastic retainers onto the body. After securing the front cable retainer screw at 2 nm (18 inch lbs.) you should connect the electrical connector to the park brake warning lamp switch. Carpets must be set before tightening the 3 park Brake Pedal assembly nuts (1, 2, 3) in sequence to 25 nm (18 ft. Lbs.). After removing the cable tension set pin through a down motion complete the tension set by running the park Brake Pedal full four times then reinstall the left front sill plate and the left sound insulator panel.


Related Chevrolet Parts
 Chevrolet Brake Calipers
 Chevrolet ABS Sensor
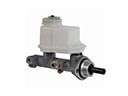 Chevrolet Brake Master Cylinder
 Chevrolet Wheel Speed Sensor
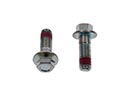 Chevrolet Brake Caliper Bolt
 Chevrolet Brake Caliper Bracket
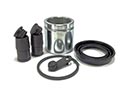 Chevrolet Brake Caliper Repair Kit
 Chevrolet Brake Dust Shields
 Chevrolet Brake Line
 Chevrolet Brake Shoe
 Chevrolet Spindle Nut
 Chevrolet Wheel Hub Bolt